Help:Nope: Difference between revisions
No edit summary |
|||
| Line 6: | Line 6: | ||
[[File:Warhammer3 2023-10-08 16-08-18.png|centre]] | [[File:Warhammer3 2023-10-08 16-08-18.png|centre|920px]] | ||
| Line 17: | Line 17: | ||
''' | ''' | ||
=== Required software === | |||
Bellow are the required tools and their configuration: | Bellow are the required tools and their configuration: | ||
| Line 30: | Line 30: | ||
=== Software configuration & plugins === | |||
==== I. Gimp batch processing plugin ==== | |||
Later on, we will need to convert DDS textures to PNG to allow Upscayl to work its magic. Therefore, we'll utilize a custom Python-fu plugin to perform batch texture conversion instead of doing it manually. | Later on, we will need to convert DDS textures to PNG to allow Upscayl to work its magic. Therefore, we'll utilize a custom Python-fu plugin to perform batch texture conversion instead of doing it manually. | ||
To do so, put the code bellow in the following folder (''make sure to add your Windows Username''): | |||
<syntaxhighlight inline lang="html">C:\Users\<username>\AppData\Roaming\GIMP\2.10\plug-ins\dds_to_png.py</syntaxhighlight> | |||
<div class="toccolours mw-collapsible mw-collapsed" style="width:auto; overflow:auto;"> | |||
<div style="font-weight:bold;line-height:1.6;">Click to toggle code </div> | |||
<div class="mw-collapsible-content"> | |||
<syntaxhighlight lang="python"> | |||
from gimpfu import * | from gimpfu import * | ||
| Line 104: | Line 102: | ||
main() | main() | ||
}} | </syntaxhighlight> | ||
</div></div> | |||
==== II. AutoHotKey script ==== | |||
Since we cannot re-use Gimp to convert from PNG to DDS, we will have to automate the manual conversion through Paint.Net. | |||
To do so, put the following code in : | |||
<syntaxhighlight inline lang="html">C:\Users\<username>\Documents\AutoHotke\/Paint.Net PNG to DDS.ahk**</syntaxhighlight> | |||
<div class="toccolours mw-collapsible mw-collapsed" style="width:auto; overflow:auto;"> | |||
<div style="font-weight:bold;line-height:1.6;">Click to toggle code </div> | |||
<div class="mw-collapsible-content"> | |||
<syntaxhighlight lang="elisp"> | |||
; Specify the directory and file extension to search for | |||
directory := "C:\\Users\\Guild\\Documents\\4k_demo\\base_colour_upscayled_RealESRGAN_General_x4_v3_x4\\" | |||
extension := "*.png" | |||
; Loop through each file in the directory | |||
Loop, Files, % directory extension | |||
{ | |||
; Open the file with Paint.NET | |||
Run, "C:\\Program Files\\paint.net\\PaintDotNet.exe" "%A_LoopFileFullPath%" | |||
; Wait for Paint.NET to become active | |||
Sleep, 1500 | |||
; Save As dialog (Ctrl+ALT+S) | |||
Send, ^+s | |||
; wait for the dialog to open | |||
Sleep, 500 | |||
; Tab to the "Save as type" dropdown field | |||
Send, {Tab} | |||
; Type in the desired format (.dds) and press Enter | |||
Send, d{Enter} | |||
; Wait for export option dialog | |||
Sleep, 500 | |||
Send, {Enter} | |||
; Wait for the export to be done | |||
Sleep, 7000 | |||
; ; Close the active file (Ctrl+W) | |||
Send, ^w | |||
; ; Wait for the file to close | |||
Sleep, 500 | |||
} | |||
</syntaxhighlight> | |||
</div></div> | |||
== Getting started == | |||
In this example, we will upscale the textures of Greenskins' trolls, including ''troll river'', ''troll river hag'', and their ''respective weapons''. | |||
=== Step 1: Extracting Textures === | |||
The first step is to extract all the textures that need upscaling. | |||
In this case, we'll focus on the ''base_colour'' and ''normal'' textures. To achieve this, we'll use the AssetEditor and apply a filter to find the desired textures: <syntaxhighlight inline lang="html">^grn_troll.*[normal|base_colour].dds$</syntaxhighlight> | |||
Additionally, ensure that you do not export low-poly textures, as we are only interested in upscaling high-quality textures. | |||
[[File:Step1.jpg|centre]] | |||
=== Step 2: Centralizing Textures === | |||
Next, we need to centralize all the textures in the same folder or directory. | |||
Since we're using different models for each type of texture (''normal'' and ''base_colour''), it's a good practice to keep them separate. | |||
Below are the commands to achieve this using the shell in Ubuntu WSL: | |||
<syntaxhighlight lang="sh"> | |||
# Create new folders to store edited textures | |||
mkdir -p /path/to/wip/normal /path/to/wip/base_colour | |||
# Move all the **normal** textures to the designated folder | |||
cp **/*normal.dds /path/to/wip/normal | |||
# Move all the **base_colour** textures to the designated folder | |||
cp **/*base_colour.dds /path/to/wip/base_colour | |||
</syntaxhighlight> | |||
[[File:Step2.jpg|center]] | |||
==== Step 3: Converting DDS to PNG ==== | |||
Now that we have all the vanilla DDS files, we need to convert them to PNG format for upscaling. | |||
# Launch Gimp and ensure you have installed the custom plugin mentioned at the beginning of this guide. | |||
# . In Gimp, select "Batch DDS to PNG" from the options, as shown in the image below [[File:Gimp custom plugin usage.jpg|center]] | |||
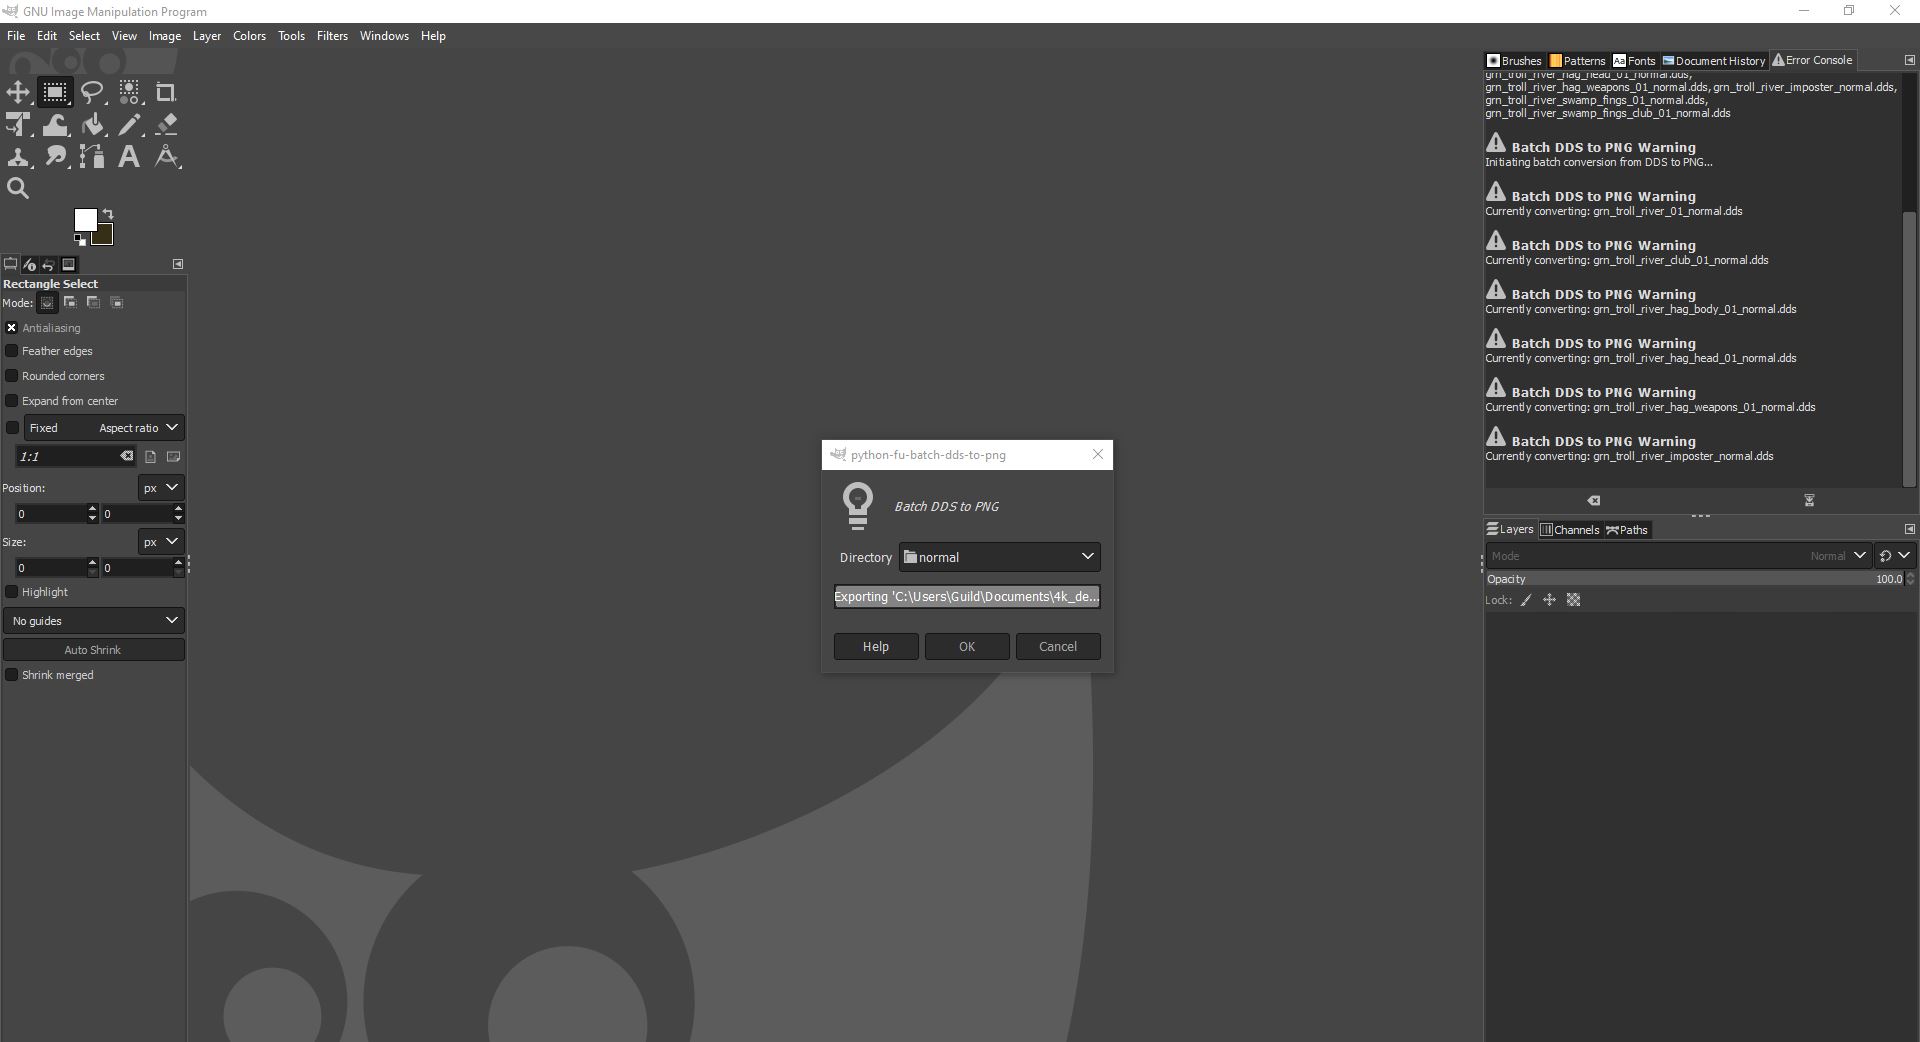
# A pop-up window will appear. Select the folder containing the vanilla ''normal'' textures and begin the conversion process, as indicated in the image bellow [[File:Gimp custom plugin usage 2.jpg|center|850px]] | |||
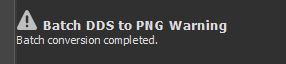
# Once the conversion is complete, you will see the message ''Batch conversion completed'' in the ''Error Console Panel'' as shown bellow [[File:Gimp custom plugin finished.jpg|center]] | |||
# Once done with the ''normal'' textures, make sure to repeat this step for the ''base_colour'' folder to convert those textures to PNG format as well. | |||
==== Step 4: Upscaling the textures ==== | |||
Now it's time to upscale the textures using your chosen models. Here are the models I personally recommend, but feel free to experiment or import your custom models: | |||
* '''Normal Textures''': ''Ultramix Balanced'' | |||
* '''Base Colour Textures''': ''Fast Real-ESRGAN'' | |||
Let's get started: | |||
* '' | # To prepare for upscaling, we need to remove or move the vanilla DDS textures to avoid conflicts. You can do this using the following commands: <syntaxhighlight lang="sh">cd /path/to/wip/ && rm normal/*dds rm base_colour/*dds</syntaxhighlight > | ||
[[File:Remove non texture files.jpg|center]] | |||
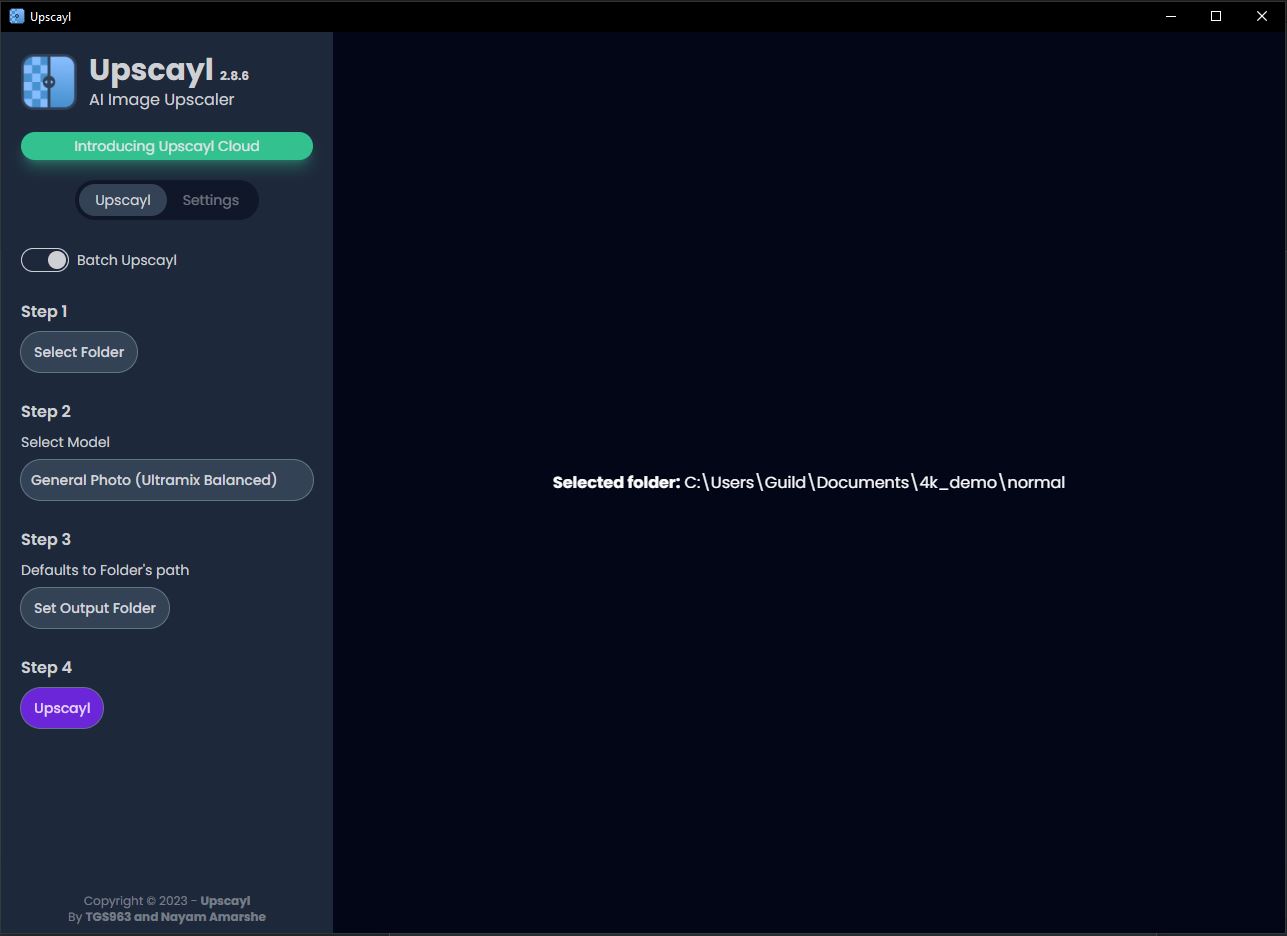
# We are now ready to launch ''upscayl''. | |||
# In the left option panel, toggle the ''batch upscayl'' option. | |||
# Select the folder containing your ''normal'' textures. | |||
# Choose the model you want to use (in this case, ''Ultramix Balanced''). | |||
# Do not specify an output folder. [[File:Upscayl config .jpg|center|850px]] | |||
# Click the purple '''Upscayl''' button | |||
# Wait for the processing to complete. [[File:Upscayl done.jpg|center]] | |||
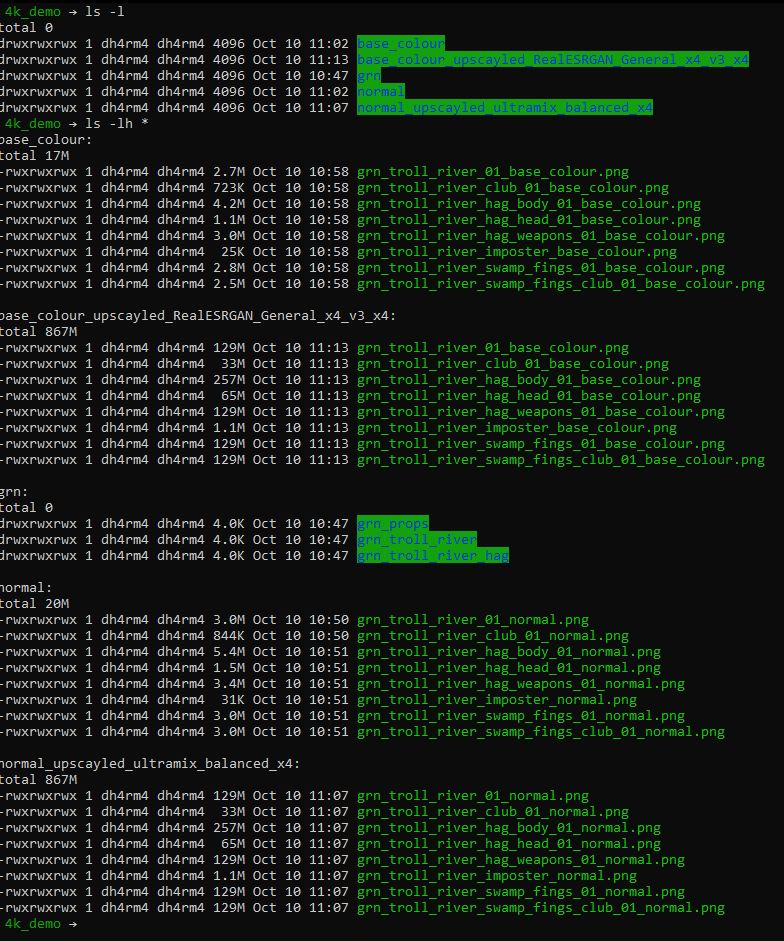
# By default Upscayl will have created a new folder containing the upscaled textures [[File:Upscayl generated folder.jpg|center]] | |||
# After completing this step, be sure to repeat the process with the ''base_colour'' folder and adjust the model accordingly. | |||
Revision as of 07:13, 11 October 2023
What is this about ?
In this article, we will explore a method for upscaling game textures using AI. This process can be partially automated, enabling batch processing of textures.

Setting up the work environment
Before proceeding, it's essential to set up the correct environment with all the necessary tools and configurations.
Note that you can adapt tools and methods based on your preferences and expertise.
Required software
Bellow are the required tools and their configuration:
- Ubuntu WSL
- Gimp
- Paint.Net
- AutoHotKey
- Upscayl
- RPFM or AssetEditor
- Python: Any form will suffice, I personally use the Python binary built-in Ubuntu WSL
Software configuration & plugins
I. Gimp batch processing plugin
Later on, we will need to convert DDS textures to PNG to allow Upscayl to work its magic. Therefore, we'll utilize a custom Python-fu plugin to perform batch texture conversion instead of doing it manually.
To do so, put the code bellow in the following folder (make sure to add your Windows Username):
C:\Users\<username>\AppData\Roaming\GIMP\2.10\plug-ins\dds_to_png.py
from gimpfu import *


def batch_dds_to_png(directory):
    import os

    pdb.gimp_message("Processing directory: " + directory)

    # Find all DDS files in the directory
    filelist = [f for f in os.listdir(directory) if f.lower().endswith('.dds')]

    pdb.gimp_message("List of files to convert: " + ", ".join(filelist))

    if len(filelist) == 0:
        pdb.gimp_message("No DDS files found in the specified directory.")
        return

    pdb.gimp_message("Initiating batch conversion from DDS to PNG...")

    for filename in filelist:
        filepath = os.path.join(directory, filename)

        pdb.gimp_message("Currently converting: " + filename)

        # Open the DDS file
        image = pdb.file_dds_load(filepath, filepath, 1, 0)

        # Get the active layer
        drawable = pdb.gimp_image_get_active_layer(image)

        # Save as PNG
        png_filepath = os.path.join(directory, os.path.splitext(filename)[0] + '.png')
        pdb.file_png_save_defaults(image, drawable, png_filepath, png_filepath)

        # Delete the image to free memory
        pdb.gimp_image_delete(image)

    pdb.gimp_message("Batch conversion completed.")


register(
    "python-fu-batch-dds-to-png",
    "Batch DDS to PNG",
    "Convert all DDS files in a directory to PNG",
    "Toumai",
    "Toumai",
    "2023",
    "Batch DDS to PNG...",
    "",
    [
        (PF_DIRNAME, "directory", "Directory", "")
    ],
    [],
    batch_dds_to_png,
    menu="<Image>/File/Batch/"
)

main()
II. AutoHotKey script
Since we cannot re-use Gimp to convert from PNG to DDS, we will have to automate the manual conversion through Paint.Net. To do so, put the following code in :
C:\Users\<username>\Documents\AutoHotke\/Paint.Net PNG to DDS.ahk**
; Specify the directory and file extension to search for
directory := "C:\\Users\\Guild\\Documents\\4k_demo\\base_colour_upscayled_RealESRGAN_General_x4_v3_x4\\"
extension := "*.png"


; Loop through each file in the directory
Loop, Files, % directory extension
{
    ; Open the file with Paint.NET
    Run, "C:\\Program Files\\paint.net\\PaintDotNet.exe" "%A_LoopFileFullPath%"

    ; Wait for Paint.NET to become active
    Sleep, 1500

    ; Save As dialog (Ctrl+ALT+S)
        Send, ^+s

    ; wait for the dialog to open
        Sleep, 500

    ; Tab to the "Save as type" dropdown field
        Send, {Tab}

    ; Type in the desired format (.dds) and press Enter
        Send, d{Enter}

    ; Wait for export option dialog
        Sleep, 500
        Send, {Enter}

    ; Wait for the export to be done
        Sleep, 7000

    ; ; Close the active file (Ctrl+W)
        Send, ^w

    ; ; Wait for the file to close
        Sleep, 500
}
Getting started
In this example, we will upscale the textures of Greenskins' trolls, including troll river, troll river hag, and their respective weapons.
Step 1: Extracting Textures
The first step is to extract all the textures that need upscaling.
In this case, we'll focus on the base_colour and normal textures. To achieve this, we'll use the AssetEditor and apply a filter to find the desired textures: ^grn_troll.*[normal|base_colour].dds$
Additionally, ensure that you do not export low-poly textures, as we are only interested in upscaling high-quality textures.

Step 2: Centralizing Textures
Next, we need to centralize all the textures in the same folder or directory. Since we're using different models for each type of texture (normal and base_colour), it's a good practice to keep them separate. Below are the commands to achieve this using the shell in Ubuntu WSL:
# Create new folders to store edited textures
mkdir -p /path/to/wip/normal /path/to/wip/base_colour

# Move all the **normal** textures to the designated folder
cp **/*normal.dds /path/to/wip/normal

# Move all the **base_colour** textures to the designated folder
cp **/*base_colour.dds /path/to/wip/base_colour

Step 3: Converting DDS to PNG
Now that we have all the vanilla DDS files, we need to convert them to PNG format for upscaling.
- Launch Gimp and ensure you have installed the custom plugin mentioned at the beginning of this guide.
- . In Gimp, select "Batch DDS to PNG" from the options, as shown in the image below

- A pop-up window will appear. Select the folder containing the vanilla normal textures and begin the conversion process, as indicated in the image bellow
- Once the conversion is complete, you will see the message Batch conversion completed in the Error Console Panel as shown bellow
- Once done with the normal textures, make sure to repeat this step for the base_colour folder to convert those textures to PNG format as well.


Step 4: Upscaling the textures
Now it's time to upscale the textures using your chosen models. Here are the models I personally recommend, but feel free to experiment or import your custom models:
- Normal Textures: Ultramix Balanced
- Base Colour Textures: Fast Real-ESRGAN
Let's get started:
- To prepare for upscaling, we need to remove or move the vanilla DDS textures to avoid conflicts. You can do this using the following commands:
cd /path/to/wip/ && rm normal/*dds rm base_colour/*dds

- We are now ready to launch upscayl.
- In the left option panel, toggle the batch upscayl option.
- Select the folder containing your normal textures.
- Choose the model you want to use (in this case, Ultramix Balanced).
- Do not specify an output folder.
- Click the purple Upscayl button
- Wait for the processing to complete.

- By default Upscayl will have created a new folder containing the upscaled textures
- After completing this step, be sure to repeat the process with the base_colour folder and adjust the model accordingly.


