Lua/First Script: Difference between revisions
mNo edit summary |
mNo edit summary |
||
| Line 194: | Line 194: | ||
Thankfully, what we want isn't too far away: | Thankfully, what we want isn't too far away: | ||
[[File:First script 13.png|none|thumb|946x946px|The autofill will show us the description of this method, and what it returns - in this case, it returns a "string", as we see after the -> line.]] | [[File:First script 13.png|none|thumb|946x946px|The autofill will show us the description of this method, and what it returns - in this case, it returns a "string", as we see after the -> line.]] | ||
Whenever we call a function, if the function gives us something back, we have to assign it to a variable or it will go away and vanish into the ether, with no memory on your PC being used to "hold" onto it. Do that with something simple: | Whenever we call a function, if the function gives us something back, we have to assign it to a variable or it will go away and vanish into the ether, with no memory on your PC being used to "hold" onto it. Do that with something simple:<syntaxhighlight lang="lua"> | ||
local name = player_faction:name() | |||
I'll keep harping on it, but you can change `local name` to whatever you want - `local key`, `local bits`, `local ostrich_on_fire`, whatever. | </syntaxhighlight>I'll keep harping on it, but you can change `local name` to whatever you want - `local key`, `local bits`, `local ostrich_on_fire`, whatever. | ||
'''''NOTE:''''' ''It keeps saying name, but its actually referring to the faction's "key" as we'll see in a second - the "code name" is has in factions_tables.'' | '''''NOTE:''''' ''It keeps saying name, but its actually referring to the faction's "key" as we'll see in a second - the "code name" is has in factions_tables.'' | ||
Now that we have the information in our code, we can put it all together and print that out to the log file: | Now that we have the information in our code, we can put it all together and print that out to the log file:<syntaxhighlight lang="lua" line="1"> | ||
out( "Hello World!" ) | |||
local function init() | |||
out("New game triggered!") | |||
local player_faction = cm:get_local_faction() | |||
local key = player_faction:name() | |||
out("Playing as " .. key) | |||
end | |||
cm:add_first_tick_callback(init) | |||
</syntaxhighlight> | |||
Revision as of 13:44, 10 June 2023
In this first step tutorial, we're going to learn:
- How to load & run a custom Lua script
- How timing works, at a large level, with scripts
- How to print out game information to interrogate the state of the game
- How simple variables work
Let's create our first script together!
Setup
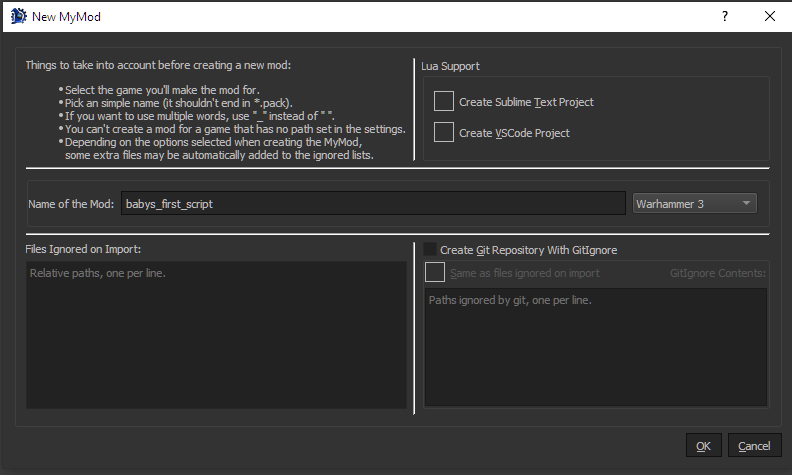
First thing's first, let's crack open RPFM to create our new Mod. In RPFM, I'm going to use MyMod -> New MyMod, to create a new easy-to-use mod system. If you haven't already, follow the setup guides in RPFM for setting up preferences and paths.
RPFM will then open up our new MyMod. Within it, use MyMod -> Export, which will unload the contents of the newly created (almost entirely empty) MyMod into your specified MyMods folder. I have this folder pinned to my quick access, but you can also get there with MyMod -> Open MyMod Folder, and navigating down to the newly created MyMod.
Now we can right click this folder and use the newly added "Open with Code" button, which will take the targeted mod folder and open it within Visual Studio Code!
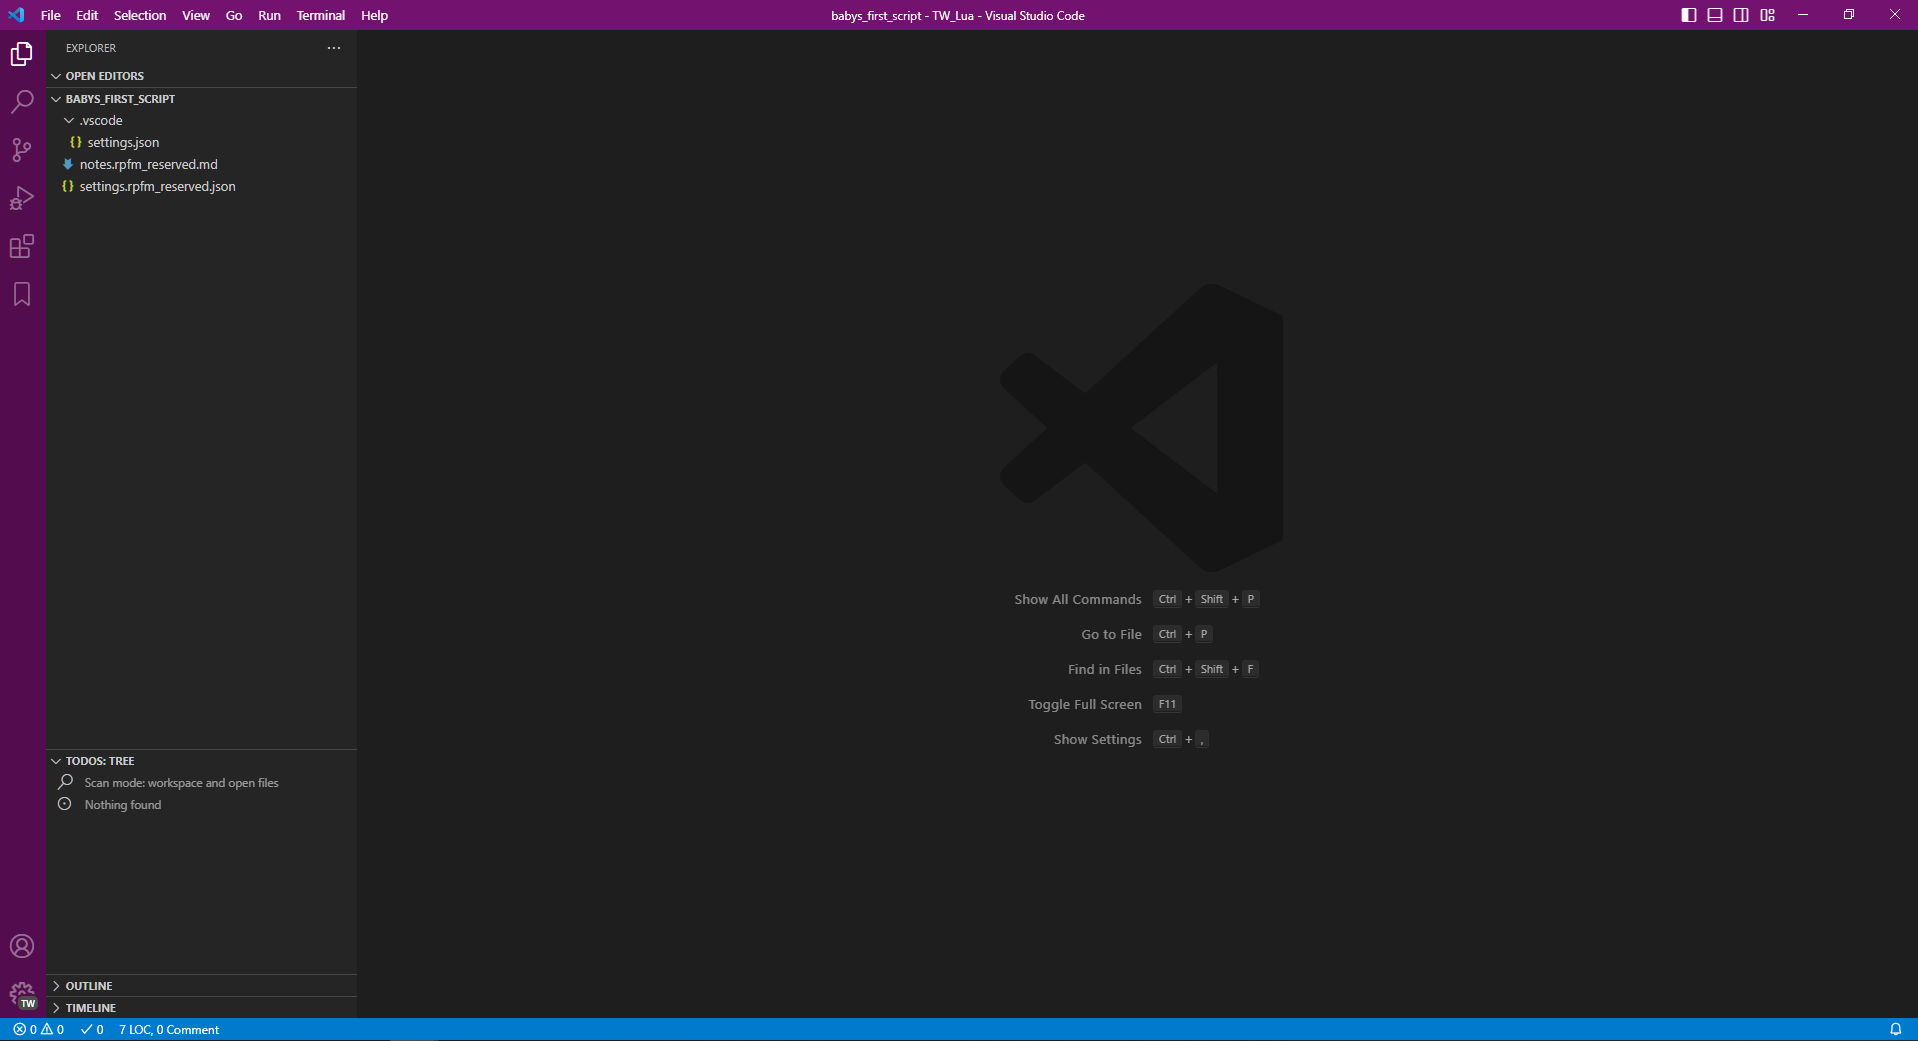
When we open up in Visual Studio Code, we'll see something that looks a little bit like this - it might differ slightly, that's totally okay!
Before we get too far, let's break down some of the parts of what we're looking at here, and set up our windows so we have everything we need.
Primary Bar
On the very left, we have what VSCode calls the "Primary Bar". It has a few things here - the top has the two files stacked on each other, a search button below that, three buttons we don't have to worry too much about yet, and a Bookmark button. The bottom has our Account and Manage button. If you haven't already, click into the Manage button and set our Profile to the correct one. I have mine saved as "TW Lua".
The part of the primary bar we care most about is the top button, the "Explorer". Think of this as your file navigation - it's effectively the same as navigating the Windows File Explorer, but it has some extra goodies that will be nice for us.
At the top of the Explorer, we have "Open Editors". This will show us all of our actively opened files - we'll see this shortly!
Below that, we have a tab for the currently opened folder. My folder is named babys_first_script, so that's what shows as the name here. Inside are all of the folders AND files that exist within my folder on my PC. We can open, create, rename, and delete any file within to our heart's content, and edit as long as Visual Studio Code can edit it. VSCode can edit essentially any text file, which is what all code files are, effectively. Based on the type of text file, VSCode will handle it differently - it knows the difference between a .lua and a .json file, and will react accordingly to the specifications of either language.
Below that, we had "TODOs: Tree", which is an extension preloaded with our Profile. This is one of my favorite tabs, because I can leave notes for myself to do stuff later and they will be displayed in this window.
Below that are Outline and Timeline, which I rarely use but can sometimes be nice. Outline will show us the layout of our code, and Timeline will show us previous local history for saving/editing these files, and more details if we're using GitHub or another version control software.
The Search button is also incredibly useful, for reasons that may be obvious.
Menu Bar
On the very top, we have our conveniently named Top Bar, or Menu Bar. You've seen these a billion times before. There's a LOT of stuff up here, but in my five years of using this program for TW Lua I've only really cared about a couple buttons within.
"File" is going to be our best friend, for opening new windows, saving, and creating new files. Edit/Selection/View have a load of commands in them, and they may be good to reference often early on to see shortcuts for saving and other helpful code shortcuts, like duplicating text or renaming stuff.
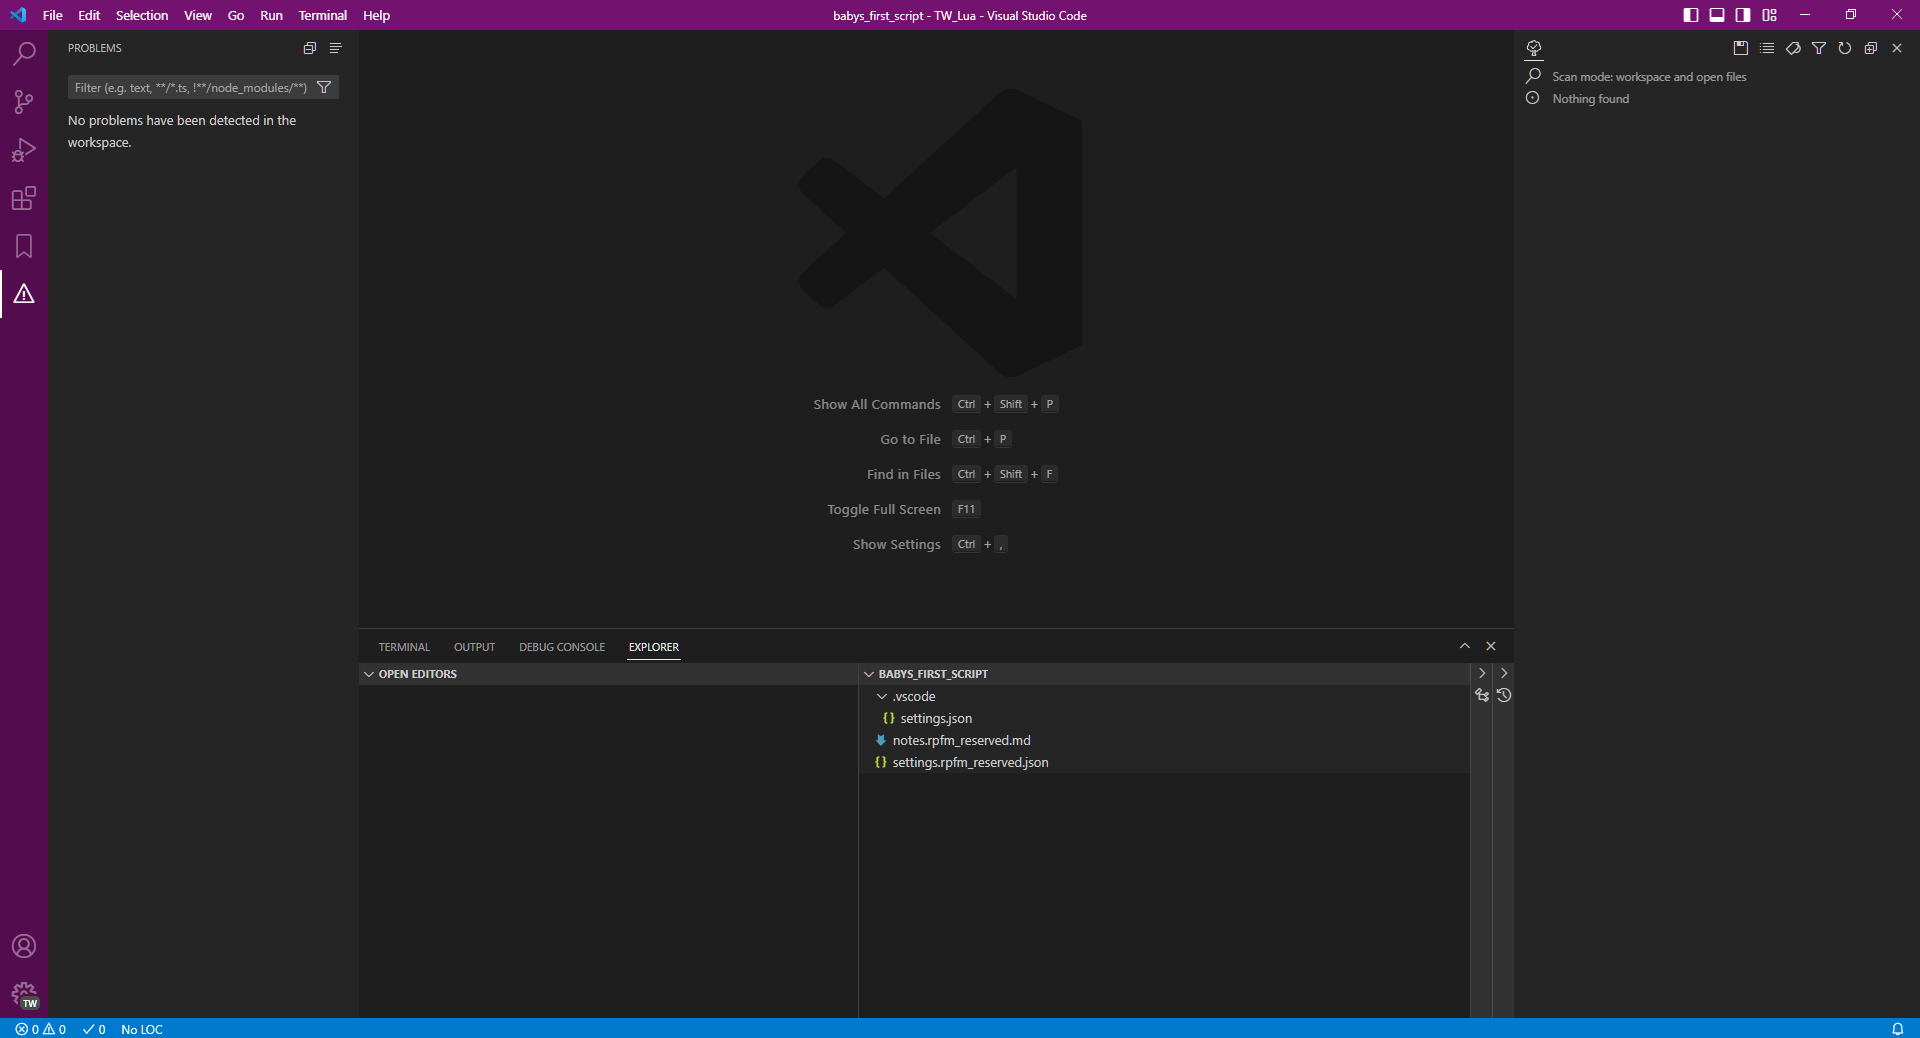
For now, what we should do is click View -> Problems, which will open up a new bottom bar for us. We only care about the "Problems" tab that shows up.
Customizabilitization
Let's introduce the idea here that VSCode is super duper flexible with its layout. Anything on your screen right now can be put somewhere else, including individual tabs, buttons, anything. We can move Problems as a button to the Primary Bar, the Explorer as a tab on the bottom, and TODOs on the right all alone.
It's a bit clunky and not exactly what I need, but it's as good time as any to show you how flexible it can get.
For now, I'm going to plop Search and TODOs on my new right sidebar stacked on one another, I'm going to right click one of the tabs at the bottom and deselect "Terminal", "Output", and "Debug Console", and keep my left Primary Bar as is otherwise and open back up the Explorer.
Script Creation
Okay, enough preamble. Let's get it started.
The Plan
Our standard first step for creating a new script is the first step we should do whenever making a new mod or system: having a plan, something we want. For this one, our goal is going to be simple. I want the following:
- When the game starts, I want to output a message to a text file that tells me the game started, and tells me where my starting faction leader and capital region are.
- On every turn after that, I want to give my faction some extra gold.
- If I'm playing as Karl Franz, I want to give my faction another two armies.
- I swear it's balanced.
Make It
In VSC, go to the Explorer, and hover over the currently-opened-folder tab. You can either right click within the white space and press "New Folder", or press the New Folder button on the tab for the currently opened folder.
Name the empty folder that's created `script`. All scripts we write will be in this main folder. With this folder selected, create a new folder again, and call this one "campaign". Do it again, calling the third "mod", making our full path script/campaign/mod.
NOTE: This folder path is one of several that is specified by Creative Assembly in more recent games, for modders to add scripts to which get automatically loaded. This behavior exists in Warhammer II, Warhammer III, Three Kingdoms, and Troy. It may continue for future games, but any game before Warhammer II needs a different way to load scripts. For more information, check out Lua/Loading Scripts.
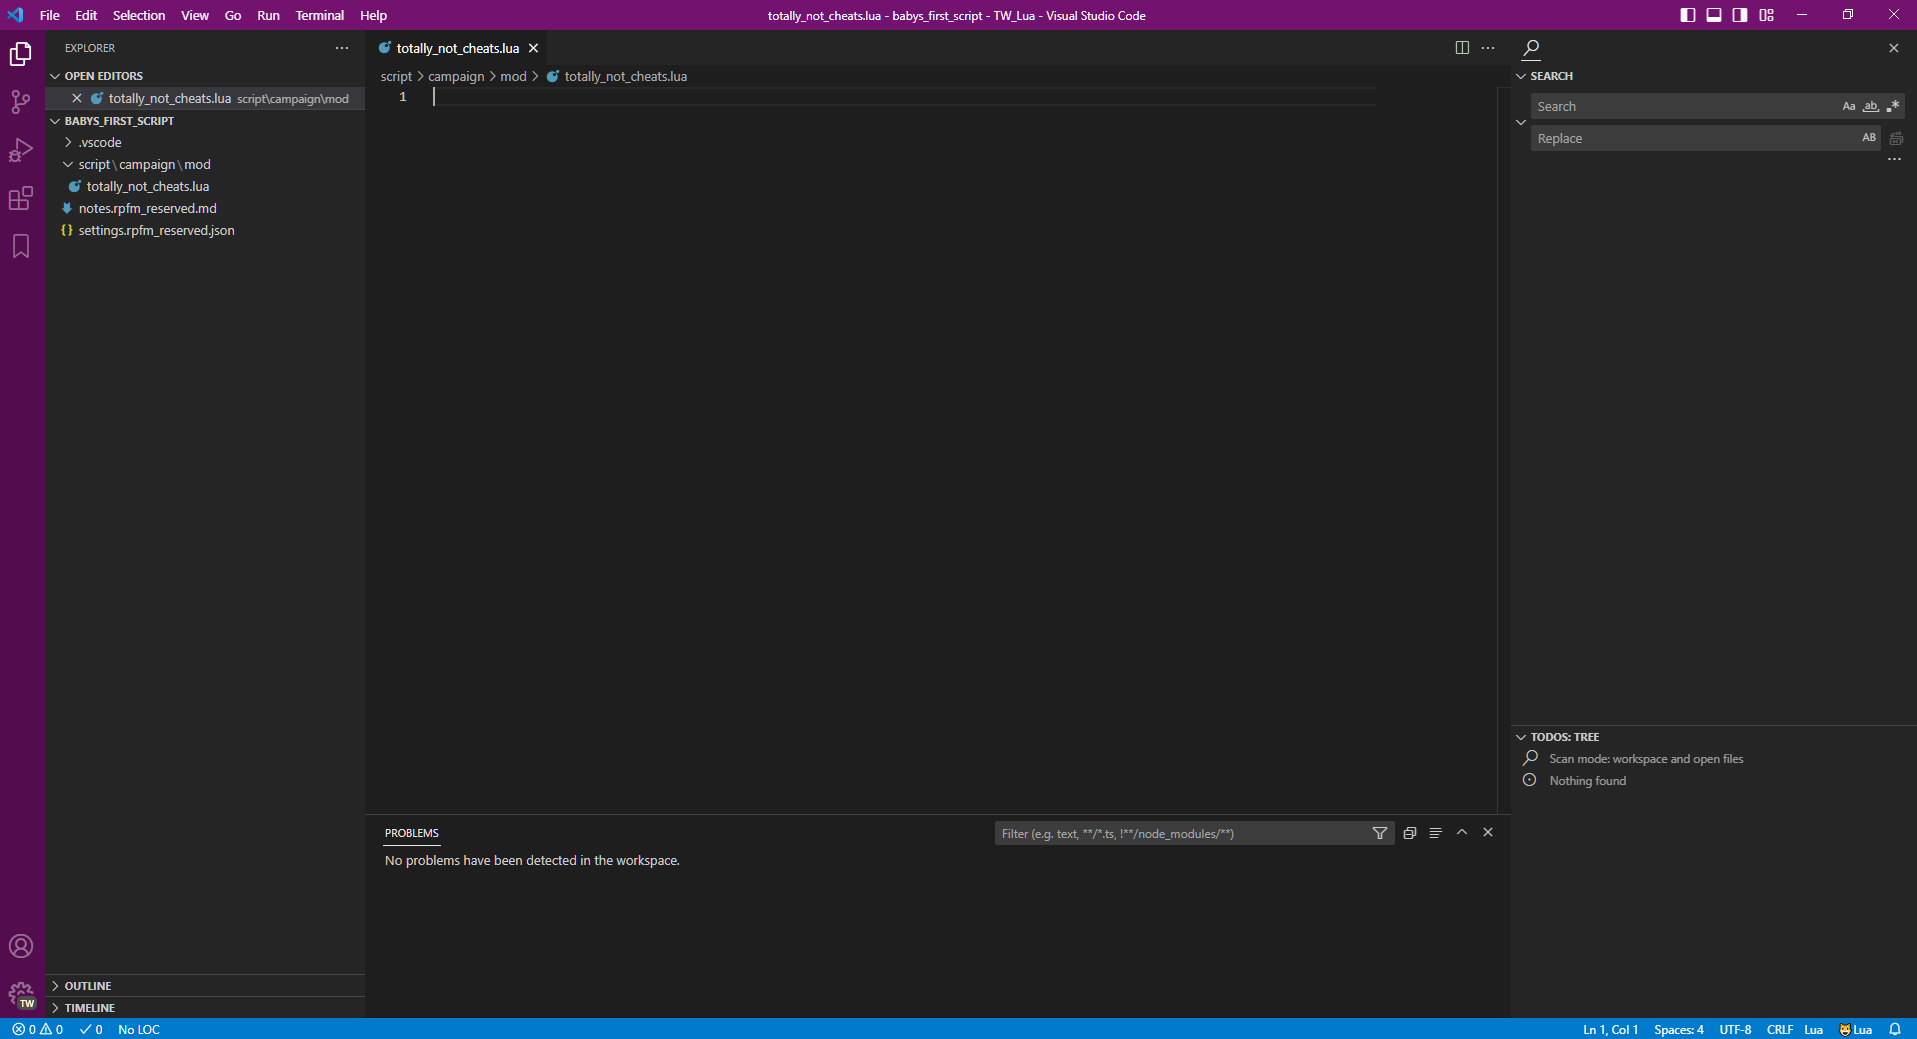
Within script/campaign/mod, now either right click the folder and press "New Text File", or use the first button on the tab to create a new file. I'm going to name mine "totally_not_cheats.lua". The .lua extension is required, don't skip it!
Start It
With our newly created file, our VSC layout will change ever so slightly. In "Open Editors", we'll see our fresh new baby script created; and in the central window, we'll see a new tab that's named the same as our new file, and an empty text file in the center with just the number "1" in it.
We'll kick off our script with the first piece of the puzzle, outputting some text to a file so we can read and interface with our scripts.
Let's get it going with a function called `out()`. This is a CA-defined function that they use all over their scripts, to print out to a text file various bits of info about the game, for debugging and logging purposes. It's a really handy system that'll let you know for certain what's actually going on in your scripts at runtime, since we can't truly test our script outside of the game.
To use the `out` function, we just have to write that word, put an open parenthesis, put in what we want to output, and then write a closing parenthesis. Let's try the old standard, and toss in the following:
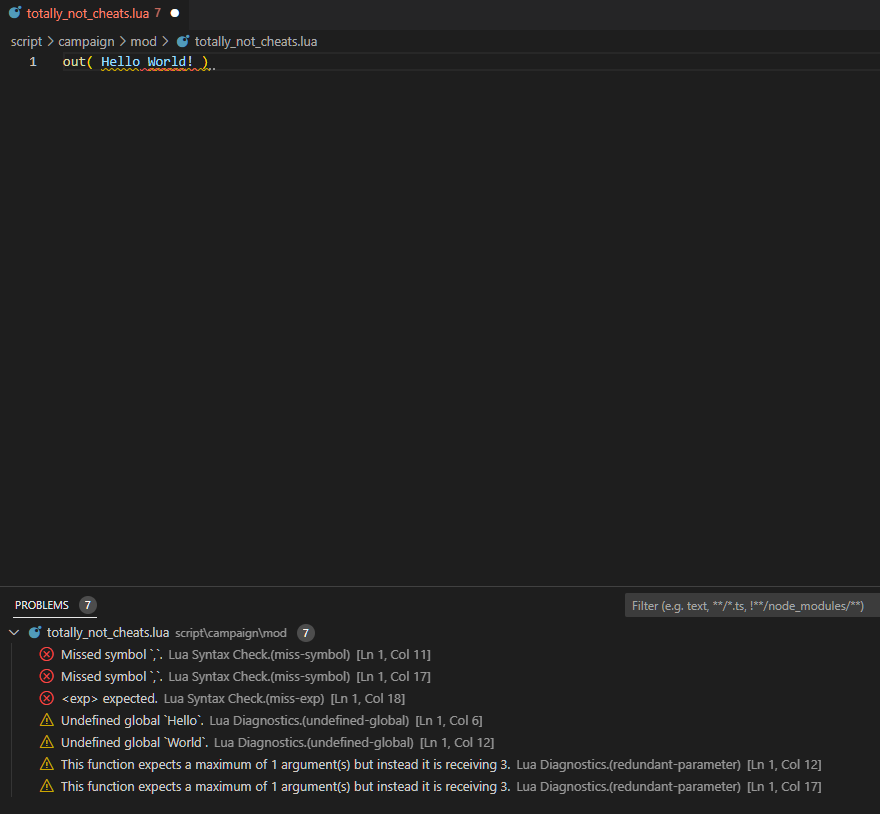
out( Hello World! )
And we should be goo- oh no! Everything's red! Why are there so many problems?!
Debugging
This will be something we'll see maybe a million times as we go forward, and it's important to not get too stressed out about it early on.
Because of our work in Lua/Setup, we now have access to a right proper debugging system that will yell at us when we do something wrong.
There's a lot of confusing bits here, and honestly, none of the problems listed are going to be specific enough to tell us what to do to fix it - at least in this situation. Some of them are telling us that we're arguing too much, one is talking about undefined globals, and one is just absolute pig latin saying it expected <exp>. None of those mean anything to us, but let's check out something that does - some documentation!
If you hover over the word "out", you'll see a popup that gives us some information about the function `out`. The most important bit is the following:
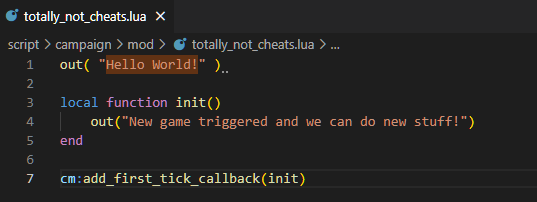
This is our function definition. It tells us what the function is called, and what it expects within the parentheses. It's asking for something it calls "output", and output is a string. String is the first of several Lua "types" we'll go over in this tutorial series. A string is text - and it's called such because it's a string of characters that make up a long piece of text. The issue we've had here is that, while `Hello World!` is text, Lua needs to be told that it's a string type. To do that, we just need to wrap quotation marks - either single or double, doesn't matter, but it can't be backticks or "pretty" quotations like what mobile phones default to. I learned that the hard way.
The easiest way to do that is to highlight the entirety of Hello World! and type in the quotation mark, just one. VSCode will plop a quotation mark on either part of your selection, and all SEVEN of our problems will vanish through air.
Getting It In-Game
We have now an incredibly basic script that I'd like to test out.
Now, the `out` function is defined by Creative Assembly within their games, but it comes disabled by default for retail. That means that while your code runs, it won't actually write anything to a log file. That way they can have their debugging tools, and we can opt into it, but it doesn't automatically happen for every single user.
This disable-by-default can be overridden in different ways, depending on the game. As of the time of writing this guide, my favorite methods are:
- Using the Mod Configuration Tool's setting for enabling game logging, if available for that game.
- Using the Script Debug Activator mod, if available for that game.
- Creating a file in your mod at `script/enable_console_logging`, with no extension. You can use VSCode and use add text file at that destination, add any text inside the file and save it.
These may change or evolve as time goes on.
Loading
Once you've got your script ready, and your game is set up to have script logs printed out, we'll want to load up our .pack file and get it set in game. For the sake of my soul and time, I'm going to assume we know how packs work, creating them and loading them, and the like.
Step one, we've got to save our stuff in VSCode. Use File -> Save All.
Worth a shout here - I altered the shortcut in Visual Studio Code for Save All, since it's maybe my most-used shortcut combination. If you go to Manage -> Keyboard Shortcuts and type in "save all" in the search bar, you can click on that shortcut and type in on your keyboard what you'd prefer. I use Ctrl+Alt+S, but set it to whatever makes you happy.
Then, in RPFM, use MyMod -> Import. Again, I added a keyboard shortcut here through RPFM - I set Import/Export to Ctrl+Alt+I/E. You can get there through PackFile -> Preferences -> Shortcuts.
Import pulls in all the stuff from your MyMod folder into your pack, while export does the opposite. I use these all the time, since I externally edit Lua files but internally edit database tables. You'll want to keep in mind where you're working, because if you edit a Lua file externally, and then a table file internally, without adding the changes from one to the other, you may end up overwriting some of your work. Because of that, I will only ever work in one sphere, then use Import/Export to make sure the folder and my .pack line up, and then edit in the other sphere.
Save in RPFM, and use PackFile -> Install to move your .pack to the game folder. Tick it in your mod manager of choice, and load up a fresh campaign!
Log File
The game-created log files will spit out in your game's folder - ie., steam/steamapps/common/Total War WARHAMMER III/. They are created as "script_log_DDMMYY_HHMM.txt". So if I made one right now, it'd be "script_log_100623_1320.txt", if you were wondering when I wrote this exact line.
The game creates a new log file every time we enter the main menu, every time we enter a campaign, and every time we enter a battle - so if you only just started using script logs, there should be two or three in there depending on if you quit to main menu or to desktop after loading up your new campaign. Navigate to the latest one and open it up.
Worth noting here, I have a file association set up to automatically open .txt files in Visual Studio Code, because I find it easier and quicker to navigate. If you right click the script log -> open with -> target Visual Studio Code, you can get it in that way. You can also simply grab the file from your file explorer and drag it into the main VSCode window, and it will be opened up within.
There's going to be... a lot of stuff in here. A lot a lot. CA uses double quindrillion calls to `out()` throughout the game. We'll actually find that it's pretty cumbersome to navigate, and later on we'll create our own custom log files! But for now, let's navigate this chonker.
Find Your Text
Sounds kinda like a platitude you'd find on a pillow in Kohl's.
In our opened new script log, we should search for the words "Hello World!". We can either do that using the Search tab we have set up, or clicking into the script log in the main window and using Ctrl+F.
WE FUCKING DID IT HELL YES.
And that's it, you're ready to script on your own!
Bye!
Timin' 'n Stuff
You'll probably maybe notice, this text is triggered very, very early on. While it's maybe ~1000 lines of text in, it's only 1.8s seconds (at least, for me, with no other mods enabled) after the script log is created. This is earlier than it might sound. At this time, the game is still going through its loading procedures - this text was triggered before the loading bar even got to 20%!
Because of how early this is, the game is not ready to be accessed yet. The game doesn't yet know what factions own what regions, what turn it is, who the player is controlling, or anything like that. The game doesn't have a map object, you can't trigger a new battle, nothin'.
What we need to do for our next step is learn how to listen and wait. Some of the most valuable things we can do in programming are listening and waiting for the right time.
Events
NOTE: Not to be confused with the "Events" in-game, the messages and such that hang out with missions.
The game has a great deal of "events" that can be triggered. Events are a way for scripts to learn some information about things happening in the game - there are events that will inform us when a new turn has started, when a region has been destroyed, when a battle has ended, when a ritual has been completed, when a mission has been failed, among many many many more. We can even define our own - more on that later!
The first event we care about is one of the most important - FirstTickAfterWorldCreated. This event is triggered immediately after the game is ready to access - about 80% of the way through the loading bar before the game is interactable for the user.
Once this event happens, we can do things like ask the game what factions exist, what turn it is, where we are, who we are, etc. Before the world is created, we can only do a bare minimum of setting things up in advance.
Flying the Time
To achieve our first goal - spitting out some information about our player faction - we're going to use a first tick callback and trigger our very own function!
A first tick callback is a way to ask the game to run code on FirstTickAfterWorldCreated. Most of your mods will probably involve a first-tick-callback. We use them in the following format:
cm:add_first_tick_callback(function_to_call)
But first, we have to create our own function. To do that, we use the following:
local function my_function_name()
-- do stuff
end
where "my_function_name" can be anything you want. In this situation, I'm going to call the function "init", short for "initialization", because this is the startpoint of my entire script. Some people also prefer "main". Whatever you want really, just make it clear for yourself and anyone else.
Eagle-eyed readers will notice that the two dashes they wrote in VSCode will be greyed out; these are called "comments". These are incredibly useful to leave notes to ourselves and other people reading our scripts, to inform yourself and others of what's going on and how things work in our code.
To safely confirm that we're calling our new function at the right time, we're going to run our function, trigger another call to out(), and see if it works!
Getting Our Info
With our first tick callback loading up properly, let's hop in and try to get some information about our played faction!
In the beginning of our init() function, we need to define a fresh new variable which will allow us to hold the faction "object" in memory. A variable is a piece of memory that your computer is going to set aside to hold some data for us - a variable can be a number, text, a function, or game objects like the faction.
We'll get it using the get_local_player() function, which we can find in the scripting documentation: https://chadvandy.github.io/tw_modding_resources/WH3/campaign/campaign_manager.html#function:campaign_manager:get_local_faction
We'll be learning a lot about how to use and read the script documentation going forward.
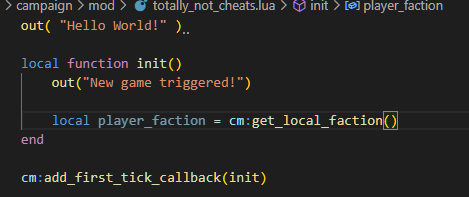
In our init() function, we need to add the following line of code:
local player_faction = cm:get_local_faction()
Where player_faction is the name of our new variable. It can be anything you want, much like init(), but it should make sense and be clear to read. It needs to be all one contiguous word, with only text, underscores, and non-leading numbers allowed (ie. my_faction_1 is allowed, 1_my_faction is not).
Visual Studio Code should automate it for you, but make sure that it's after the init() keyword, is one line after the out() call, is before the `end` keyword, and is one tab over. I like to space my code out thought-by-thought, so this will be a bit lower than my out() code.
The way we get information about this game object will be to ask it questions, using functions, or in this case methods.
The first thing we want to ask is, hey, what's the faction's name please?
To ask the game object questions, we need to use the variable name followed by the : sign. Our VSCode plugin will then, thankfully, list us with a great deal of suggestions that we can use. We can also reference the scripting documentation for game objects.
Thankfully, what we want isn't too far away:
Whenever we call a function, if the function gives us something back, we have to assign it to a variable or it will go away and vanish into the ether, with no memory on your PC being used to "hold" onto it. Do that with something simple:
local name = player_faction:name()
I'll keep harping on it, but you can change `local name` to whatever you want - `local key`, `local bits`, `local ostrich_on_fire`, whatever.
NOTE: It keeps saying name, but its actually referring to the faction's "key" as we'll see in a second - the "code name" is has in factions_tables.
Now that we have the information in our code, we can put it all together and print that out to the log file:
out( "Hello World!" )

local function init()
    out("New game triggered!")

    local player_faction = cm:get_local_faction()
    local key = player_faction:name()

    out("Playing as " .. key)
end

cm:add_first_tick_callback(init)
