Editing and Creating Models and Textures in Blender: Difference between revisions
LazyIcarus (talk | contribs) (Guide for how to edit and create models and textures in blender and convert back) |
LazyIcarus (talk | contribs) (Insert images that were awaiting approval and expand on troubleshooting new issues I encountered) |
||
| Line 25: | Line 25: | ||
# open RME 3.5 (assuming game folders are set up), select game to WH3 (or WH2 if WH3 is not available) | # open RME 3.5 (assuming game folders are set up), select game to WH3 (or WH2 if WH3 is not available) | ||
# click Open File/Recent Files to open the RMV2 file | # click Open File/Recent Files to open the RMV2 file | ||
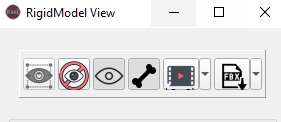
# click the Export this Object to FBX button | # click the Export this Object to FBX button [[File:Rme export.png|alt=RME Export dialogue to focus on after opening a RMV2 file|thumb|RME export to FBX area to focus on after opening a RMV2 file]] | ||
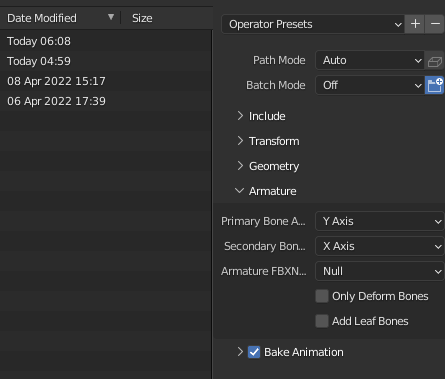
# in Blender, file > new > general, delete the cube, then file > import > FBX and select the exported FBX file from step 4 ('''make sure to uncheck armature > add leaf bones''' on the right side of the dialogue) | # in Blender, file > new > general, delete the cube, then file > import > FBX and select the exported FBX file from step 4 ('''make sure to uncheck armature > add leaf bones''' on the right side of the dialogue)[[File:Add leaf nodes.png|alt=Export to FBX dialogue in Blender; make sure to check off Add Leaf Nodes under Armature|thumb|Export to FBX dialogue in Blender; make sure to check off Add Leaf Nodes under Armature]] | ||
# make changes in Blender, such as weight painting to fix clipping, then file > export > FBX back into an FBX file | #make changes in Blender, such as weight painting to fix clipping, then file > export > FBX back into an FBX file ('''make sure to select either all models, or if exporting only selected components include the armature''' that is the orange man shaped thing and the green man shaped thing on the top right; otherwise the skeleton won't be exported correctly and RME will hang) | ||
# in RME 3.5 click Open FIle/Recent Files to open the FBX file | #in RME 3.5 click Open FIle/Recent Files to open the FBX file | ||
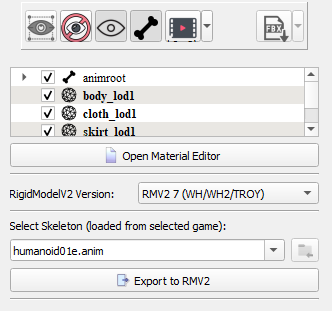
# select RigidModelV2 Version as RMV2 7 (for future versions of RME may be able to use version 8) | #select RigidModelV2 Version as RMV2 7 (for future versions of RME may be able to use version 8) [[File:Rme import.png|alt=RME Import dialogue area to focus on|thumb|RME export to RMV2 area to focus on after opening an FBX file]] | ||
# select skeleton in the drop down field either by typing or navigating the drop down (can type the prefix); determine the right skeleton by opening the original RMV2 in AssetEditor and clicking the animation tab at the bottom | #select skeleton in the drop down field either by typing or navigating the drop down (can type the prefix); determine the right skeleton by opening the original RMV2 in AssetEditor and clicking the animation tab at the bottom | ||
# import the RMV2 file back inside the pack file using either RPFM or the AssetEditor | #import the RMV2 file back inside the pack file using either RPFM or the AssetEditor | ||
== Importing Textures in Blender == | ==Importing Textures in Blender== | ||
The previous section is sufficient if you are only editing the geometry and are OK with the same textures applied to a deformed model. Sometimes the model changes are so significant that you have to adjust the texture. | The previous section is sufficient if you are only editing the geometry and are OK with the same textures applied to a deformed model. Sometimes the model changes are so significant that you have to adjust the texture. | ||
# extract the .dds files from the pack using RPFM; you can extract folders and it'll preserve the folder structure | #extract the .dds files from the pack using RPFM; you can extract folders and it'll preserve the folder structure | ||
# convert the .dds files to .tga format using paint.net | #convert the .dds files to .tga format using paint.net | ||
# convert the orange normal.tga file to blue using RME 0.97 under File > Normal Maps (have to setup game's data folder in RME first) | # convert the orange normal.tga file to blue using RME 0.97 under File > Normal Maps (have to setup game's data folder in RME first) | ||
# in Blender, select the material tab and either create a new material or click on the existing material | #in Blender, select the material tab and either create a new material or click on the existing material | ||
# enter shading mode from the top navigation bar | #enter shading mode from the top navigation bar | ||
# click Use Nodes and tick the Use Nodes box on the bottom panel | #click Use Nodes and tick the Use Nodes box on the bottom panel | ||
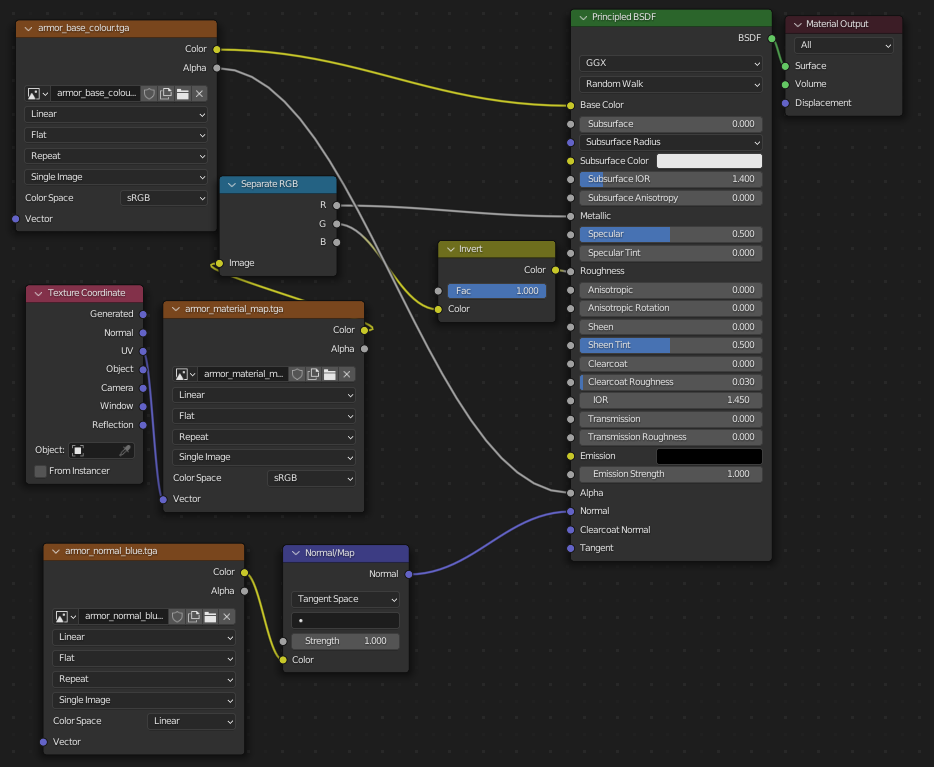
# setup the nodes with your 3 texture .tga files as below | #setup the nodes with your 3 texture .tga files as below | ||
[[File:Princpled bsdf nodes.png|alt=Principled BSDF Node setup to get shading in Blender similar to what you'd see in game|thumb|Principled BSDF Node setup to get shading in Blender similar to what you'd see in game]] | |||
==Troubleshooting== | |||
*washed out / ashy textures | |||
**caused by .dds files not being saved in the right format, see above the format needed for each category of .dds file and resave the .dds using paint.net (format specified at save as dialogue) | |||
* washed out / ashy textures | *invisible texture in the AssetEditor but shows up in game | ||
** caused by .dds files not being saved in the right format, see above the format needed for each category of .dds file and resave the .dds using paint.net (format specified at save as dialogue) | **caused by .dds files not having mipmaps; resave the .dds using paint.net (mipmap generation specified at save as dialogue) | ||
* invisible texture in the AssetEditor but shows up in game | |||
** caused by .dds files not having mipmaps; resave the .dds using paint.net (mipmap generation specified at save as dialogue) | |||
* parts are not showing up in game when VMD points to the .wsmodel file, but everything shows up if the VMD points to the RMV2 file directly | * parts are not showing up in game when VMD points to the .wsmodel file, but everything shows up if the VMD points to the RMV2 file directly | ||
** caused by missing part definition in the .wsmodel file, or missing material files | **caused by missing part definition in the .wsmodel file, or missing material files | ||
* part shows up in the rest pose, but whenever an animation plays disappears | *part shows up in the rest pose, but whenever an animation plays disappears | ||
** possibly caused if you imported multiple FBX into the same blender scene. Even if all models use the same skeleton and so have the same armature and vertex group names, they don't refer to the same vertex group. Do the following | **possibly caused if you imported multiple FBX into the same blender scene. Even if all models use the same skeleton and so have the same armature and vertex group names, they don't refer to the same vertex group. Do the following | ||
**# select the part you'd like to add to the main model | **#select the part you'd like to add to the main model | ||
**# remove all unassigned vertex groups | **#remove all unassigned vertex groups | ||
**# shift click the armature from the main model to select them both | **#shift click the armature from the main model to select them both | ||
**# Ctrl P > Armature Deform without selecting any of the autogenerate weight options | **#Ctrl P > Armature Deform without selecting any of the autogenerate weight options | ||
* half of your part shows up while the other appears silvery / transparent | *half of your part shows up while the other appears silvery / transparent | ||
** caused by missing textures; potentially caused if you delete half of a part (e.g. a shoe) then duplicate and mirror to complete the deleted half. Not verified yet, but it could be the UV map for the other half also gets deleted. The solution is to not delete or create a material from scratch | **caused by missing textures; potentially caused if you delete half of a part (e.g. a shoe) then duplicate and mirror to complete the deleted half. Not verified yet, but it could be the UV map for the other half also gets deleted. The solution is to not delete or create a material from scratch | ||
*RME loads your FBX model fine, but hangs when you try to select a skeleton | |||
**caused by improper skeleton being exported, probably because you're exporting with add leaf node enabled (by default), or you didn't select the armature when exporting selection only, or the armature is hidden (eye icon) | |||
*parts of your mesh that's supposed to be transparent shows up as black but works fine in game, and you're sure you configured the shading nodes correctly | |||
**caused by not having alpha clip on for blend mode in the material setting [alpha clip mode.png] | |||
Revision as of 12:31, 13 April 2022
If you are doing a reskin/creating a unit, you need to create 3D models for them. If the model you want can be done by combining, scaling, translating, and otherwise kitbashing existing models, then the Tutorial:AssetEditor is the most convenient and simple tool for the job. However, if you need more advanced modifications, retexturing (for now), or creating meshes, then you need to export to an external 3D software like Blender, 3DS Max, or Maya. This guide assumes the reader is familiar with modding basics like pack files and editing database entries. It is pretty involved, but the discord community (Modding Den Discord on the side bar; you can find me as Johnson on the discord, or LazyIcarus elsewhere) is very active and helpful.
Tools Involved
- RPFM: Tutorial:RPFM For Dummies for exporting and importing files into pack files, editing database entries, and installing/uninstalling pack files
- AssetEditor: Tutorial:AssetEditor could also be used for exporting/importing files; it's more convenient than opening up the game to check how your models look and if the paths are valid
- RME: [1] as of April 10, 2022, need QtRME 3.5 to convert between RMV2 files (.rigid_model_v2 files holding mesh info used inside the game) and FBX files (files holding mesh info external 3D editors can import). QtRME 3.7 is needed to export animations from the game to FBX if you need to for any reason (e.g. fix clipping), and RME 0.97 is needed to convert beteween blue (externally used) and orange (CA used) format normal texture files. QtRME 3.9 is supposed to handle all these operations so you don't need 3 versions of the tool.
- Paint.net: [2] free texture conversion/editing tool that converts between .dds image format (CA used) and .tga image format (externally used). There are also special settings needed for the .dds that will be elaborated on later.
- External 3D tool, this tutorial will be for Blender 3.1.2
Files Involved
I recommend you use the .wsmodel way of associating materials with meshes (see Tutorial:Creating & Editing .Wsmodels), which will have the advantage of allowing advanced shaders. This is meant as a reference, so you can ignore any details that you don't understand up to now and come back to it. The setup will involve
- db/variants_tables containing the table entry with an in game ID in the Variant Name (CA specified, you have to find it for each unit), with a Variant Filename of your choice
- variantmeshes/variantmeshdefinitions/<Variant Filename>.variantmeshdefinition (VMD) file that you have to create; it describes where to find your model (.wsmodel file or RMV2 file). See example ones to figure out how to write one.
- .wsmodel file that you have to create; it can be called anything and placed arbitrarily, you just have to specify the path to it in the VMD file. However, it's recommended to put it in the same folder structure as CA (e.g. variantmeshes/wh_variantmodels/hu1e/cth/cth_dragon_storm_human/miao_ying.wsmodel). This XML formatted file specifies the geometric mesh in the form of a RMV2 file, and the material for each part of the mesh
- .rigid_model_v2 (RMV2) file containing geometric mesh information as well as optionally material information (textures)
- .material files referenced in the .wsmodel file that describe the textures (.dds files) and shaders to use for each material
- .dds files containing texture image data in a couple of formats. You should have a base color (saved with BC1 (sRGB, DX 10+)), material map (saved with BC1 (sRGB, DX 10+)), and a normal (saved with BC3 (Linear, DXT5))
Exporting RMV2 to Blender and Back
If you are not creating a model from scratch or you want to use parts of some existing model, you'll want to convert RMV2 to a format Blender can use.
- extract the RMV2 file to outside the pack file using either RPFM or the AssetEditor
- open RME 3.5 (assuming game folders are set up), select game to WH3 (or WH2 if WH3 is not available)
- click Open File/Recent Files to open the RMV2 file
- click the Export this Object to FBX button
- in Blender, file > new > general, delete the cube, then file > import > FBX and select the exported FBX file from step 4 (make sure to uncheck armature > add leaf bones on the right side of the dialogue)
- make changes in Blender, such as weight painting to fix clipping, then file > export > FBX back into an FBX file (make sure to select either all models, or if exporting only selected components include the armature that is the orange man shaped thing and the green man shaped thing on the top right; otherwise the skeleton won't be exported correctly and RME will hang)
- in RME 3.5 click Open FIle/Recent Files to open the FBX file
- select RigidModelV2 Version as RMV2 7 (for future versions of RME may be able to use version 8)
- select skeleton in the drop down field either by typing or navigating the drop down (can type the prefix); determine the right skeleton by opening the original RMV2 in AssetEditor and clicking the animation tab at the bottom
- import the RMV2 file back inside the pack file using either RPFM or the AssetEditor
Importing Textures in Blender
The previous section is sufficient if you are only editing the geometry and are OK with the same textures applied to a deformed model. Sometimes the model changes are so significant that you have to adjust the texture.
- extract the .dds files from the pack using RPFM; you can extract folders and it'll preserve the folder structure
- convert the .dds files to .tga format using paint.net
- convert the orange normal.tga file to blue using RME 0.97 under File > Normal Maps (have to setup game's data folder in RME first)
- in Blender, select the material tab and either create a new material or click on the existing material
- enter shading mode from the top navigation bar
- click Use Nodes and tick the Use Nodes box on the bottom panel
- setup the nodes with your 3 texture .tga files as below
Troubleshooting
- washed out / ashy textures
- caused by .dds files not being saved in the right format, see above the format needed for each category of .dds file and resave the .dds using paint.net (format specified at save as dialogue)
- invisible texture in the AssetEditor but shows up in game
- caused by .dds files not having mipmaps; resave the .dds using paint.net (mipmap generation specified at save as dialogue)
- parts are not showing up in game when VMD points to the .wsmodel file, but everything shows up if the VMD points to the RMV2 file directly
- caused by missing part definition in the .wsmodel file, or missing material files
- part shows up in the rest pose, but whenever an animation plays disappears
- possibly caused if you imported multiple FBX into the same blender scene. Even if all models use the same skeleton and so have the same armature and vertex group names, they don't refer to the same vertex group. Do the following
- select the part you'd like to add to the main model
- remove all unassigned vertex groups
- shift click the armature from the main model to select them both
- Ctrl P > Armature Deform without selecting any of the autogenerate weight options
- possibly caused if you imported multiple FBX into the same blender scene. Even if all models use the same skeleton and so have the same armature and vertex group names, they don't refer to the same vertex group. Do the following
- half of your part shows up while the other appears silvery / transparent
- caused by missing textures; potentially caused if you delete half of a part (e.g. a shoe) then duplicate and mirror to complete the deleted half. Not verified yet, but it could be the UV map for the other half also gets deleted. The solution is to not delete or create a material from scratch
- RME loads your FBX model fine, but hangs when you try to select a skeleton
- caused by improper skeleton being exported, probably because you're exporting with add leaf node enabled (by default), or you didn't select the armature when exporting selection only, or the armature is hidden (eye icon)
- parts of your mesh that's supposed to be transparent shows up as black but works fine in game, and you're sure you configured the shading nodes correctly
- caused by not having alpha clip on for blend mode in the material setting [alpha clip mode.png]


