Tutorial:Editing Animation Glows & Effects: Difference between revisions
(Created page with "https://tw-modding.com/shawmuscle/editing-animation-glows-effects/ Category:To be Imported") |
No edit summary |
||
| (3 intermediate revisions by the same user not shown) | |||
| Line 1: | Line 1: | ||
https:// | Have you ever wanted to change the color of a glow or give a custom unit an epic lighting effect like other units in the game? well look no further, this guide aims to shed some light on editing some anim.meta files and vfx files, how to take an existing animation and change not only its color but also to a completely different effect, from fire to lightning etc. | ||
[[Category: | |||
This guide assumes you know the basics about modding using PFM and creating your own units, if you dont look up “sebidee modding guide” | |||
== Getting Started == | |||
T hings you will need | |||
PFM (this is the one I used in the guide but is now old use RPFM if possible) <nowiki>https://sourceforge.net/projects/packfilemanager/</nowiki> | |||
RPFM (RECOMMENDED) | |||
<nowiki>https://github.com/Frodo45127/rpfm/releases/tag/v1.4.1</nowiki> | |||
notepad++ | |||
<nowiki>https://notepad-plus-plus.org/download/v7.6.2.html</nowiki> | |||
Hxd | |||
<nowiki>https://mh-nexus.de/en/downloads.php?product=HxD</nowiki> (pick your lanugauge) | |||
Now we are ready to turn water into wine and fire into lightning. | |||
=== please skip ahead to section 2 of the guide for the latest way of editing glows and effects === | |||
I have left the first section of the guide in as some people may still want to only change glows associated with animations. | |||
Finding The Information | |||
To start I am going to assume you have a character in mind that you have made or seen that you would like to edit. | |||
In PFM locate your “land_units_tables” and find the “man_animation” column | |||
[[File:Animations effects 01.jpg|frameless|551x551px]] | |||
here you can see this unit is using the “hu1_empire_hr1_warhorse_sword_and_shield_gk” which is the green knights animation | |||
you have to pick animations that already have a VFX attatched to them as we, as of right now cannot edit anim.meta files enough to give any animation a glow effect. Perhaps in the future and if so I will update the guide. | |||
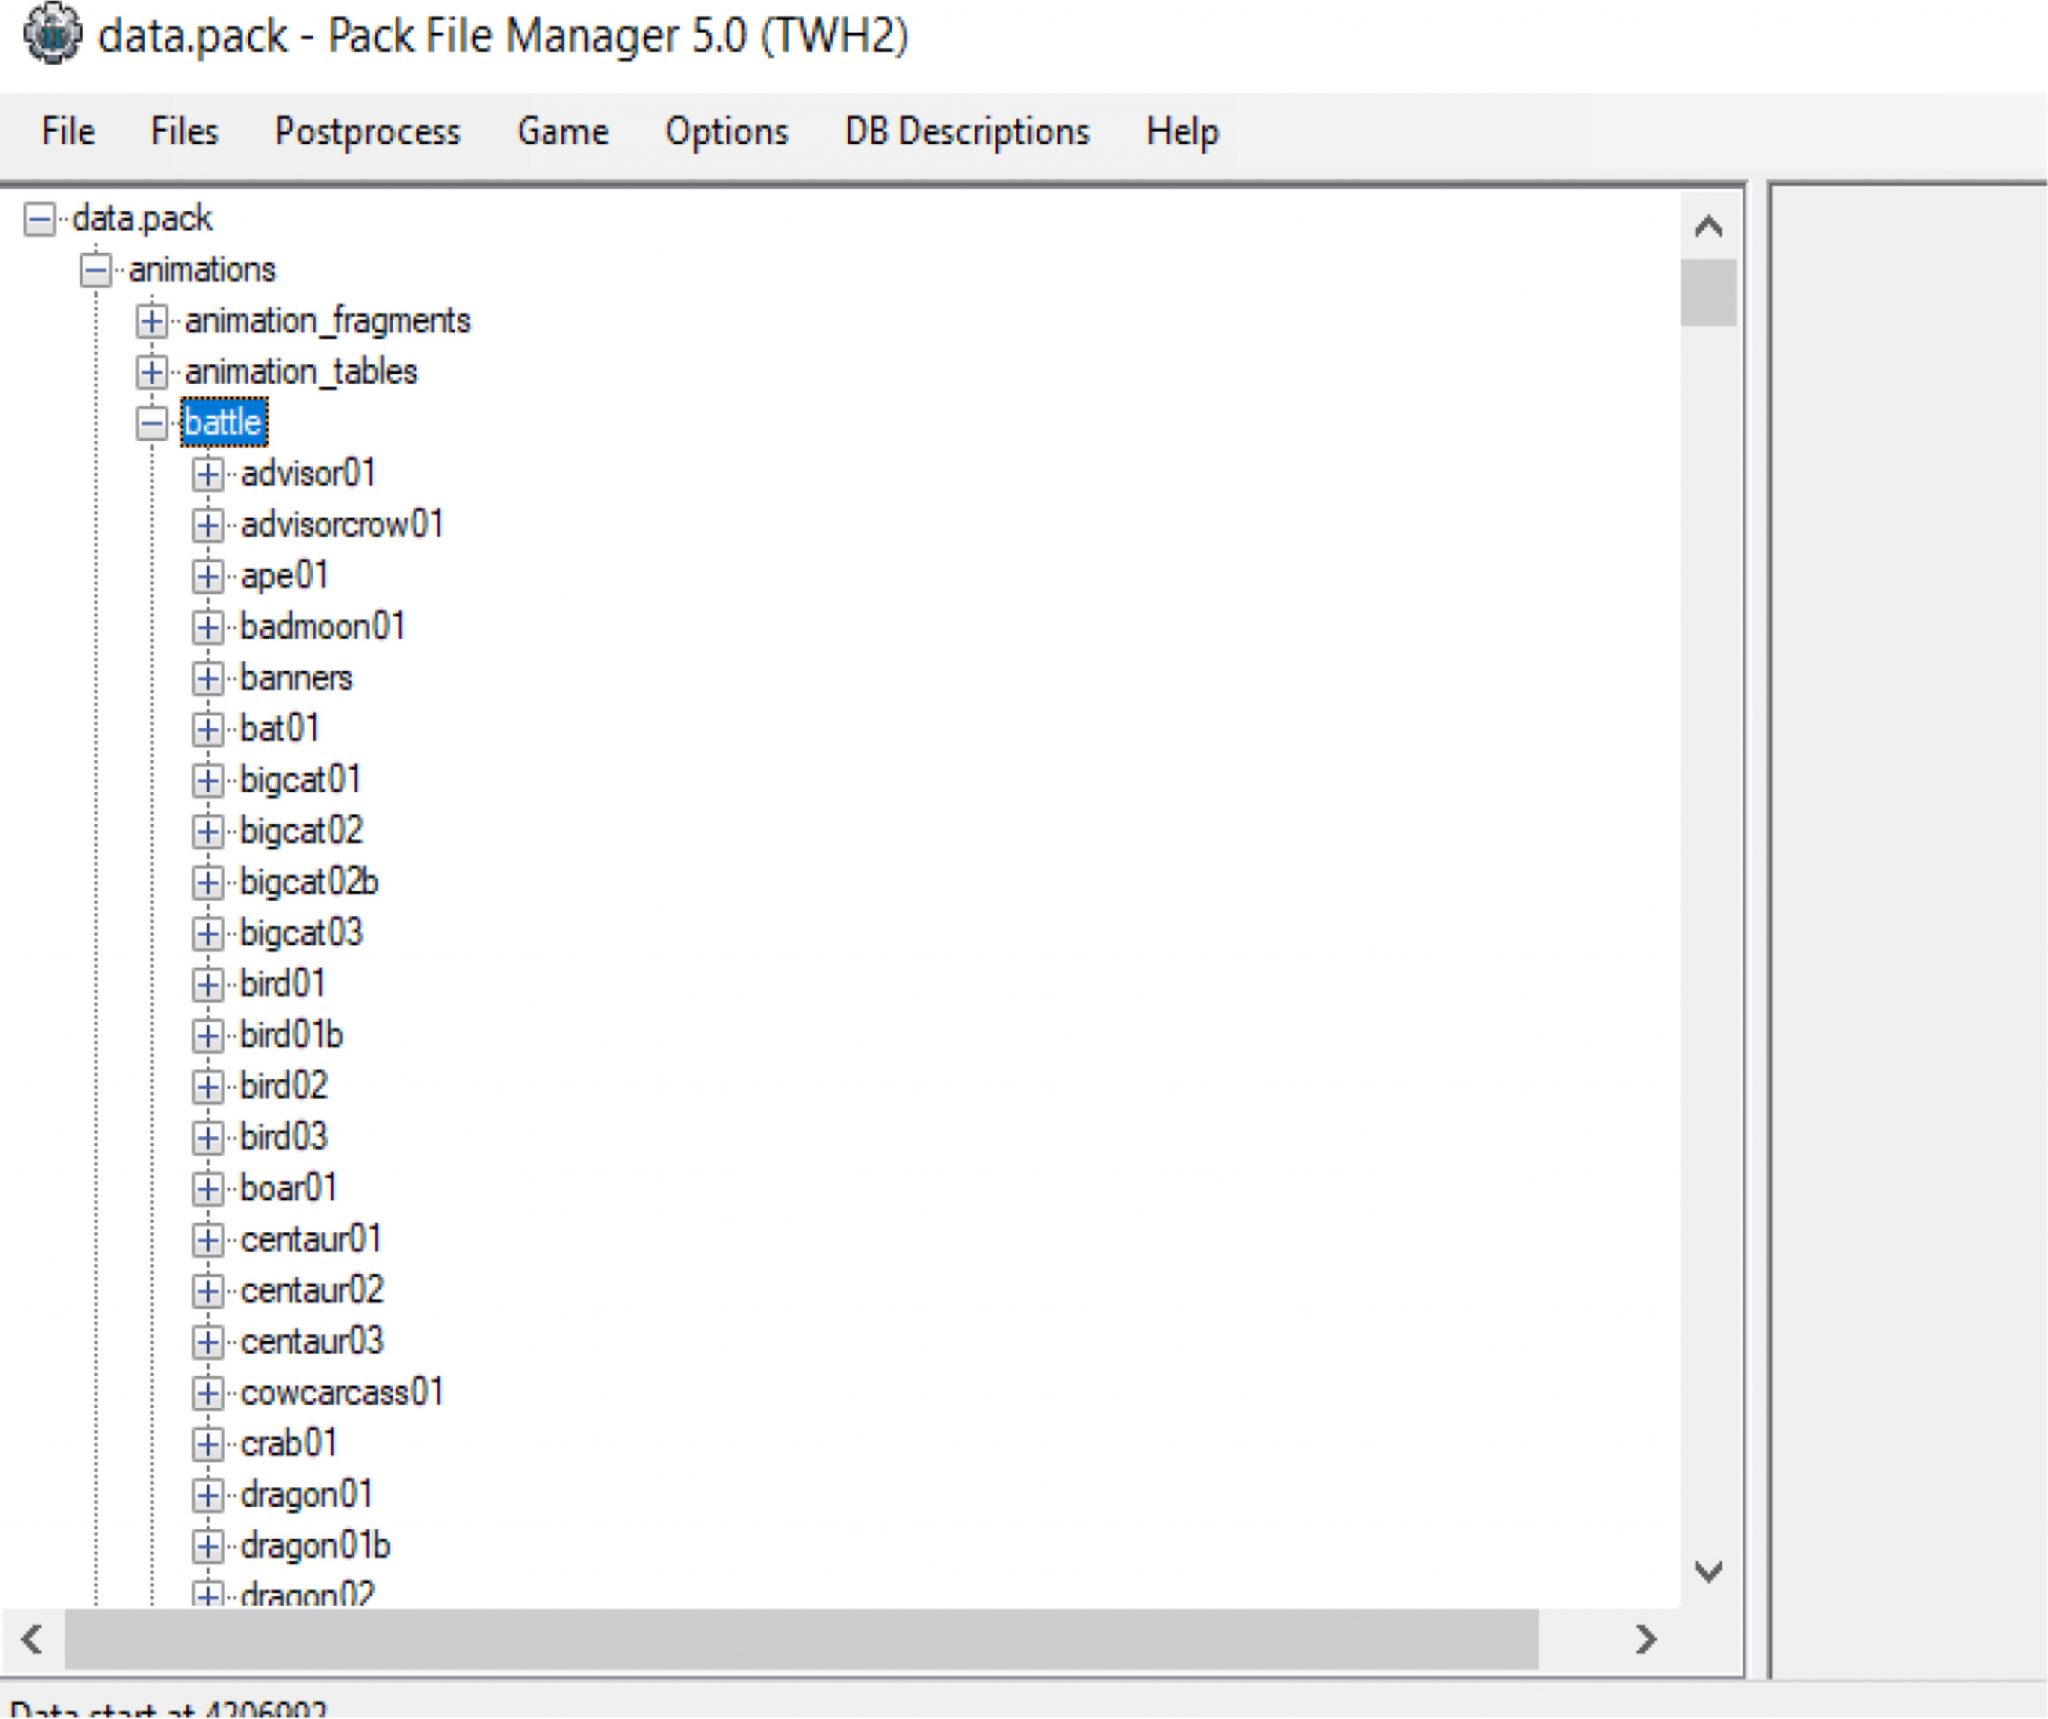
so with this in mind we go to the next step which is to find the anim.meta file itself, which is located in PFM / data / animations / battle | |||
[[File:Animations effects 02.jpg|frameless|325x325px]] | |||
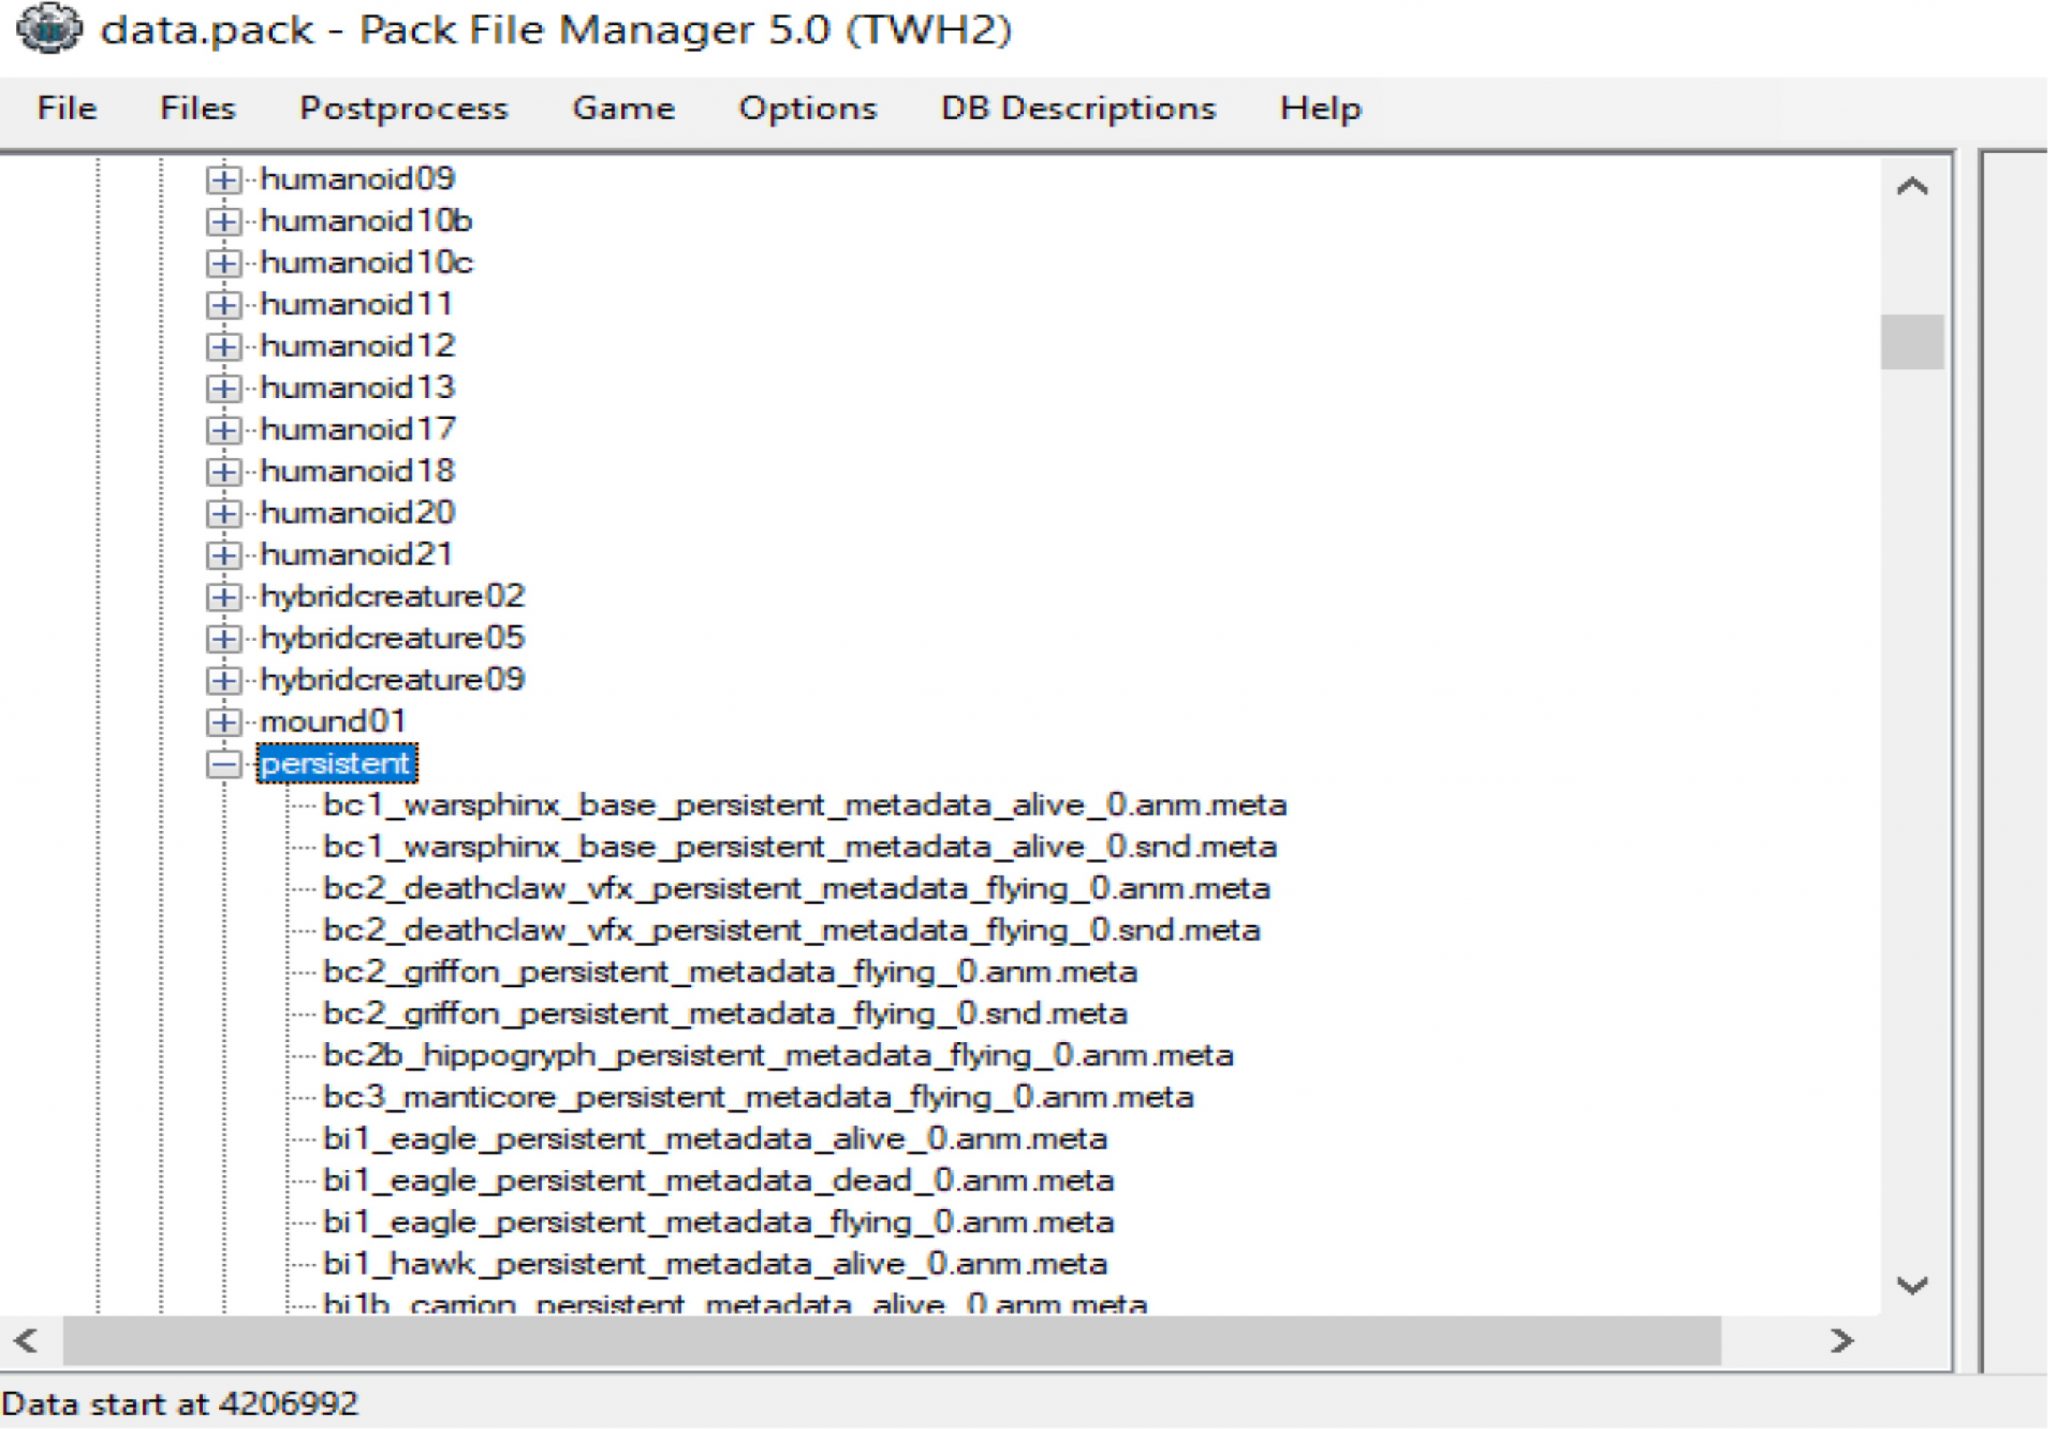
in here are all the animations for battle, the ones we want are located in PFM / data / animations / battle / persistent | |||
[[File:Animations effects 03.jpg|frameless]] | |||
locate your animatoin file in this case because our unit is using the green knights animation we want to extract “hu1_green_knight_vfx_persistent_metadata_alive_0.anm.meta” | |||
to do this simply highlight the file and right click extract/extract selected | |||
=== Now to look inside this file for the information we want === | |||
To find this file you just extracted go to | |||
C:\Program Files (x86)\Steam\steamapps\common\Total War WARHAMMER II\''Duke_Thomas_d’Lyonesse''\animations\battle\persistent | |||
where mine says ''Duke_Thomas_d’Lyonesse'' this will be your mod name. | |||
ok location of the file complete, now open it with Hxd (or notpad++ both work but hxd is better for later use) | |||
[[File:Animations effects 04.jpg|frameless|356x356px]] | |||
as you can see the this now tells us that the vfx file we need that is associated with this animation is “wh_dlc05_green_knight_mist” | |||
So now we know the name of the VFX file we can locate it in PFM found at | |||
data/vfx | |||
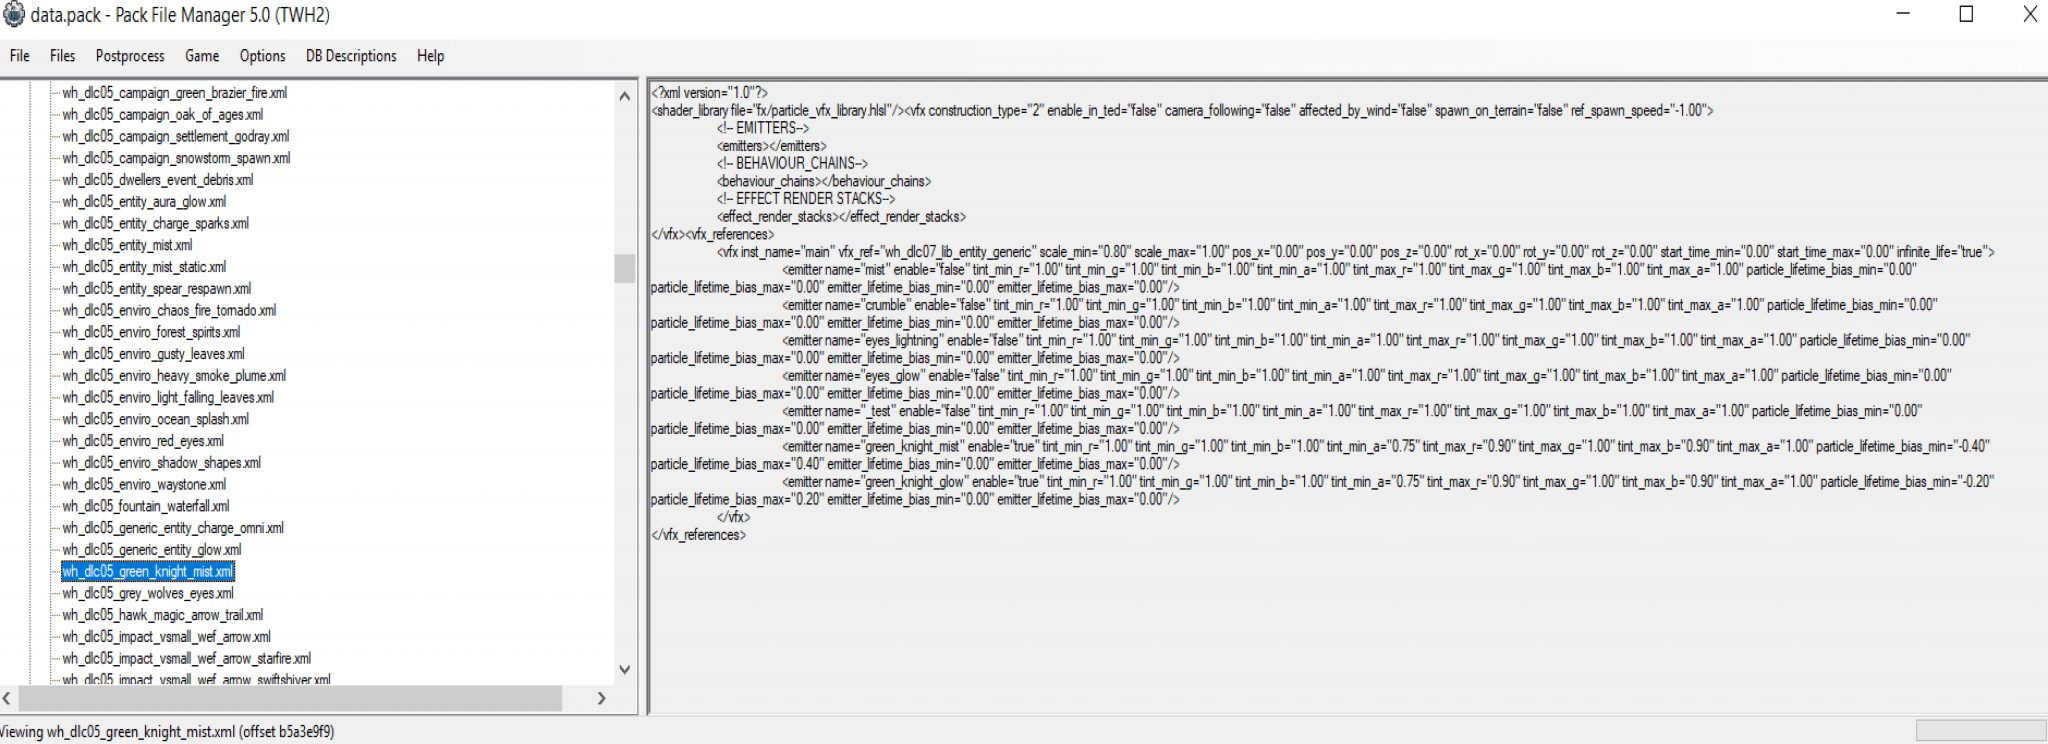
yup a long list, thats why its best to find what you need first. scroll down until you find | |||
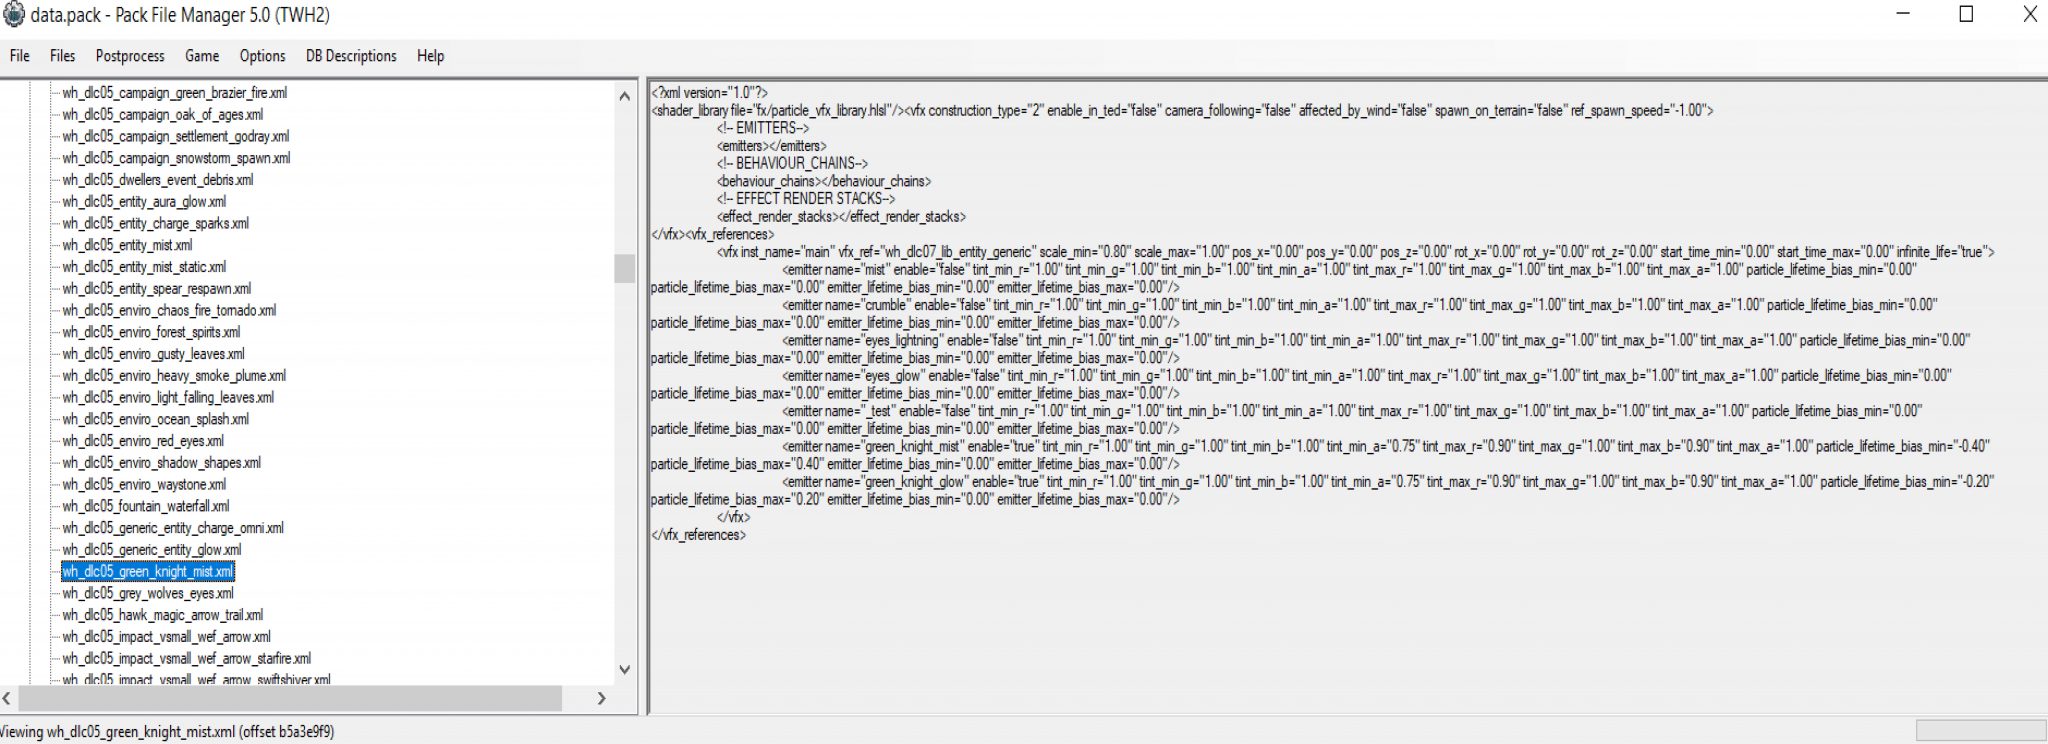
wh_dlc05_green_knight_mist.xml | |||
[[File:Animations effects 05.jpg|frameless|410x410px]] | |||
now extract this file. | |||
=== Great all our important info has been collected! === | |||
Editing the files | |||
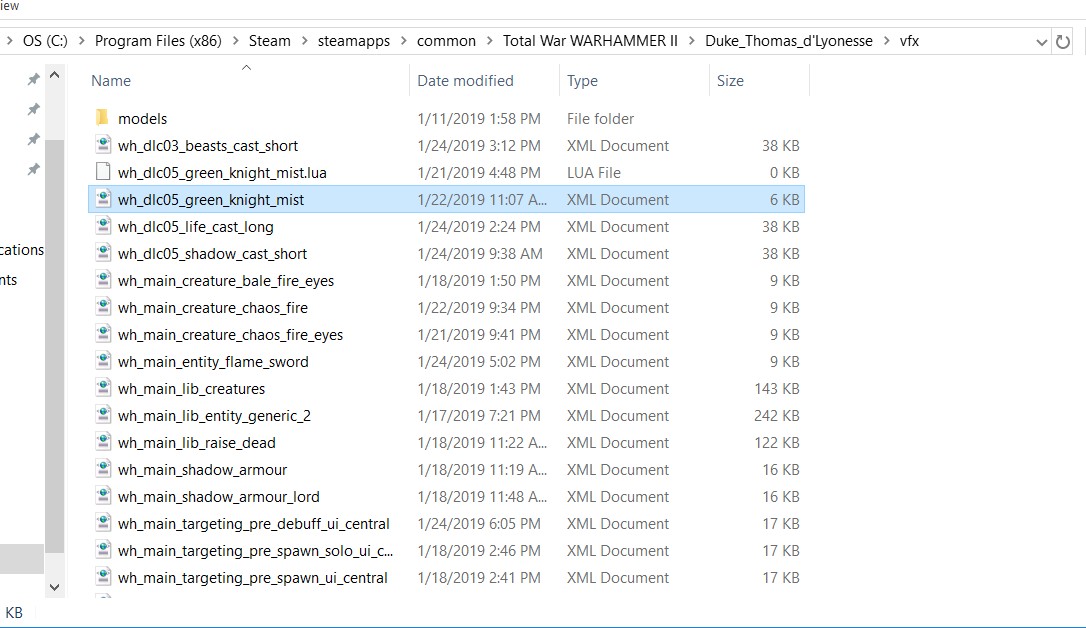
From here we want to locate our “wh_dlc05_green_knight_mist.xml” file in C:\Program Files (x86)\Steam\steamapps\common\Total War WARHAMMER II\Duke_Thomas_d’Lyonesse\vfx | |||
[[File:Animations effects 06.jpg|frameless|388x388px]] | |||
now open this file with notepad++ | |||
[[File:Animations effects 07.png|frameless|485x485px]] | |||
dont fret its not all doom and gloom from here, its actaully pretty simple. so first, on the left you can see the name of the effect | |||
this is where we pick which ones we want active, we do this by changing the true/false values, be sure to set the ones you dont want to false | |||
so now we have set everything to “false” except “green_knight_mist” this means that this will be the only effect active. | |||
now we want to change the colour of the mist, we do this by editing the RGBA values what is this I hear? simple R-red G-green B-blue A-alpha (alpha is like opacity) | |||
the range of RED,GREEN and BLUE – is 0 = Black and 2=white/color (now these vary according to effect so a little trial and error) | |||
[[File:Animations effects 08.png|frameless|457x457px]] | |||
[[File:Animations effects 09.jpg|frameless|455x455px]] | |||
So I want to make the “Green knight” the “Black Knight” | |||
to do this we simply set all the values in this row to “0.00” but not the Alpha Value, as black does not show so well we will set the Alpha-min value to “3.00” and the max Alpha to “5.00” (alpha values can be the same) | |||
this would create a black mist, if we wanted a red mist we would set all the R values to somewhere between “0.01”-“2.50” so on and so forth for Green and Blue. | |||
[[File:Animations effects 10.png|frameless|455x455px]] | |||
now we have ourselves a black mist we want to put it back into the game. first thing is east just hit “save” | |||
=== DO NOT CHANGE THE FILE NAME OR TYPE === | |||
Now you are going to need a movie mod file. here’s one I made earlier as we no longer require 2 | |||
files. you can use my template or using your existing mod change the file type to “movie” you do this under file/change file type/movie | |||
<nowiki>https://drive.google.com/file/d/15kMrHUpH39l19agMCdsbUW_gU6yeetzR/view?usp=sharing</nowiki> dowload this file to this location as its an “mov” file | |||
C:\Program Files (x86)\Steam\steamapps\common\Total War WARHAMMER II\data | |||
(be sure to delete the “hu1_green_knight_vfx_persistent_metadata_alive_0.anm.meta” and “wh_dlc05_green_knight_mist.xml” files as yours will not upload if you do not do this, I left mine in so you can see what it looks like) | |||
you should be able to see something that looks like this | |||
[[File:Animations effects 11.jpg|frameless|450x450px]] | |||
great! now simple just insert your new vfx file “wh_dlc05_green_knight_mist.xml” | |||
should have been located in the same file it came from | |||
C:\Program Files (x86)\Steam\steamapps\common\Total War WARHAMMER II\Duke_Thomas_d’Lyonesse\vfx | |||
otherwise it wont work. | |||
if its not put the edited file in there then insert it into the mod. hit save and open the game see if it worked! | |||
== Editing The Choice Of Effects == | |||
But Shawmuscle what if I want lighting instead of a mist? | |||
this follows alot of the same steps, remember when we opened the “hu1_green_knight_vfx_persistent_metadata_alive_0.anm.meta” with HXD this is why. | |||
pro tip open this file using HXD, you should see something that looks like this | |||
[[File:Animations effects 04.jpg|frameless]] | |||
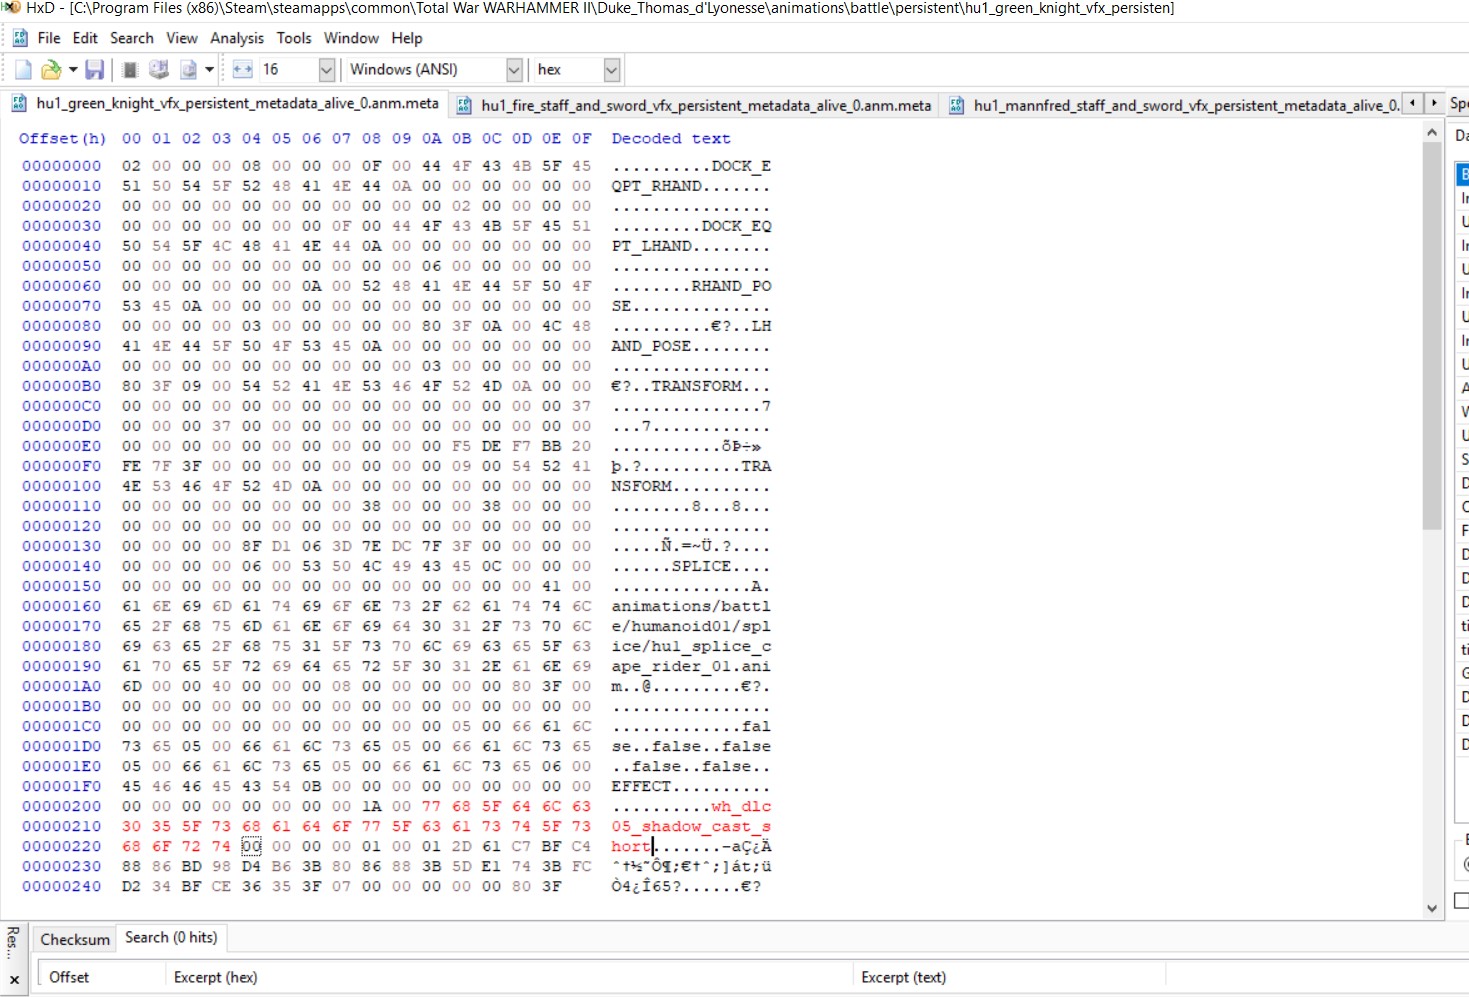
we are going to change the “wh_dlc05_green_knight_mist” to “wh_dlc05_shadow_cast_short” | |||
so highlight “wh_dlc05_green_knight_mist” and paste in its place “wh_dlc05_shadow_cast_short” if you get a messege saying “do you want to change the file size the answer is NO | |||
it has to be the exact same amount of characters, do not change. This is why we have selected “wh_dlc05_shadow_cast_short” you can use any other vfx that has 26 characters in it but, this works and has more choices | |||
should look like this | |||
[[File:Animations effects 12.jpg|frameless|373x373px]] | |||
hit save. | |||
now you have to import your new | |||
“hu1_green_knight_vfx_persistent_metadata_alive_0.anm.meta” file into your mod from the correct file which is | |||
C:\Program Files (x86)\Steam\steamapps\common\Total War WARHAMMER II\Duke_Thomas_d’Lyonesse\animations\battle\persistent | |||
now open up | |||
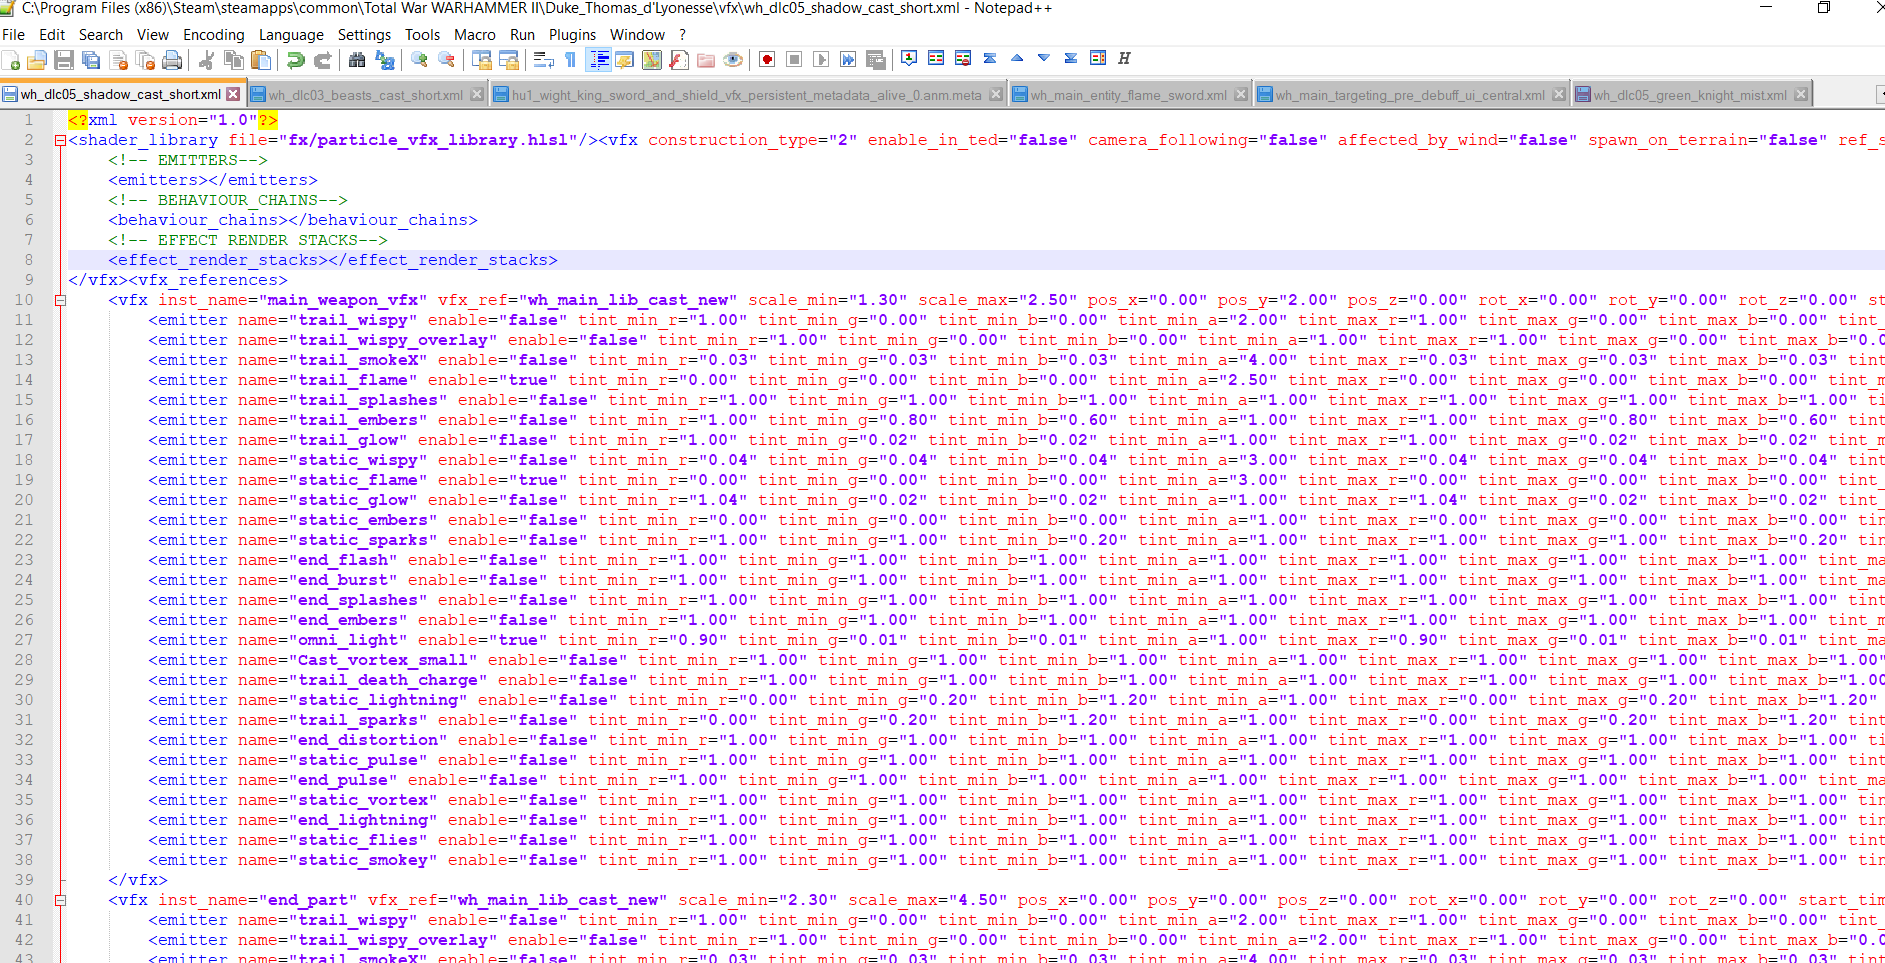
the “wh_dlc05_shadow_cast_short” in notepad++ as we did before | |||
[[File:Animations effects 13.png|frameless|447x447px]] | |||
as you can see in this file there are not only more choices but 2 references to effects, means we can be creative! | |||
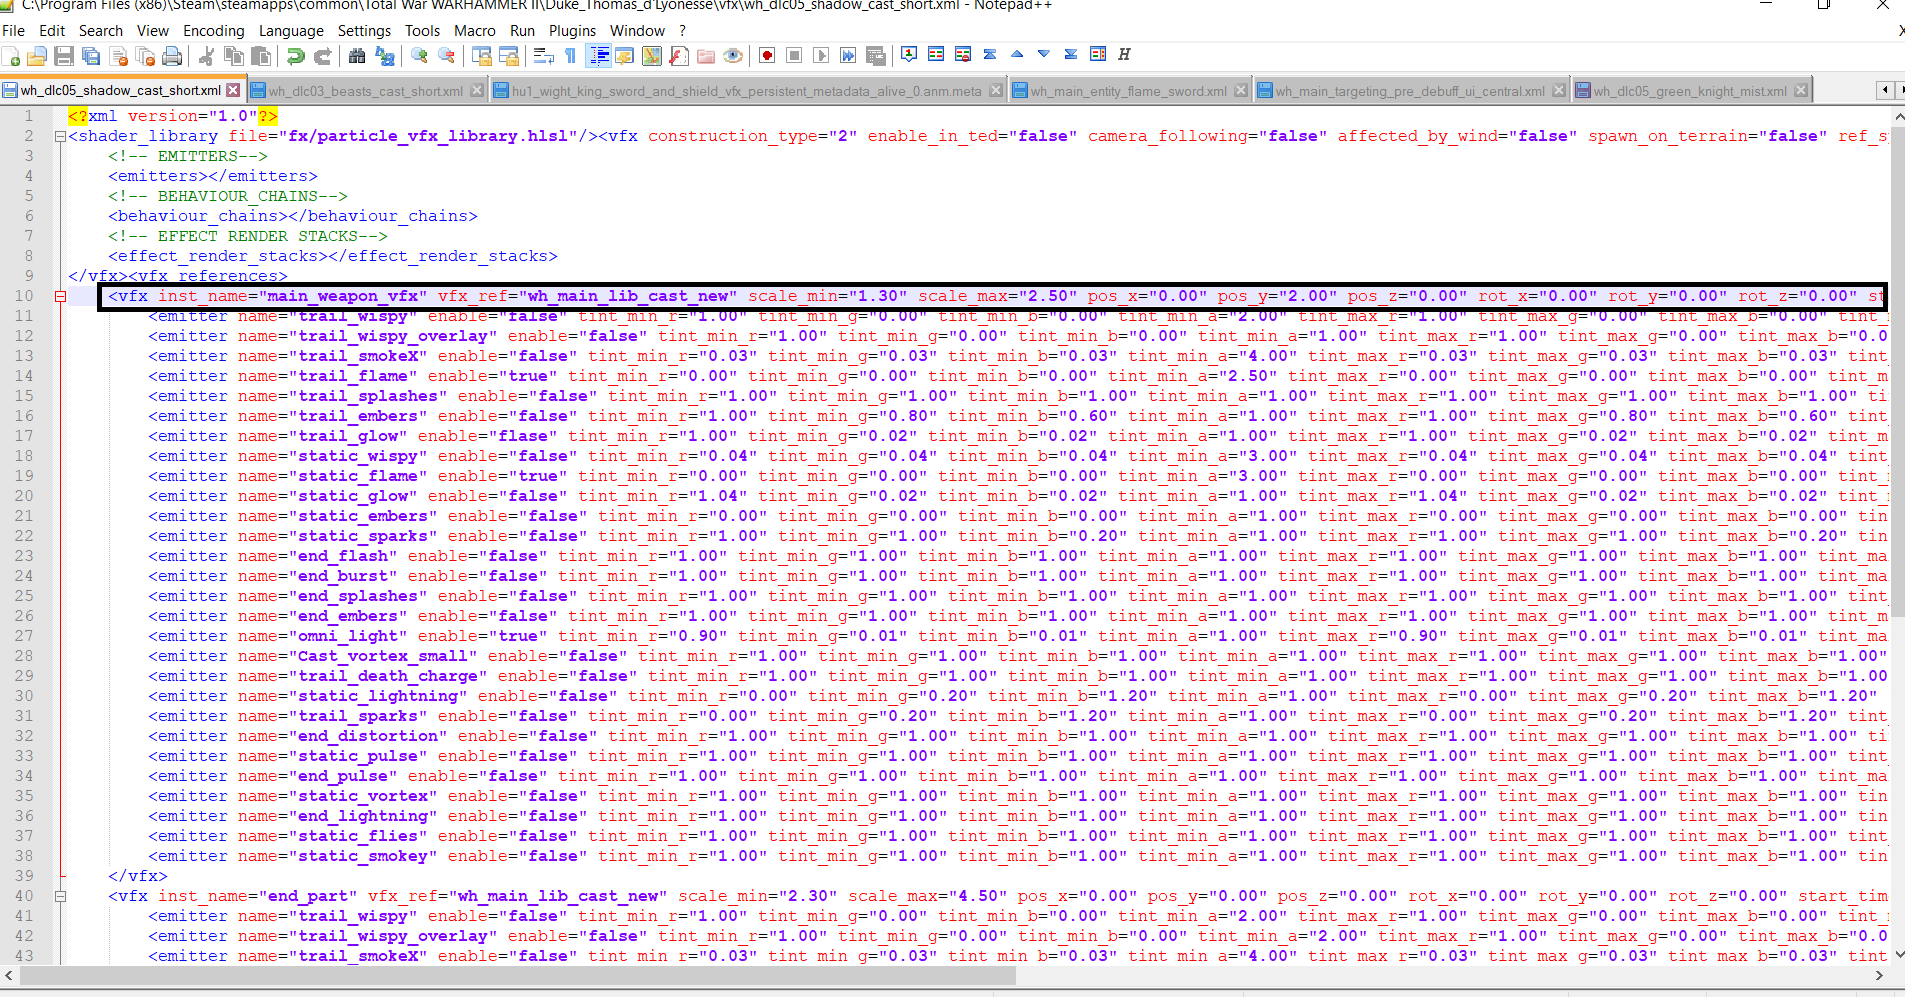
at first both of these effects are located in the same place but if we go to the top vfx line we can change the X,Y,Z values and even rotation if we wanted. but we wont today. | |||
(the values of rotation are based on 360 degrees, if you set the X rotation value to “180.00” the effect | |||
will now be upside down) | |||
the first 3 are the ones we want to change, essentially this is just “up/down” “left/right” “front/back” easy. | |||
we are going to give one effect to our rider and one for the horse, to do this we will set the top effect Y value to “2.00” and leave the bottom Y value as “0.00” | |||
[[File:Animations effects 14.png|frameless|415x415px]] | |||
now repeat earlier steps pick your effect RBGA values etc. and put back into the pack file. | |||
if you have changed it and cannot see it, it could be too small or the Alpha value needs to be increased. | |||
to change the size of each effect you change the “scale” values located in the same line as the X,Y,Z | |||
these two values can be set from 0.1 to 25.00+ but i would probably not go over 10.00 for the max scale. | |||
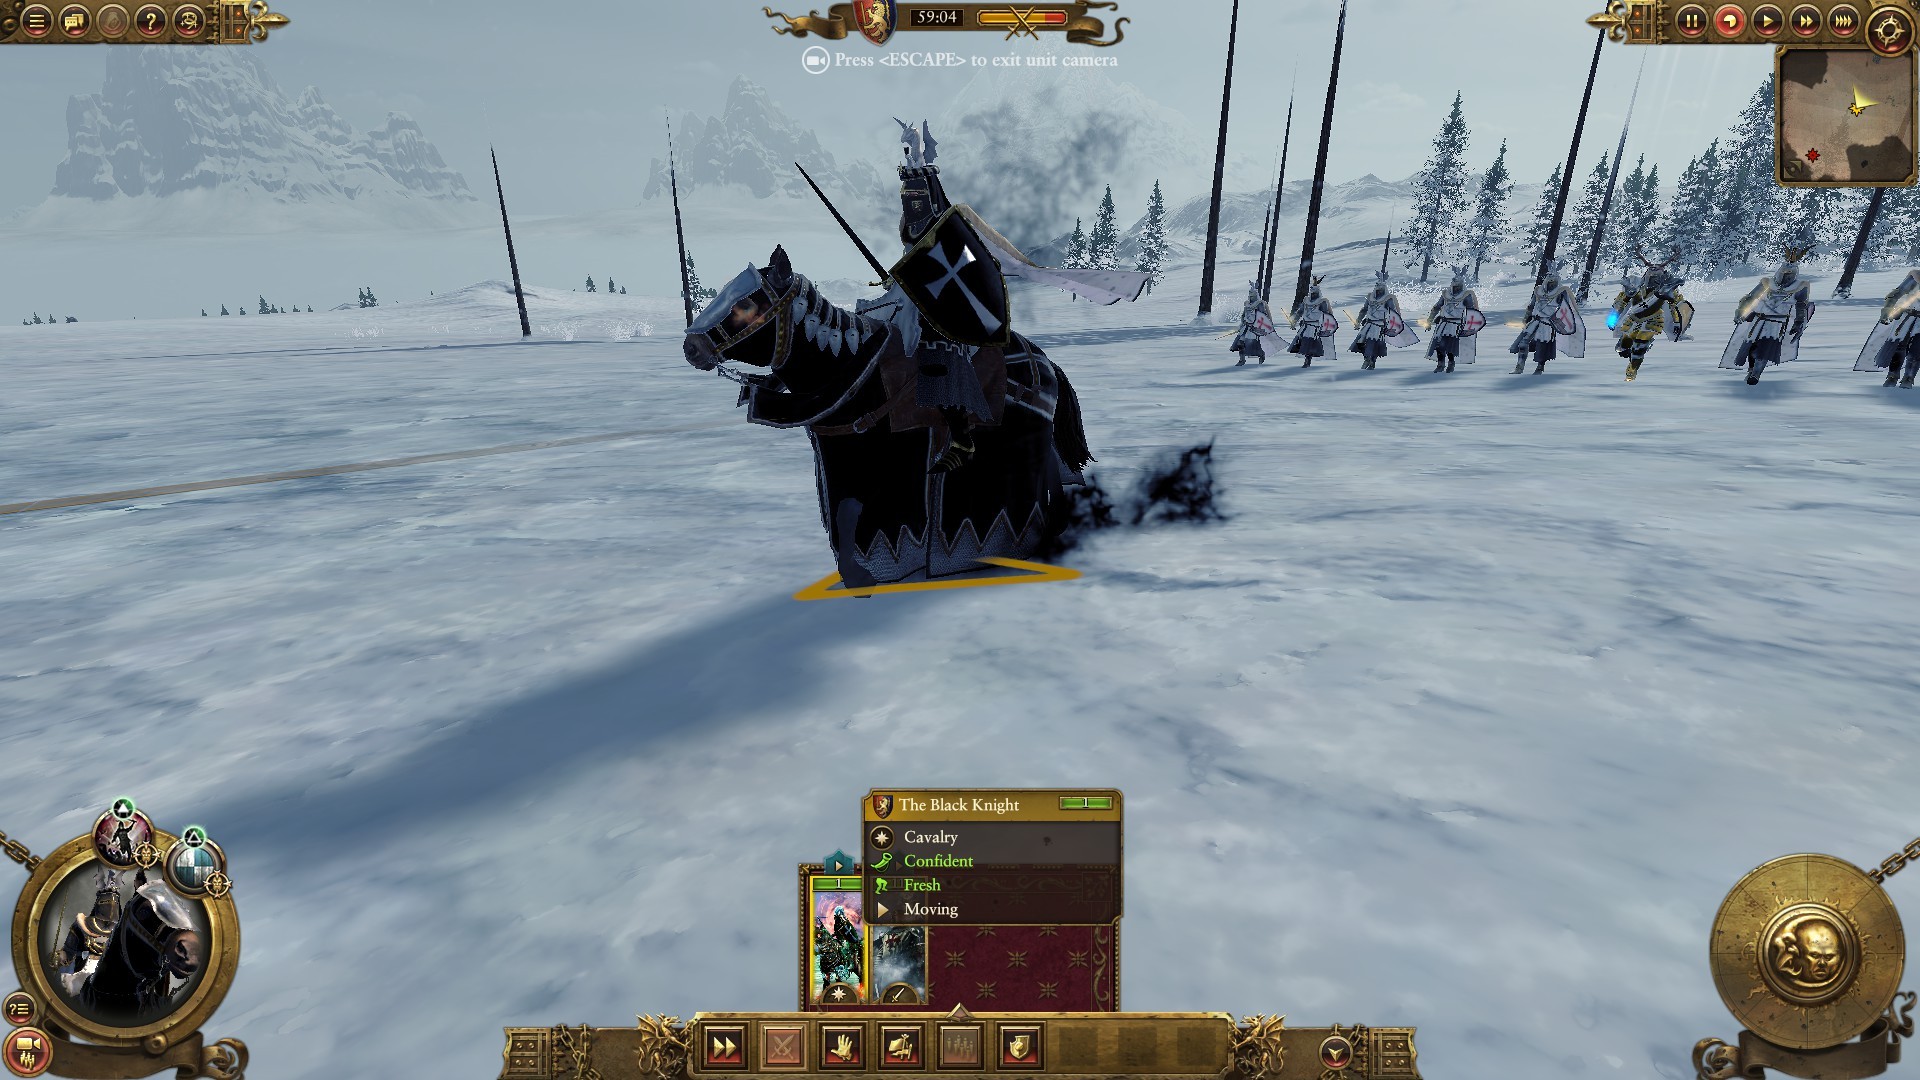
once you have done all of those things you may have something that looks like this | |||
[[File:Animations effects 15.jpg|frameless|595x595px]] | |||
== Edit Summon Effects == | |||
This section assumes you know how to create custom spells and summon abilities. using a lot of what you have just learned we can now edit summon VFX | |||
we are going to use a Hex Area spell that actives when the unit is summoned looks a little like this | |||
[[File:animations_effects_16.jpeg|400px]] | |||
looking at the “wh_abilities_generic_vortex” in the “active_aoe column” (you can also use the others seen but this is one I have already edited) | |||
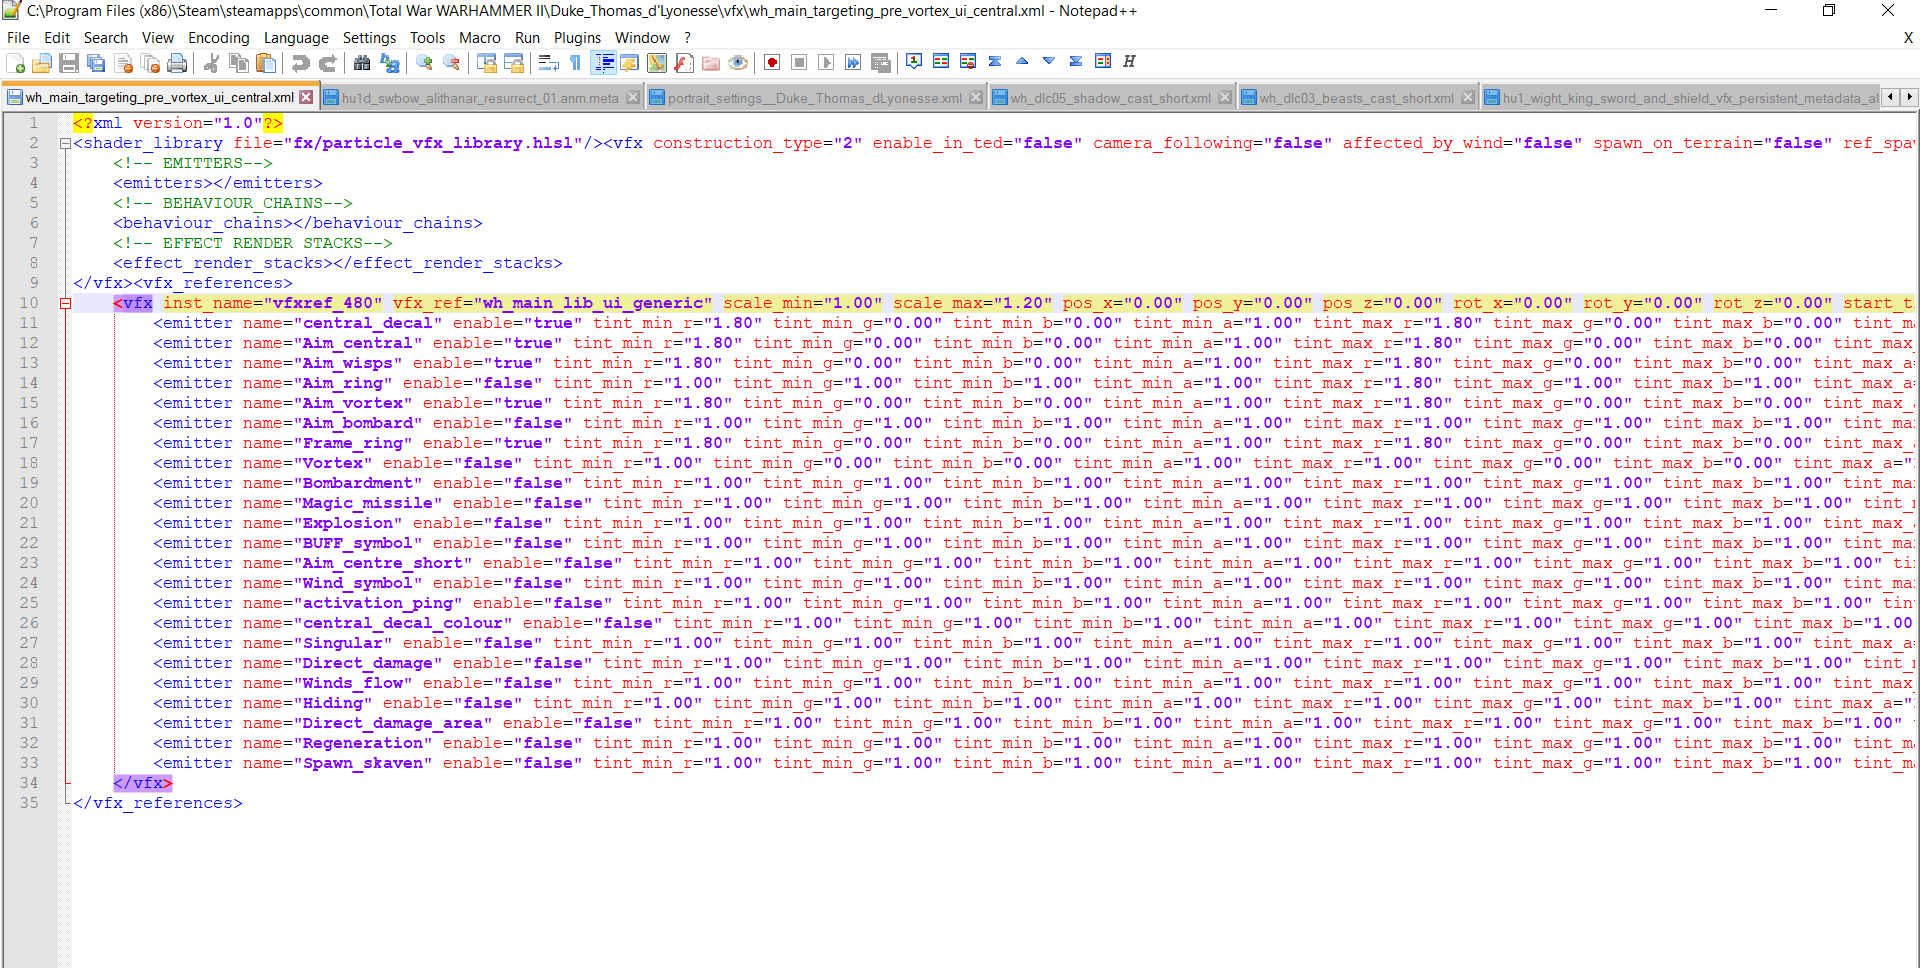
now go into DATA/VFX to find its vfx file wh_main_targeting_pre_vortex_ui_central.xml | |||
extract this file and open in notepad++ like before | |||
[[File:animations_effects_17.png|400px]] | |||
edit it as we did previously by choosing which effects you would like and what colour etc. and adding it to your MOV file | |||
once you have decided you can add the ability to your unit in “land_unit_abilties_tables” | |||
now using your summon ability the character will now spawn using your new effect, you do not have to use a summon ability with the hex ability I have just found that more effects/vfx are available this way. | |||
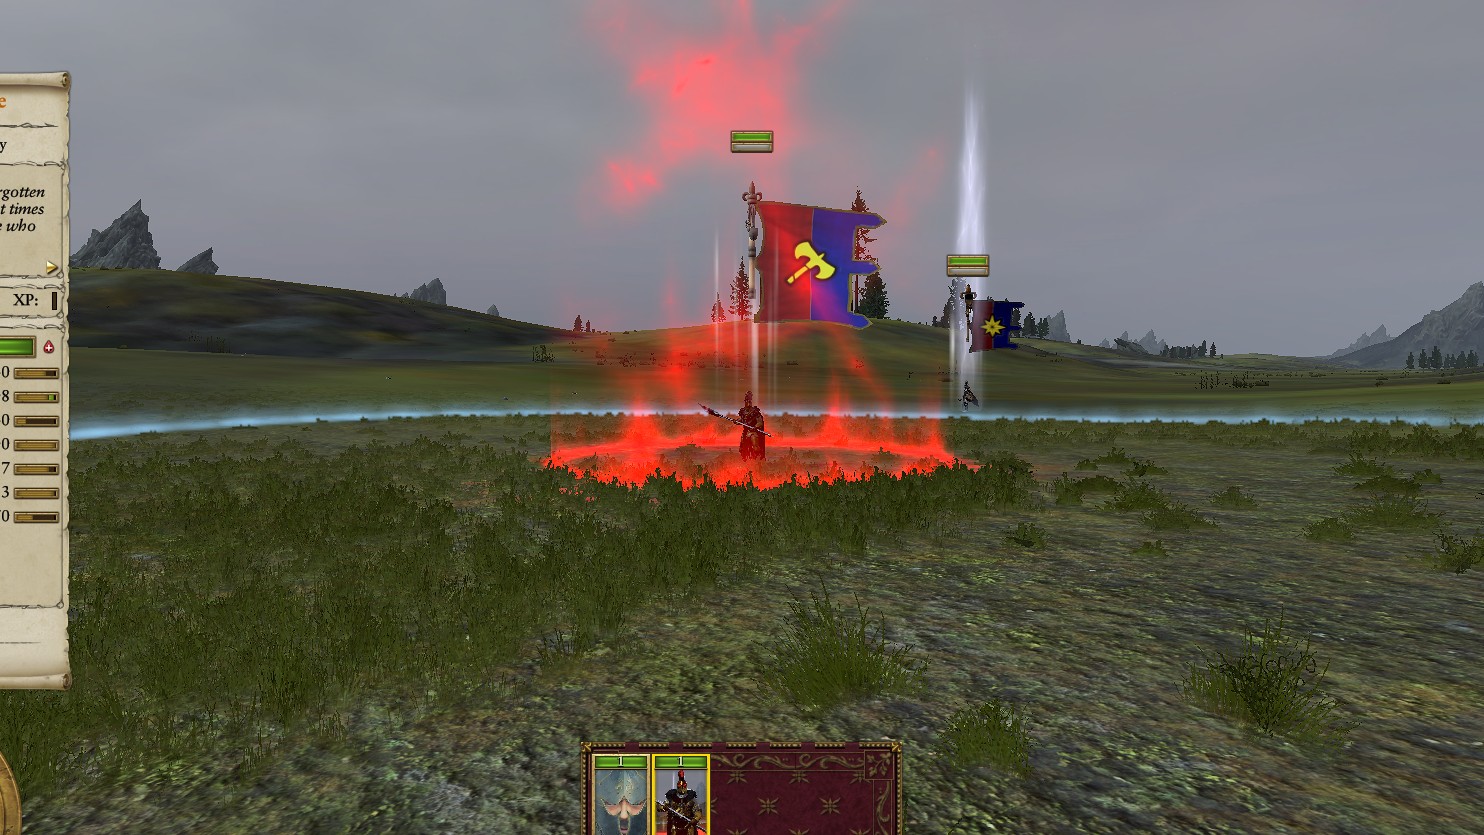
you may end up with something like this | |||
[[File:animations_effects_18.jpeg|400px]] | |||
== Words Of Warning == | |||
These files when edited will change all units that use those animations, for exaple if you change an animation just for your character all units in the game that use those animations will now have your animation. | |||
try to pick animations that your faction are unlikely to meet like “krell” and “battle pligrims” Enjoy modding animation glows | |||
== Part 2 – Adding Glows To Any Animation == | |||
As promised, I have finally found a way to add glows to any animation, it does have it limits and I will show you what they are and some potential fixes and the downsides to the fixes etc. | |||
Ok to start, using the same programs as before but instead of PFM for all our mod work we will be using RPFM downloaded here – | |||
RPFM | |||
<nowiki>https://github.com/Frodo45127/rpfm/releases/tag/v1.4.2</nowiki> | |||
as this will make it easier to find some of our files as it has a search tool and you can see which columns relate to which tables. | |||
Alright now we are ready to get into the good stuff. | |||
== Creating a new ability == | |||
The work around we will use for being able to add glows to any animation is through the creation of custom passive spells and abilities. I assume you know how to make one already I’m just going to point out the columns you need to change. | |||
the tables you are going to need are – | |||
unit_special_abilities_tables unit_abilities_tables | |||
special_ability_to_special_ability_phase_junctions_tables special_ability_phases_tables area_of_effect_displays_tables | |||
particle_effects_tables | |||
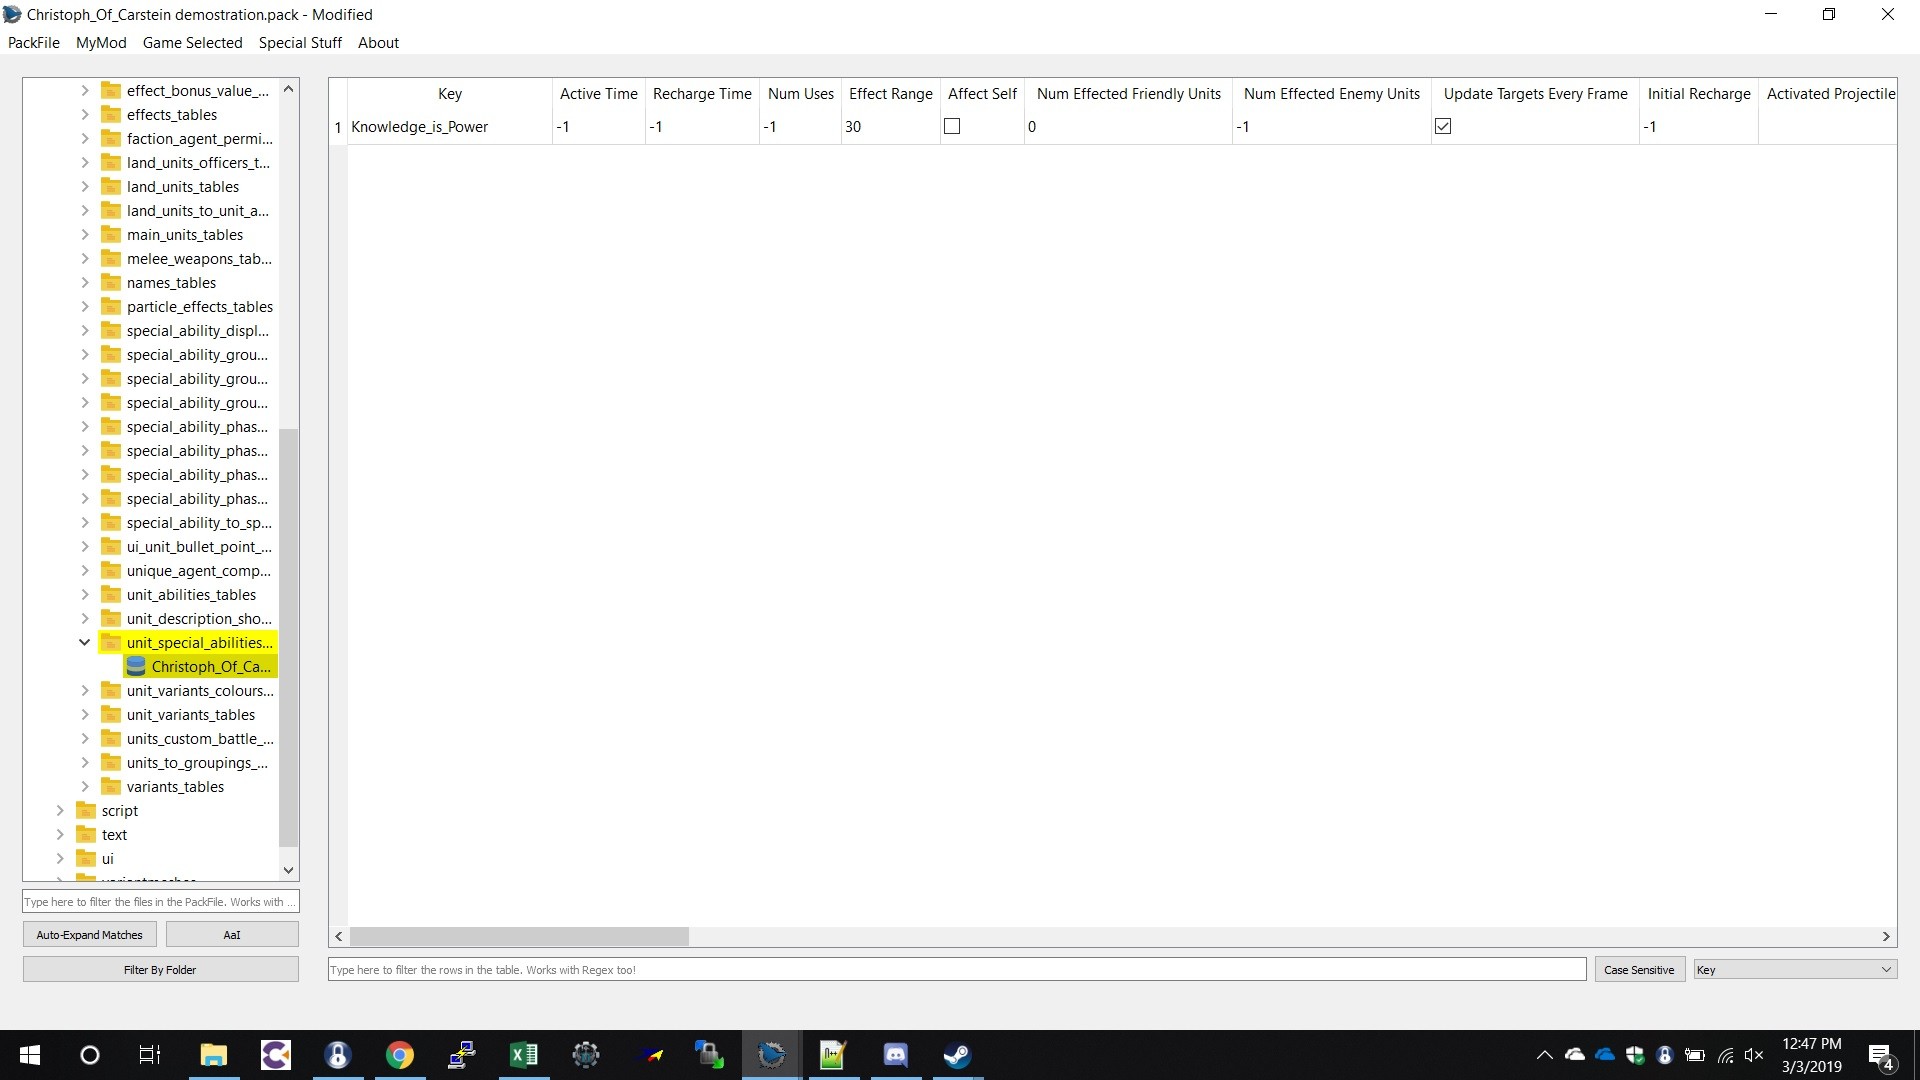
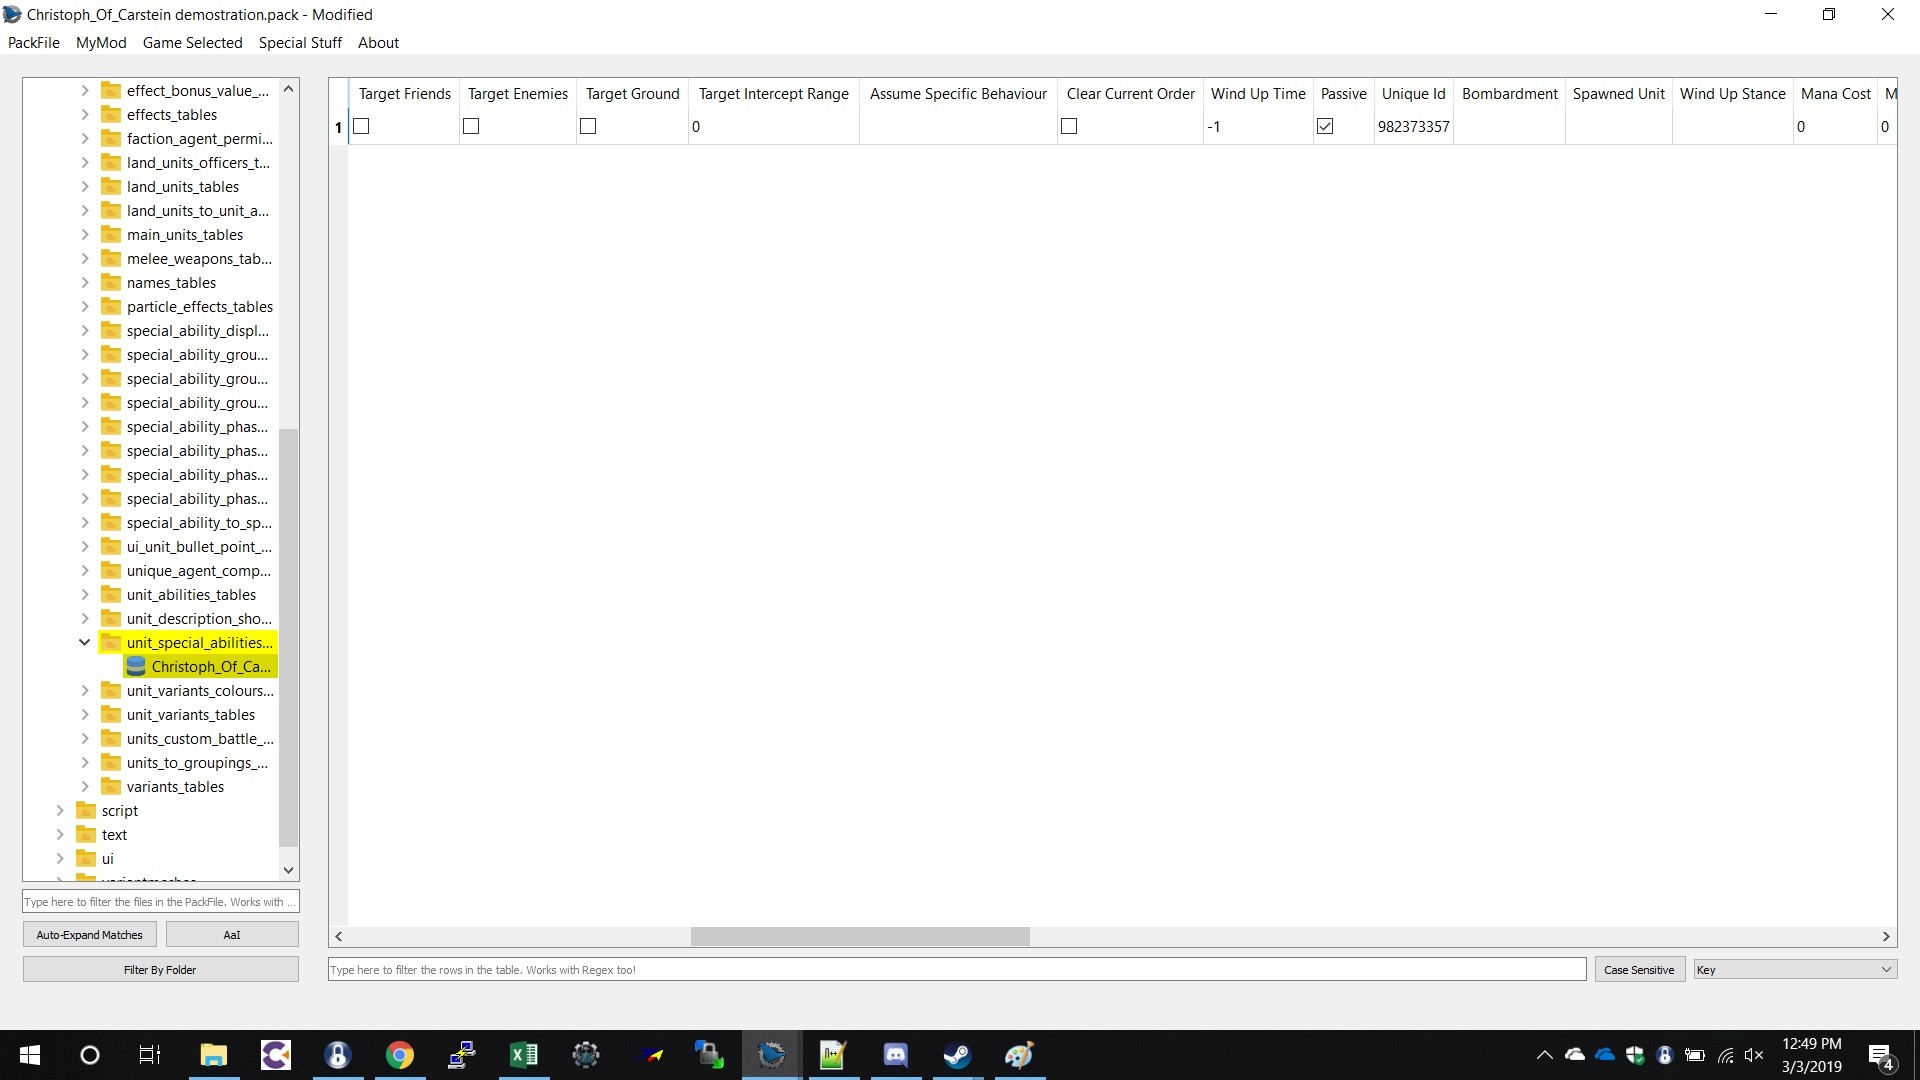
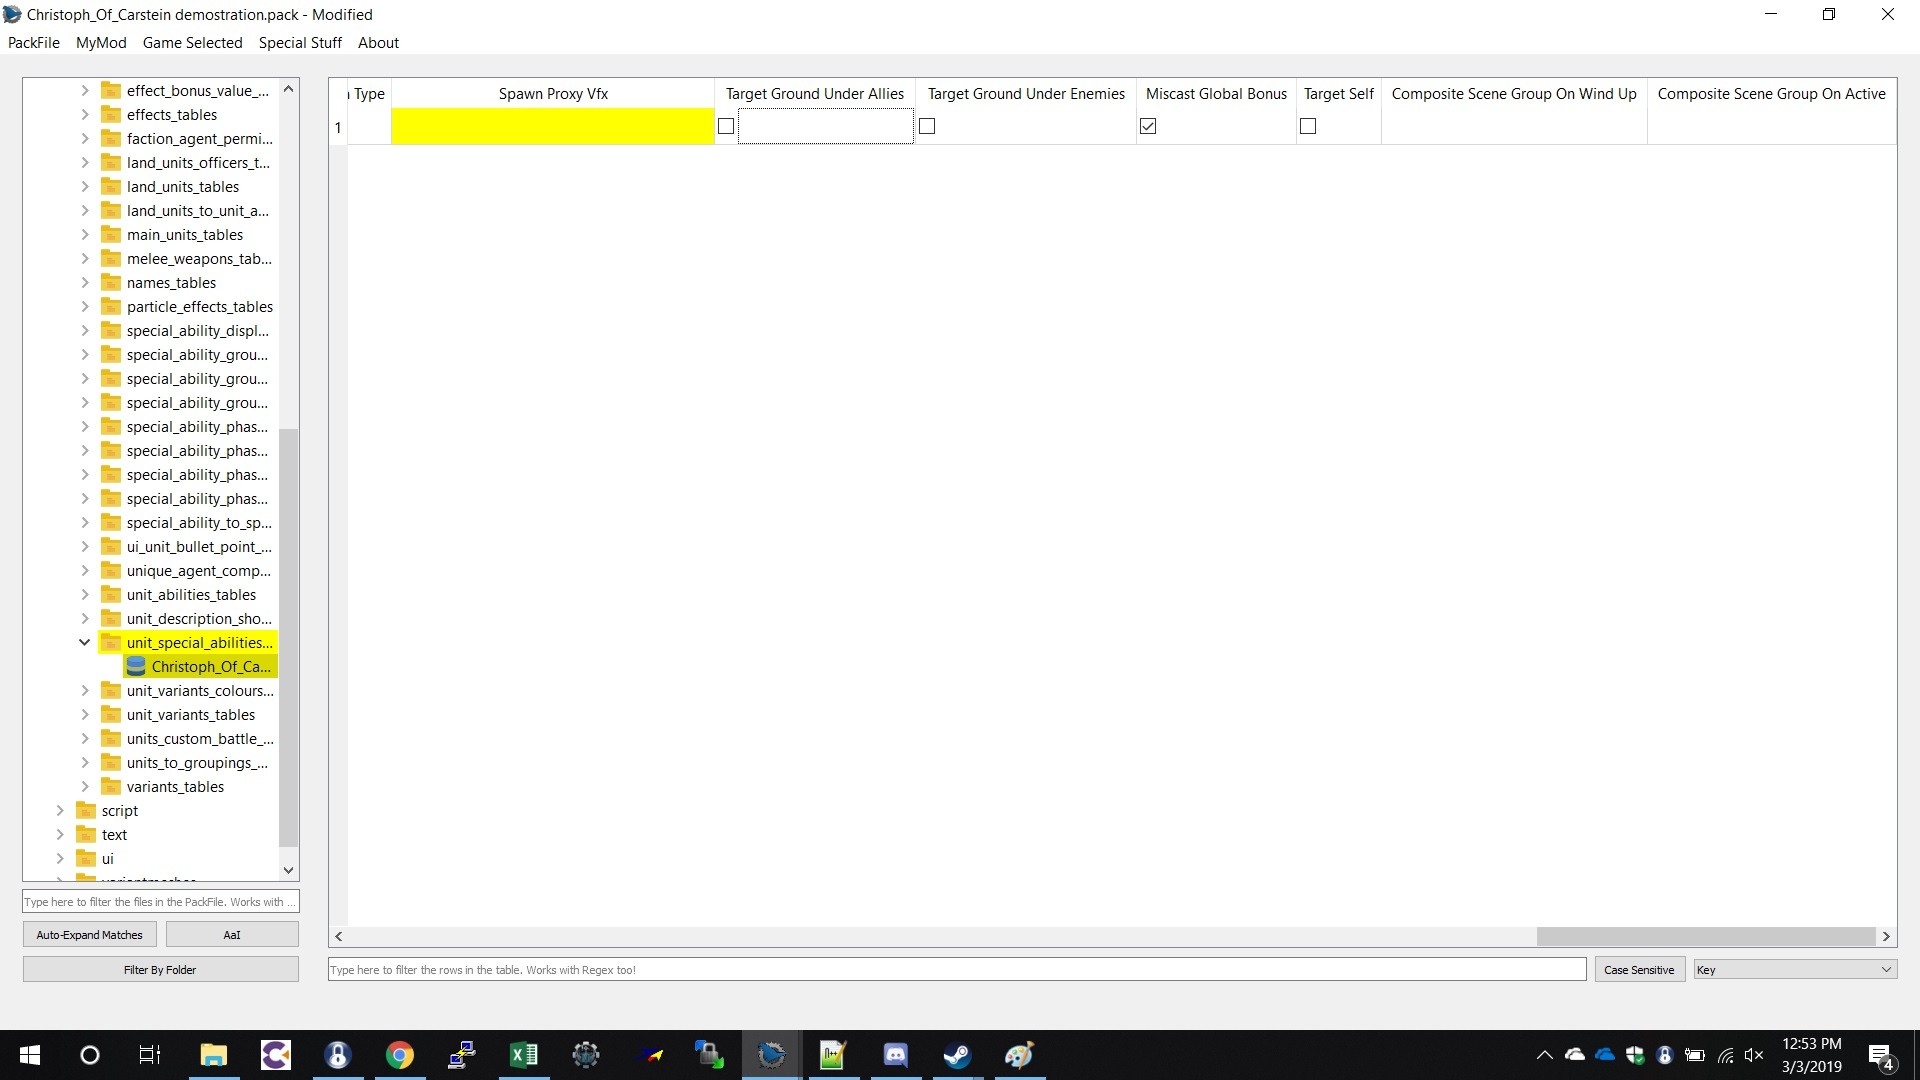
Ok now we have the right tables to create a new spell and custom effect to go with it. starting with the unit_special_abilities_tables create something that looks like this – | |||
[[File:animations_effects_19.jpeg|400px]] | |||
[[File:animations_effects_20.jpeg|400px]] | |||
[[File:animations_effects_21.jpeg|400px]] | |||
[[File:animations_effects_22.jpeg|400px]] | |||
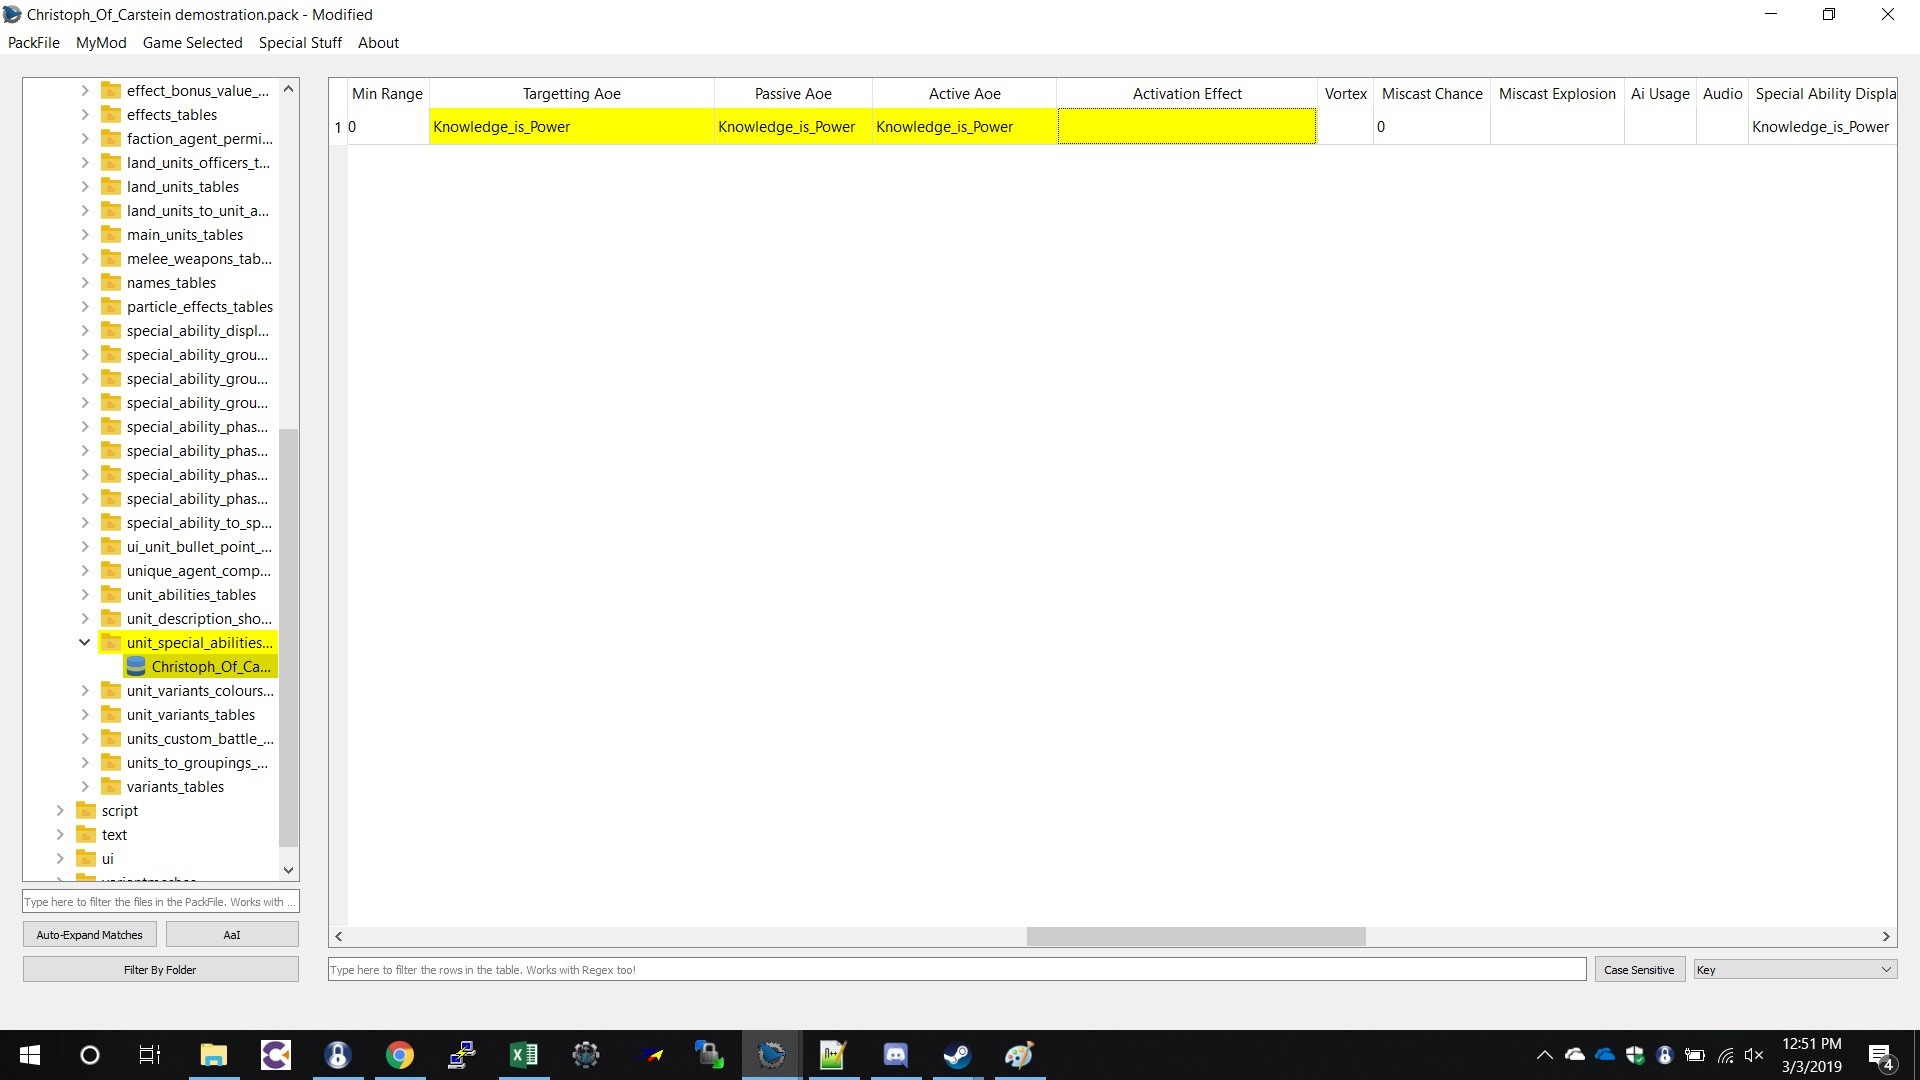
ok great! now you have a passive ability, the part we are really focused on are the Targetting Aoe, Passive Aoe, and Active Aoe located in pic number 3, highlighted in yellow, name these whatever you like but to keep it simple names it the same as my ability. | |||
Now go ahead and fill in the unit_abilities_tables, special_ability_to_special_ability_phase_junctions_tables as these are as you would usually make a passive spell or ability (if you dont know how copy a vanilla one and change the name) | |||
great! next is special_ability_phases_tables which there is nothing in here that effects the glows but I just wanted to make sure you have the duration set to -1 because we obviously dont want it to end our effect. | |||
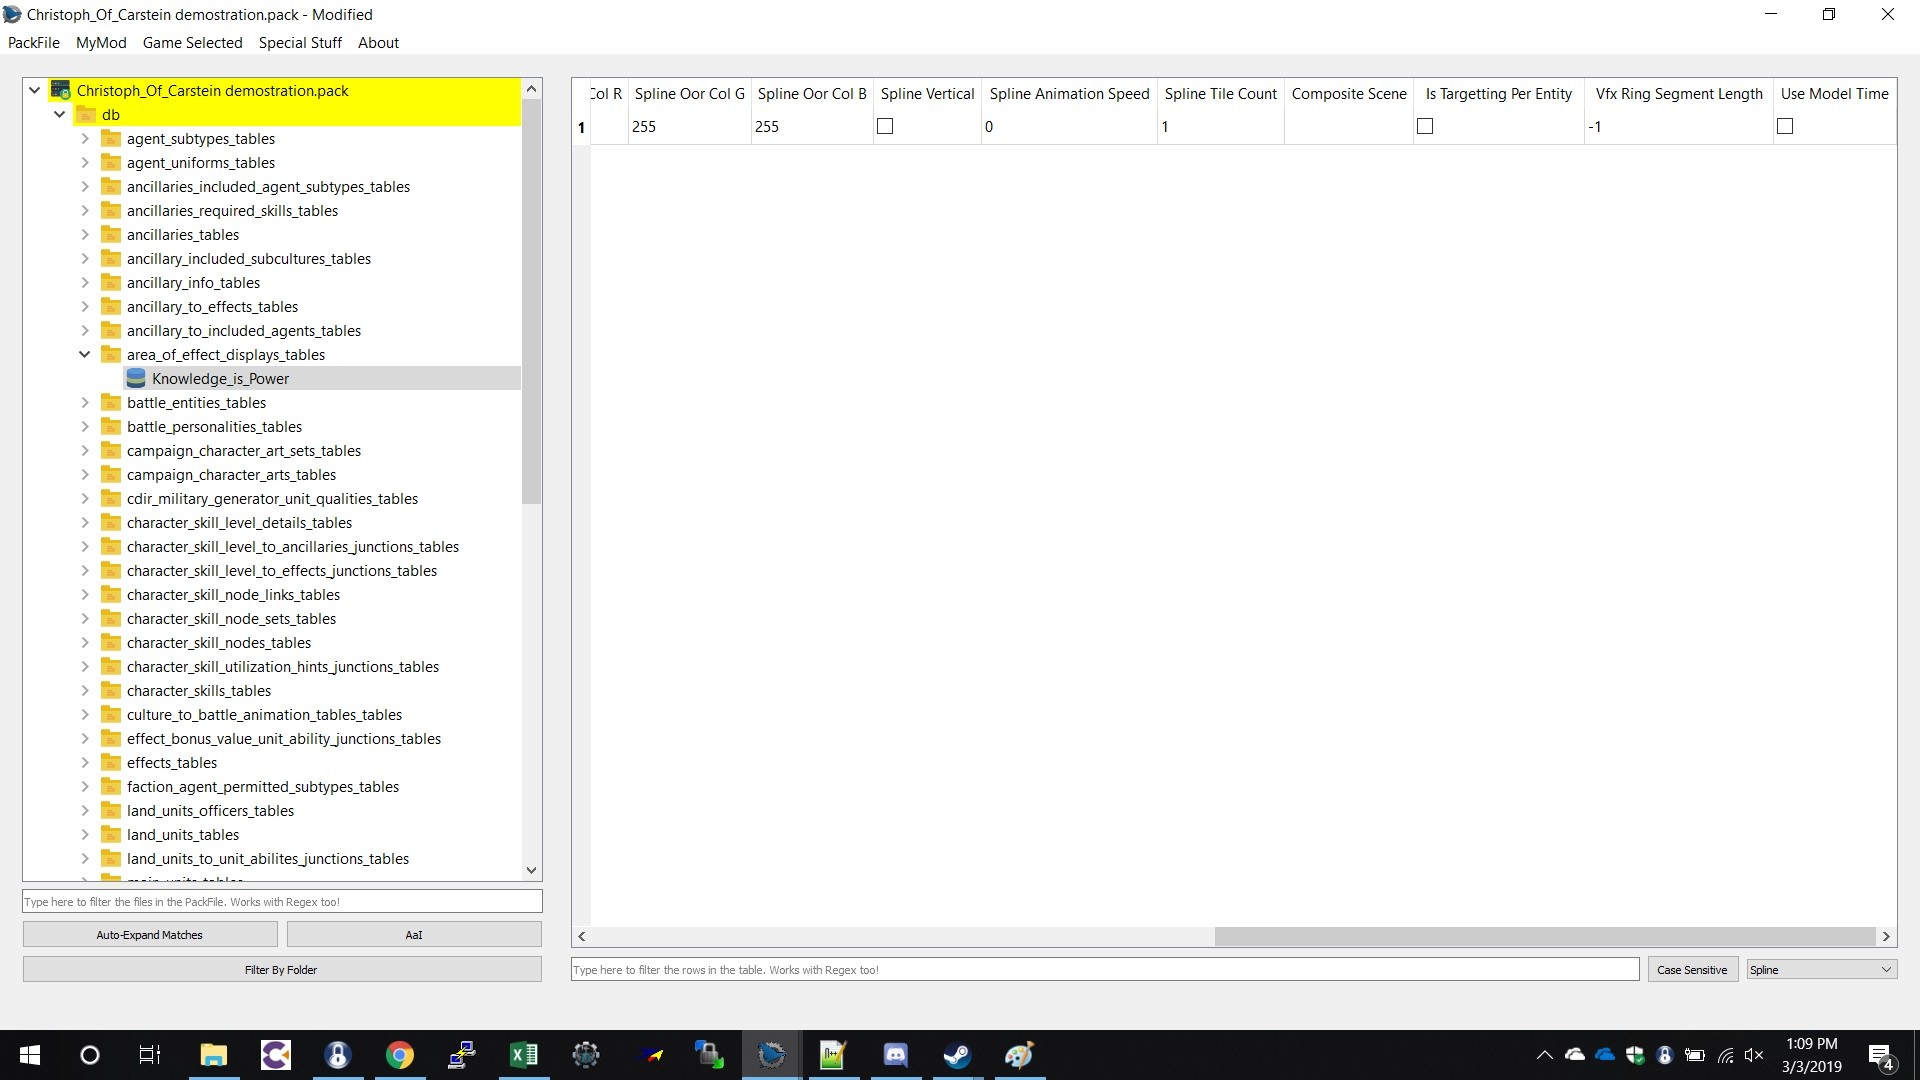
Now to area_of_effect_displays_tables this relates to these tables Targetting Aoe, Passive | |||
Aoe, and Active Aoe which means you have to have the same key as you used in these columns, should look something like this – | |||
[[File:animations_effects_23.jpeg|400px]] | |||
the important columns in this table are Vfx Central and Vfx Ring which are a reference to particle_effects_tables I would recommend using a prefix of something that exists as it will make later edits easier the prefix I used was wh_main_light_cast_medium | |||
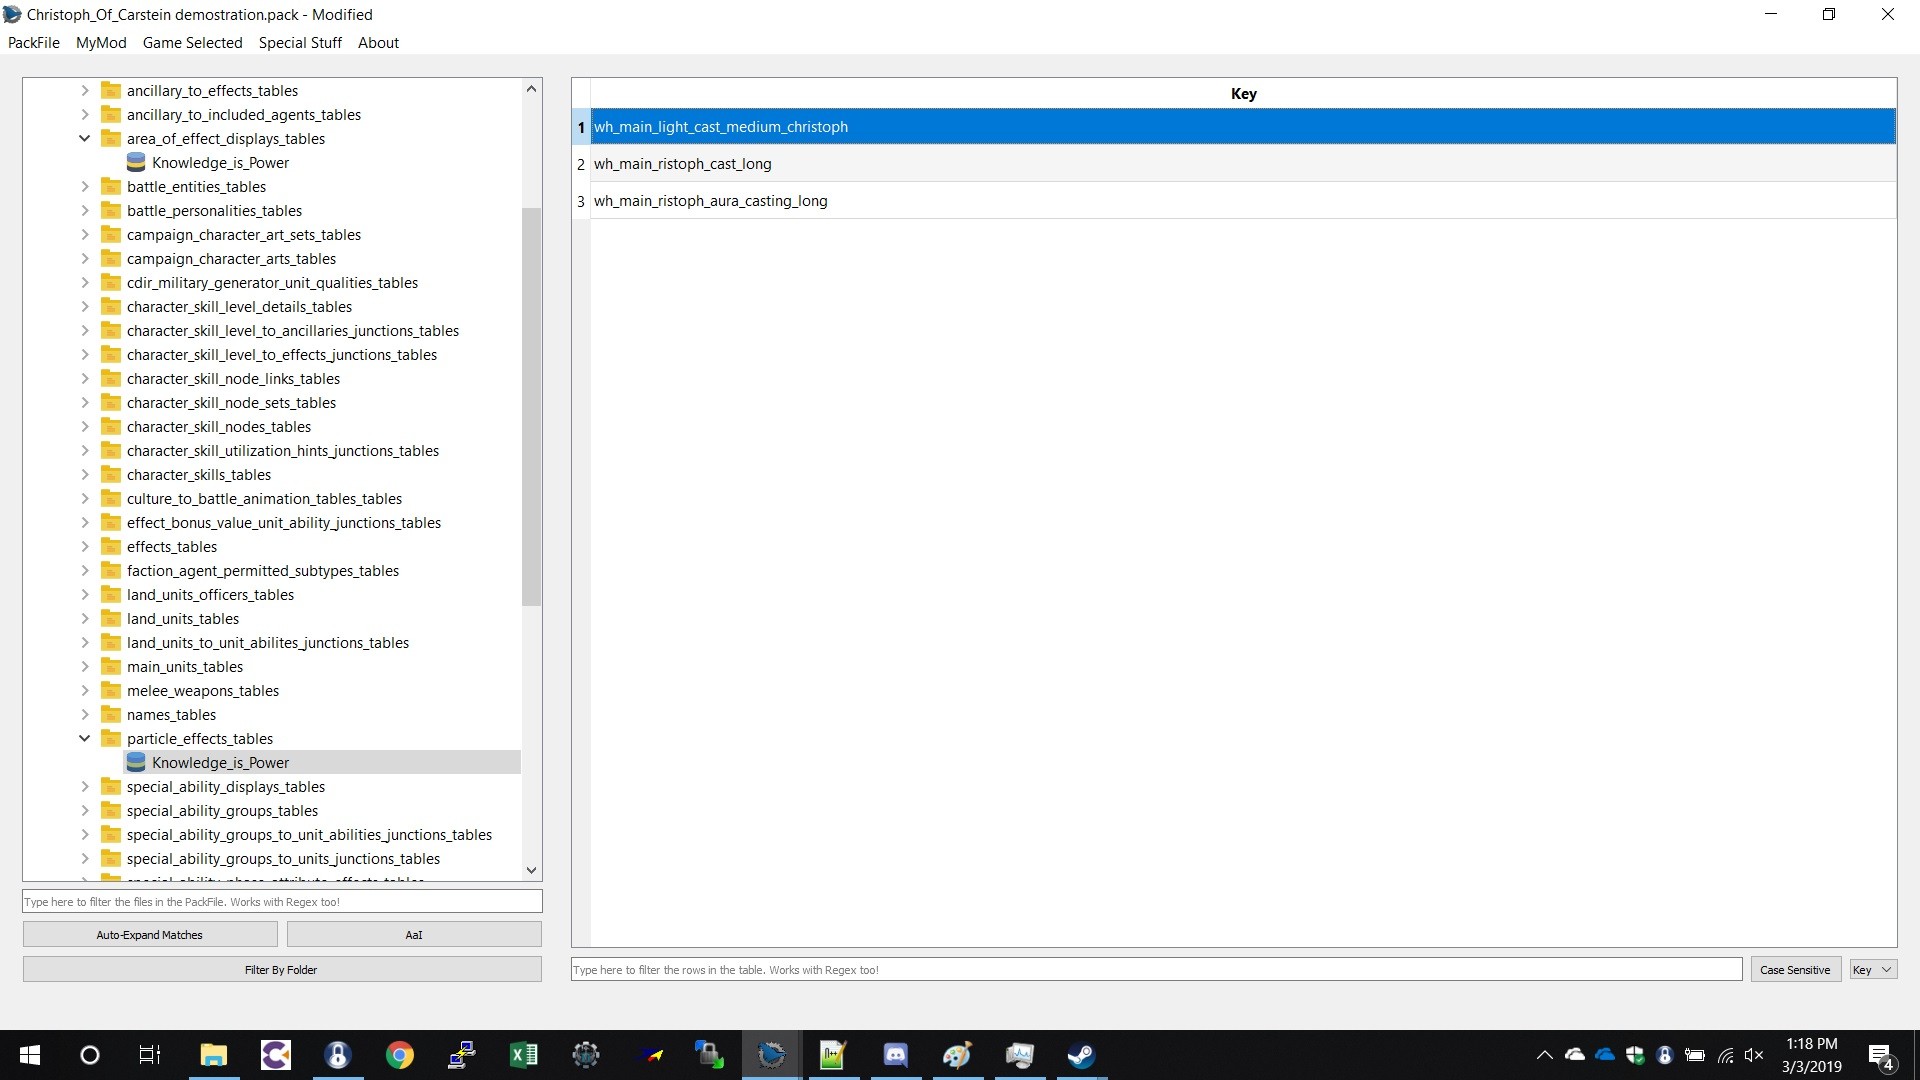
Ok last table particle_effects_tables its nice and simple looks like this – | |||
[[File:animations_effects_24.jpeg|400px]] | |||
looking only at the one highlighted in blue, notice how this matches the Vfx Central and Vfx Ring | |||
columns. | |||
so now we have to create a Vfx with that name. “ON TO THE NEXT SECTION!” | |||
== Creating a new Vfx == | |||
Now all the tables are in order we are going to get back into the Vfx files which I explained in Part 1 of this guide. | |||
So assuming you read that go ahead and extract a Vfx file of your choosing from the Vfx folder – looks like this | |||
[[File:animations_effects_25.jpeg|400px]] | |||
I recommend a casting Vfx as it has 2 effects, I used wh_main_light_cast_medium | |||
[[File:animations_effects_26.jpeg|400px]] | |||
Ok now open it in Notepad++ like we did before, looks something like this- | |||
which you guys have seen before and now know what to change to get your desired effects. now save the file not save as. Then find the file in “file explorer” and rename the file to match the | |||
particle_effects_tables in my case it was “wh_main_light_cast_medium_christoph”. | |||
Now as we did previously in part one of the guide, open/create an “MOV” pack or you can copy your other one and rename it if you dont know how, delete out the old files obvs. | |||
Insert your new “wh_main_light_cast_medium_christoph” file into this pack file as you did before following the file path you got it from. looks like this – | |||
[[File:animations_effects_27.jpeg|400px]] | |||
the one highlighted in blue, dont mind the others in there I will explain later. | |||
Now as we did in part one save this file to | |||
C:\Program Files (x86)\Steam\steamapps\common\Total War WARHAMMER II\data thats all for this section. | |||
== Limitations Of This Method == | |||
Go ahead and start up your mod and new effects. If it looks just as you wanted Great! You are good to go with your characters new Glows and Effects that no other character will have! As long as you only assign the Special ability to that char. | |||
……if anyone changed the location of the effect in the previous Notpad++ section you will probably have a bug that looks like this – | |||
[[File:animations_effects_28.jpeg|400px]] | |||
the effect is only associated with the center of the character, it does not rotate with him. | |||
There is a fix for this but it presents the same issue we had before, another character in the game uses the same animation. | |||
If you dont mind this bug and you are happy that it does not effect any other unit in the game then you are Done! whoo! But for those who cant stand this lets find a fix. | |||
== Editing Animation files == | |||
Here we are going to get Knee deep into animations, as I mentioned at the start of this guide its not possible for us to edit animation files which we previously thought limited us to only being able to use | |||
characters/animations with an effect assigned to them. This not completely true and I am going to show you how. | |||
We are going to use a mage model as its the one I am working with at the moment and the first I have got to work this way. | |||
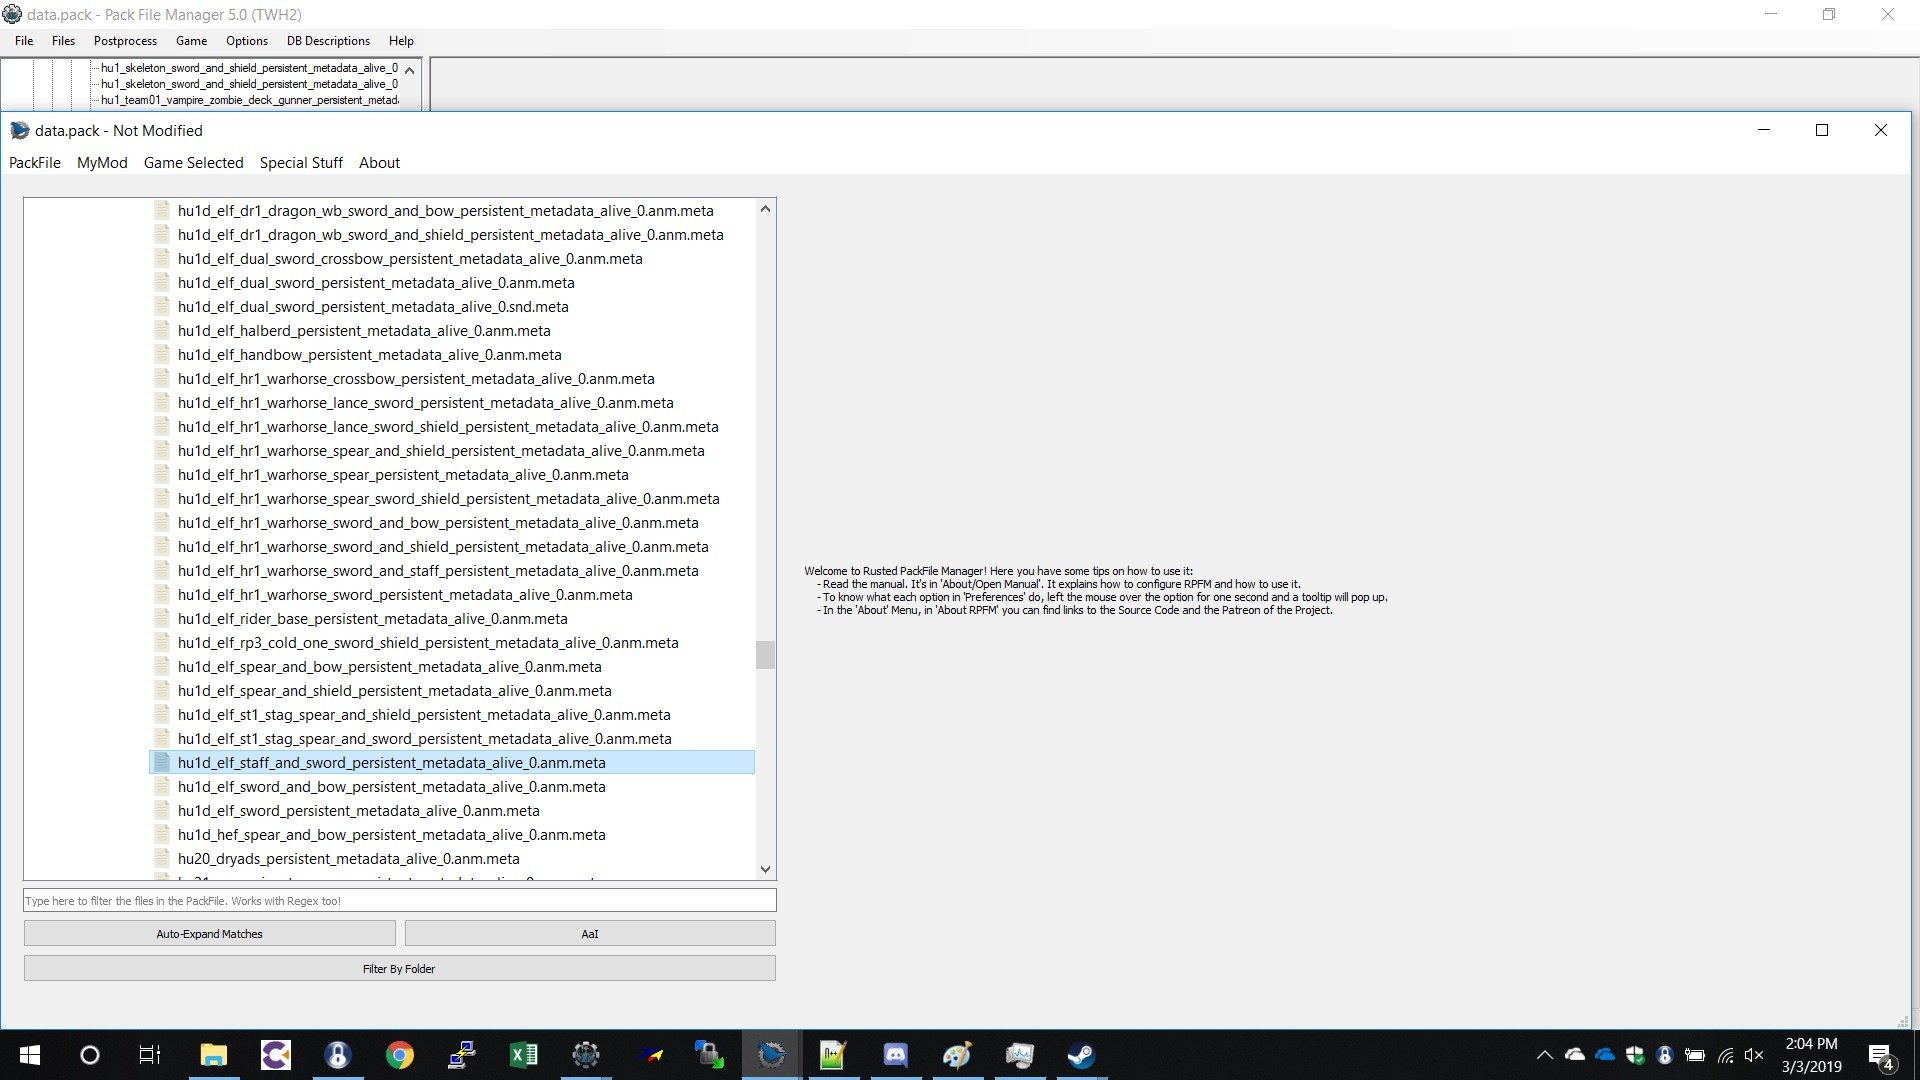
If we look into the “unit_special_abilities_tables” there is a column called wind up stance, as we all know when a mage/wizard character in the game casts a spell it uses an animation that gives it glows and effects that move with the character, we are going to take this animation and give it to our character as a constant effect not just for that short spell cast time. | |||
Start by finding your characters animation in data / animations / battle / persistent like we did in part 1 of the guide, looks like this – | |||
[[File:animations_effects_29.jpeg|400px]] | |||
We are going to be using teclis animation, go ahead an extract this file, be sure to use the right file path, as we are going to put it back in later. | |||
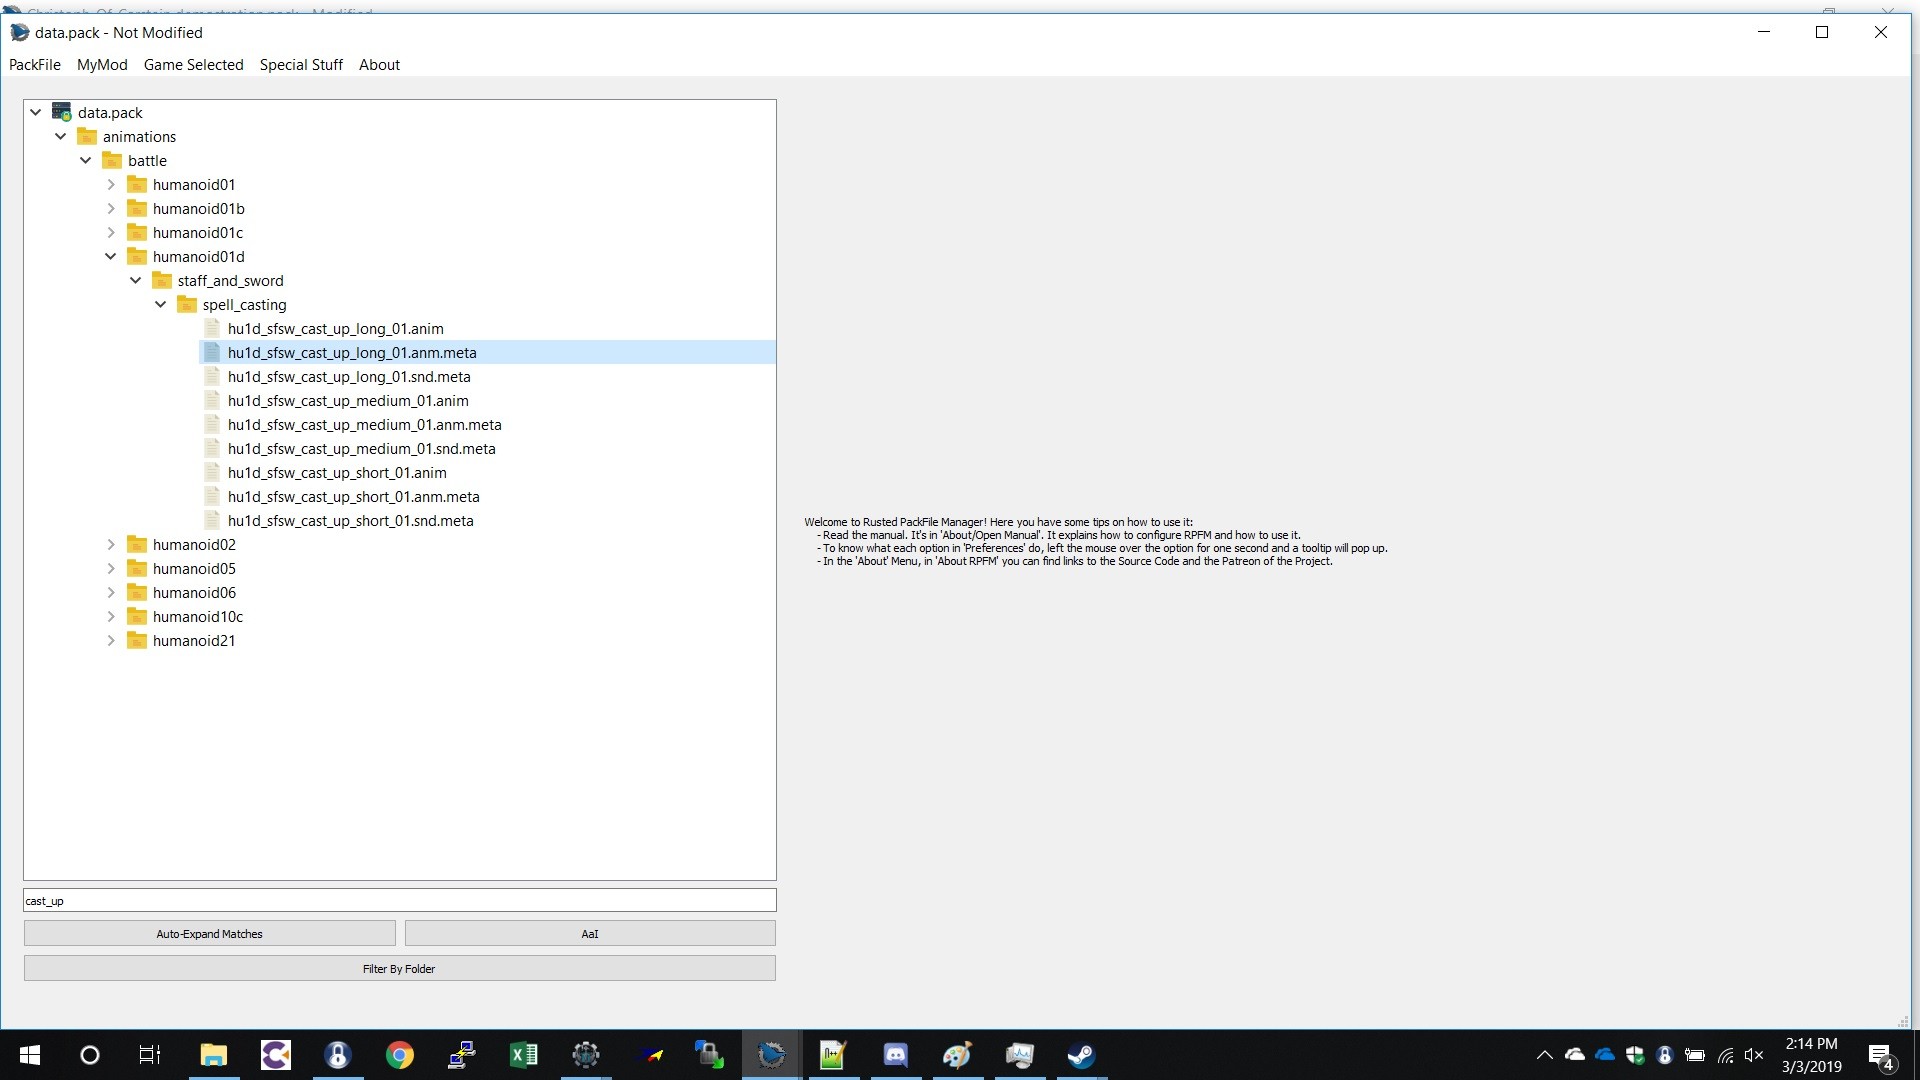
Now we are going to need to find out where the casting animation is for teclis that gives him the glows when he casts a spell. The way I did this was to go to “unit_special_abilities_tables” then column “wind up stance” which said “cast_up_long” and searched it in RPFM this will give you all the animations that use this. looks like this – | |||
[[File:animations_effects_30.jpeg|400px]] | |||
I new it would be i the file location of “humaniod01d” as this is an elf animation, so for your relevant animation you will find the one you need in that file. | |||
Go ahead and extract the file that has “anim.meta” as this is the same file type as the one in the persistent file location that we extracted earlier. | |||
To the editing section! | |||
== Getting into it == | |||
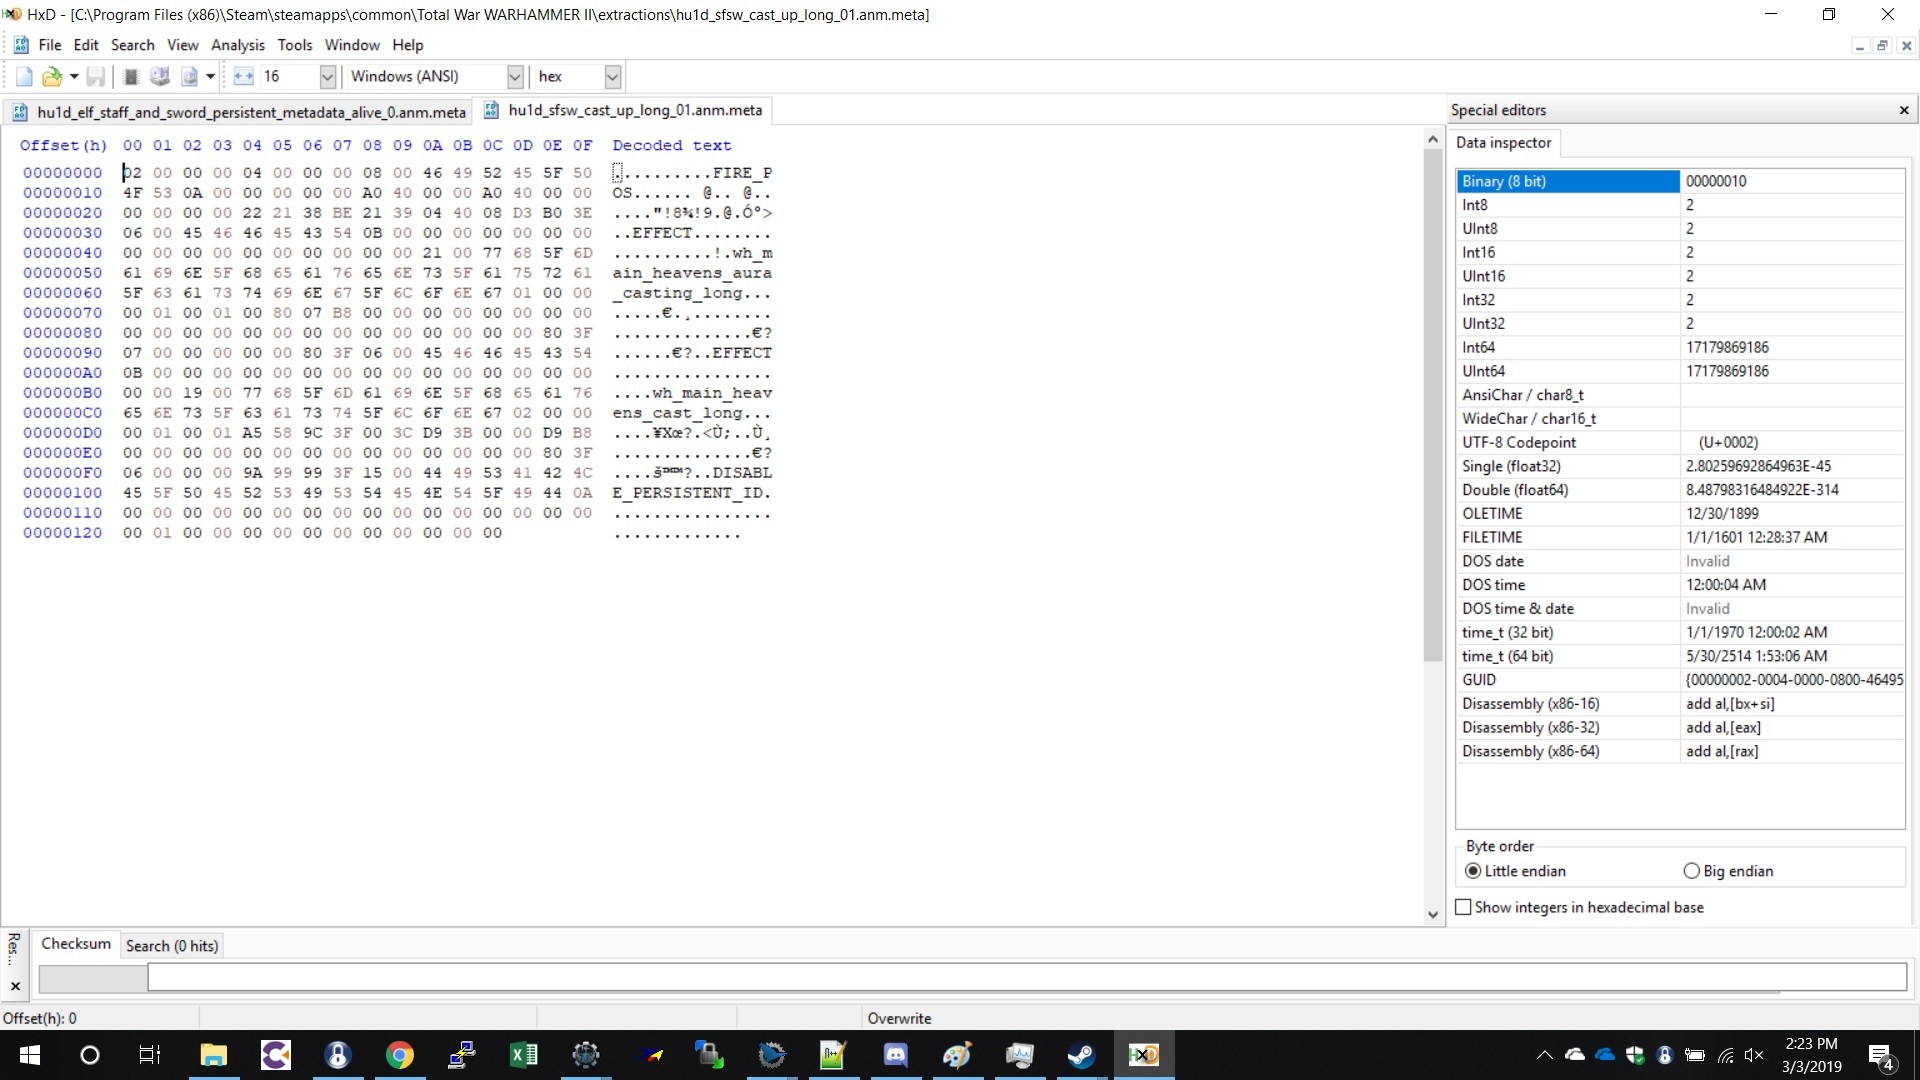
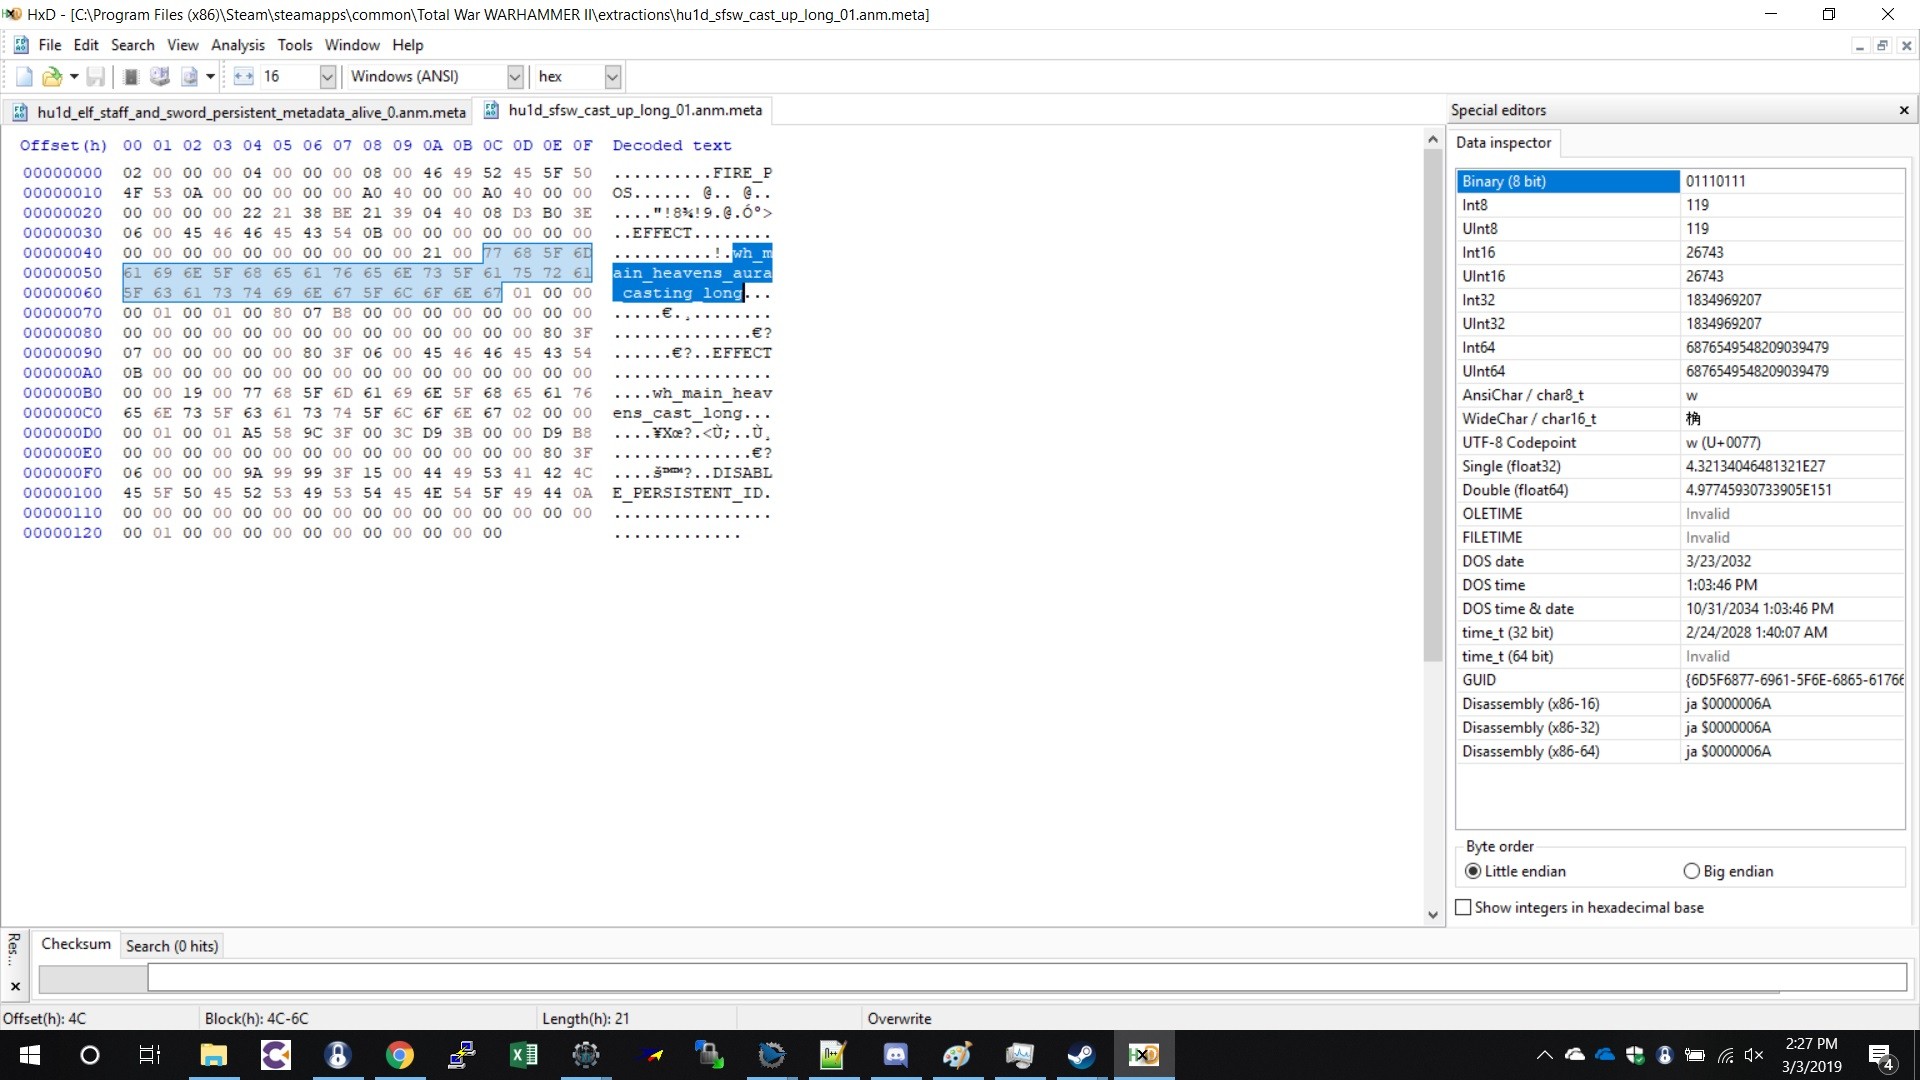
Here we are going to open up the file we just extracted, the hu1d_sfsw_cast_up_long_01.anm in HXD | |||
[[File:animations_effects_31.jpeg|400px]] | |||
[[File:animations_effects_32.jpeg|400px]] | |||
[[File:animations_effects_33.jpeg|400px]] | |||
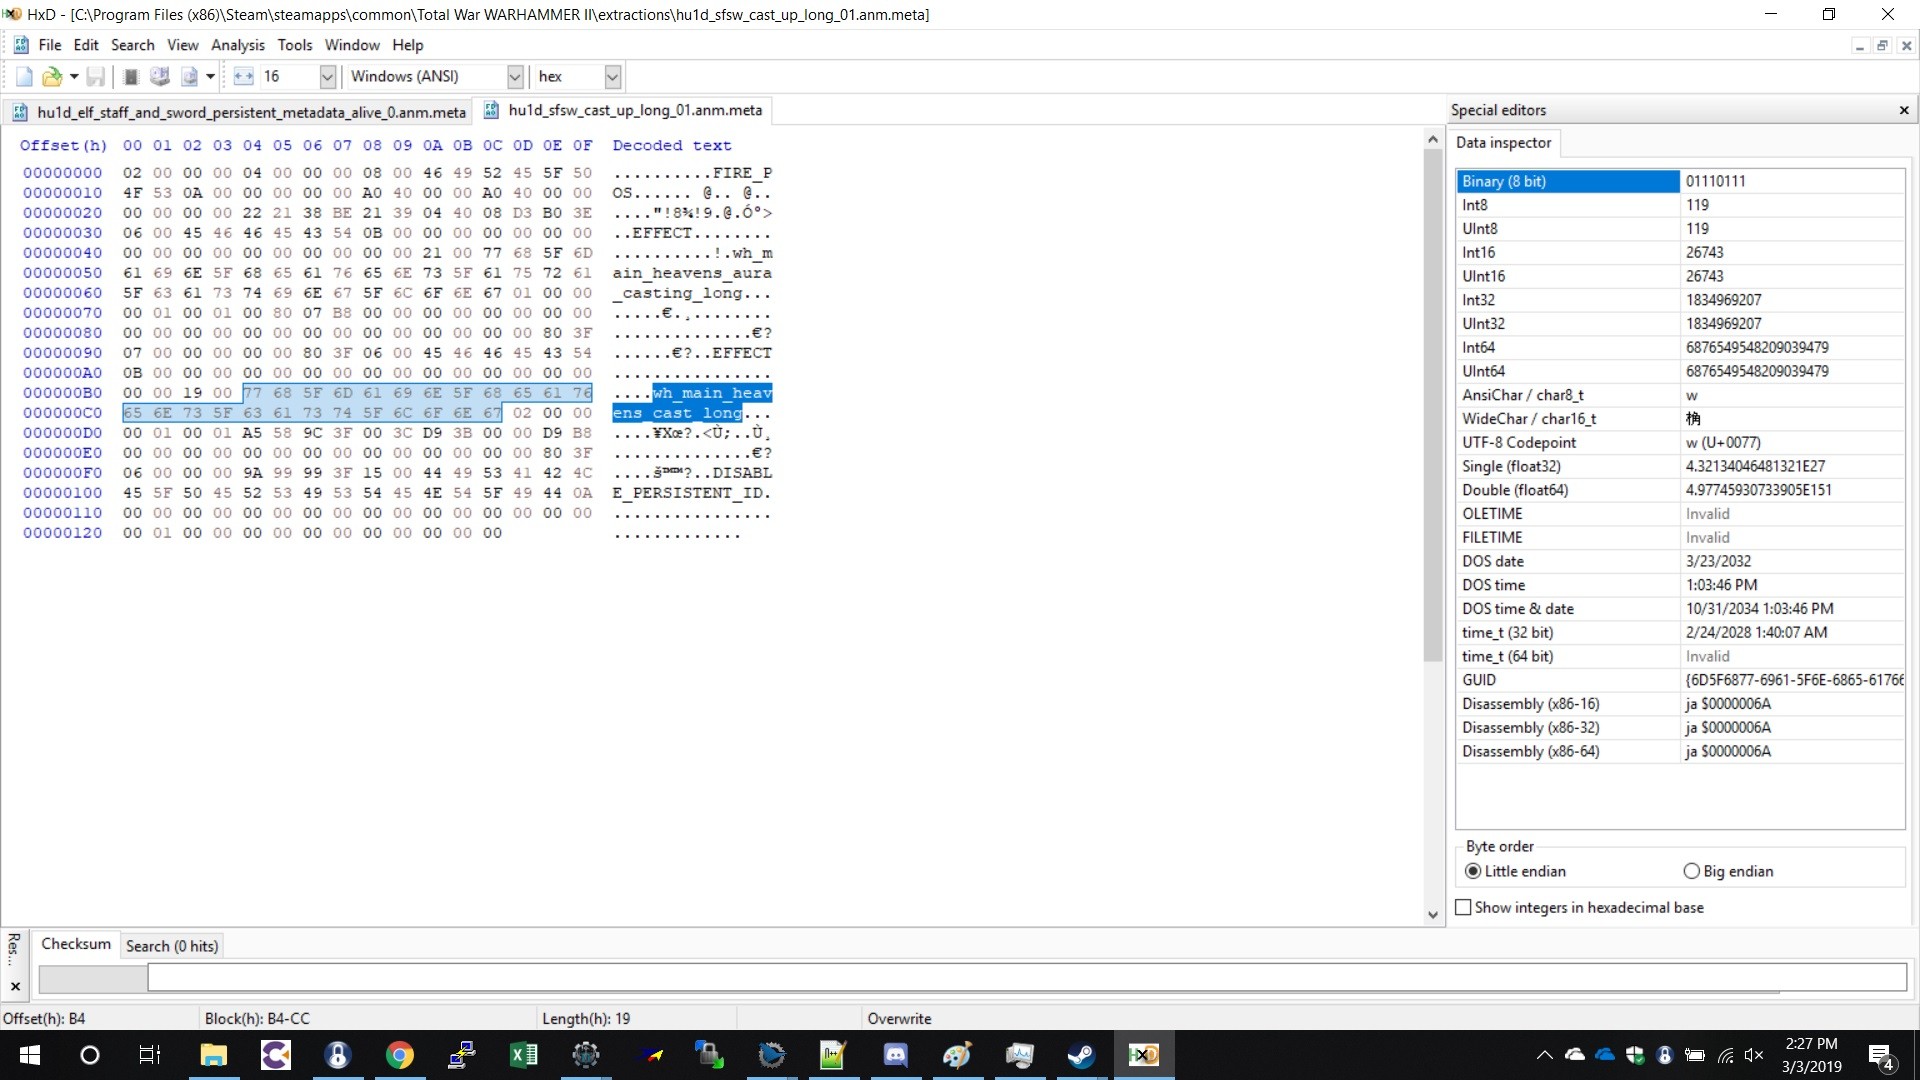
so now you have the file that gives the glows we can give it our own custom glows buy changing the | |||
name of the glow effects (highlighted in blue) within this file as we did before in part one, however this time you can call it whatever you like but | |||
= DO NOT CHANGE THE FILE SIZE = | |||
Looks like this – | |||
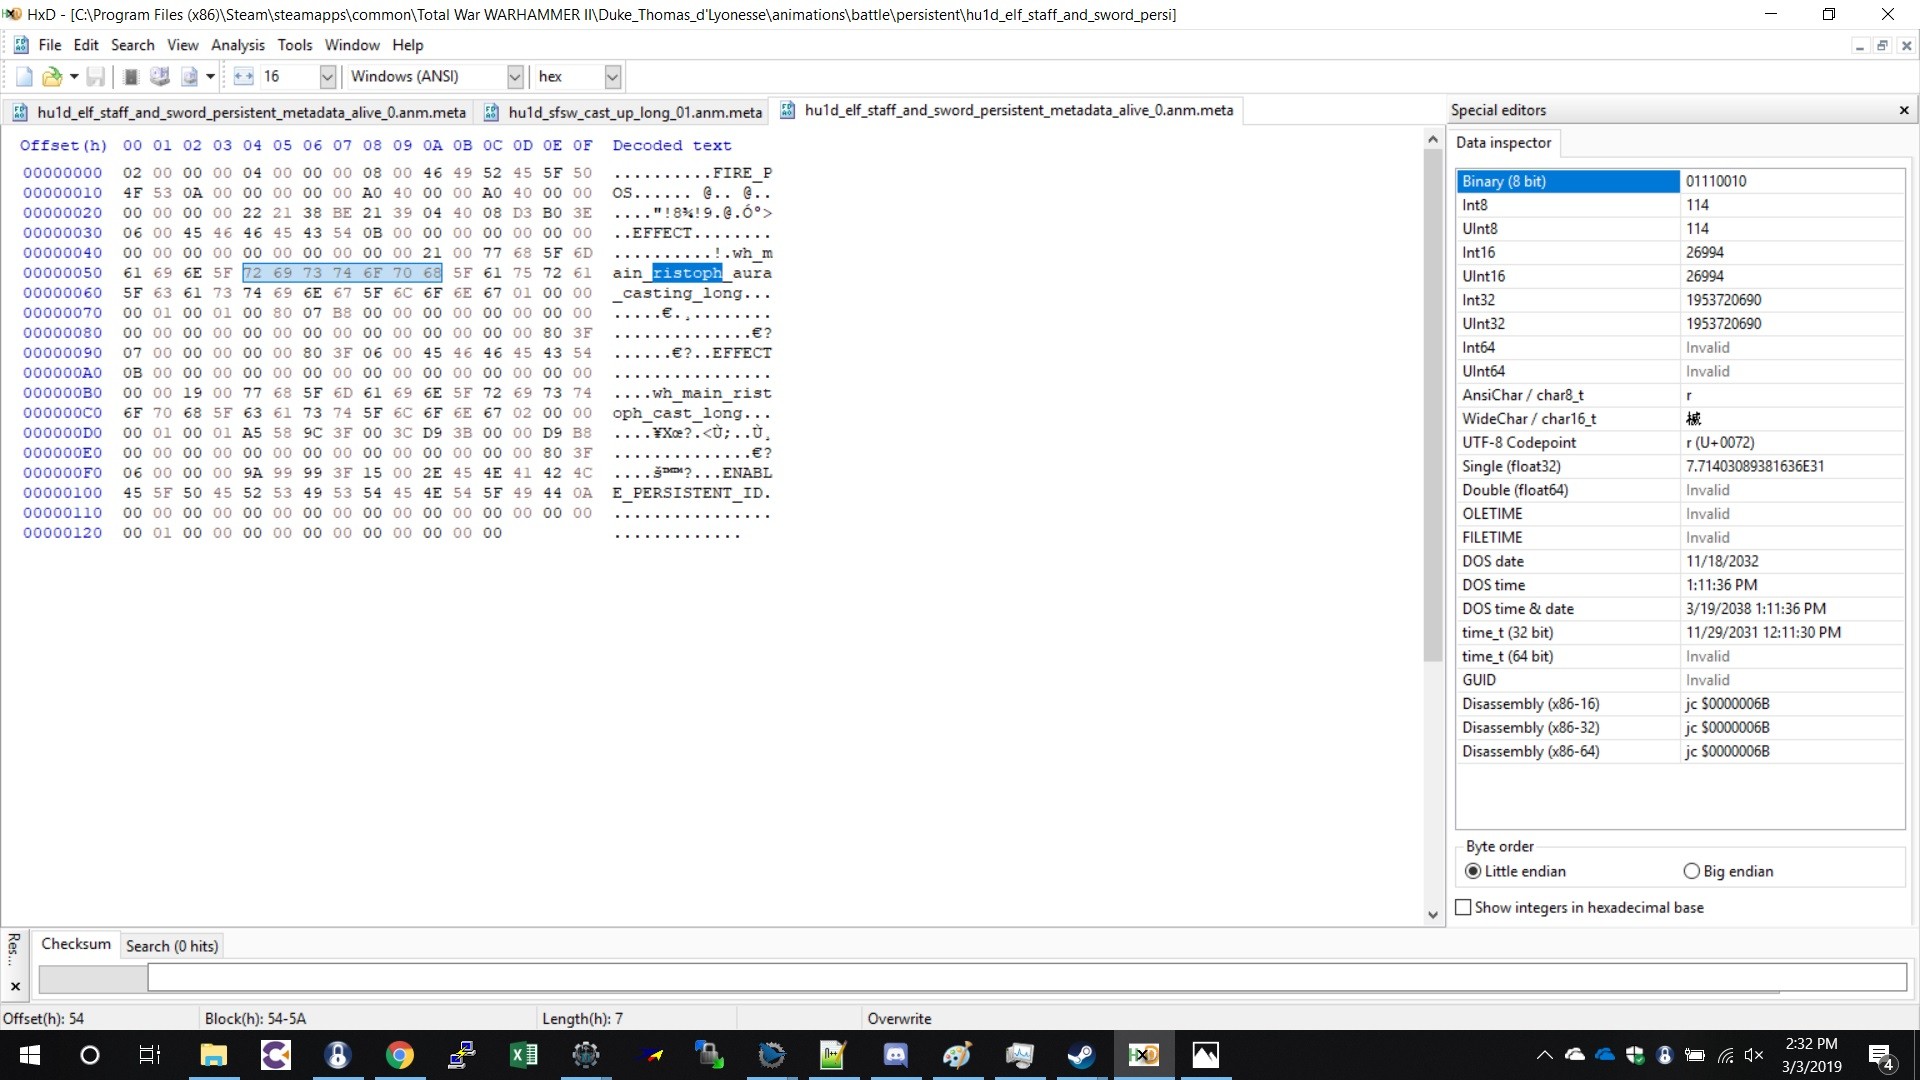
[[File:animations_effects_34.jpeg|400px]] | |||
notivce how i took out the work ''heavens'' and replaced with ''ristoph'' both are 7 letters long so no change of file size, go ahead and save this file. | |||
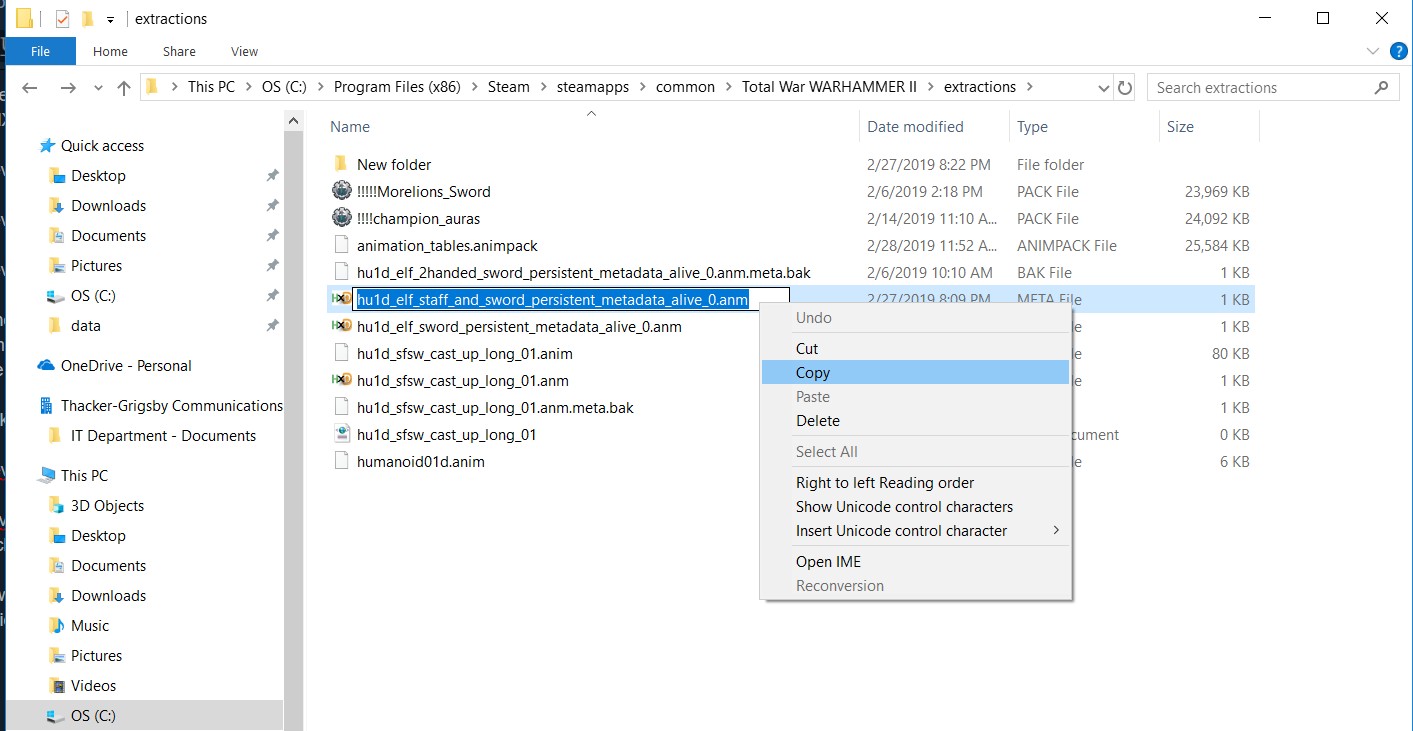
Now we are going to take the file name of the animation found in battle/persistent/ that we extracted earlier | |||
[[File:animations_effects_35.jpeg|400px]] | |||
copy it and then go to the file location of the casting animation hu1d_sfsw_cast_up_long_01.anm | |||
and rename to match. | |||
now copy this file that is renamed to hu1d_elf_staff_and_sword_persistent_metadata_alive_0.anm | |||
and paste into the original file location which is | |||
C:\Program Files (x86)\Steam\steamapps\common\Total War WARHAMMER II\Duke_Thomas_d’Lyonesse\animations\battle\persistent | |||
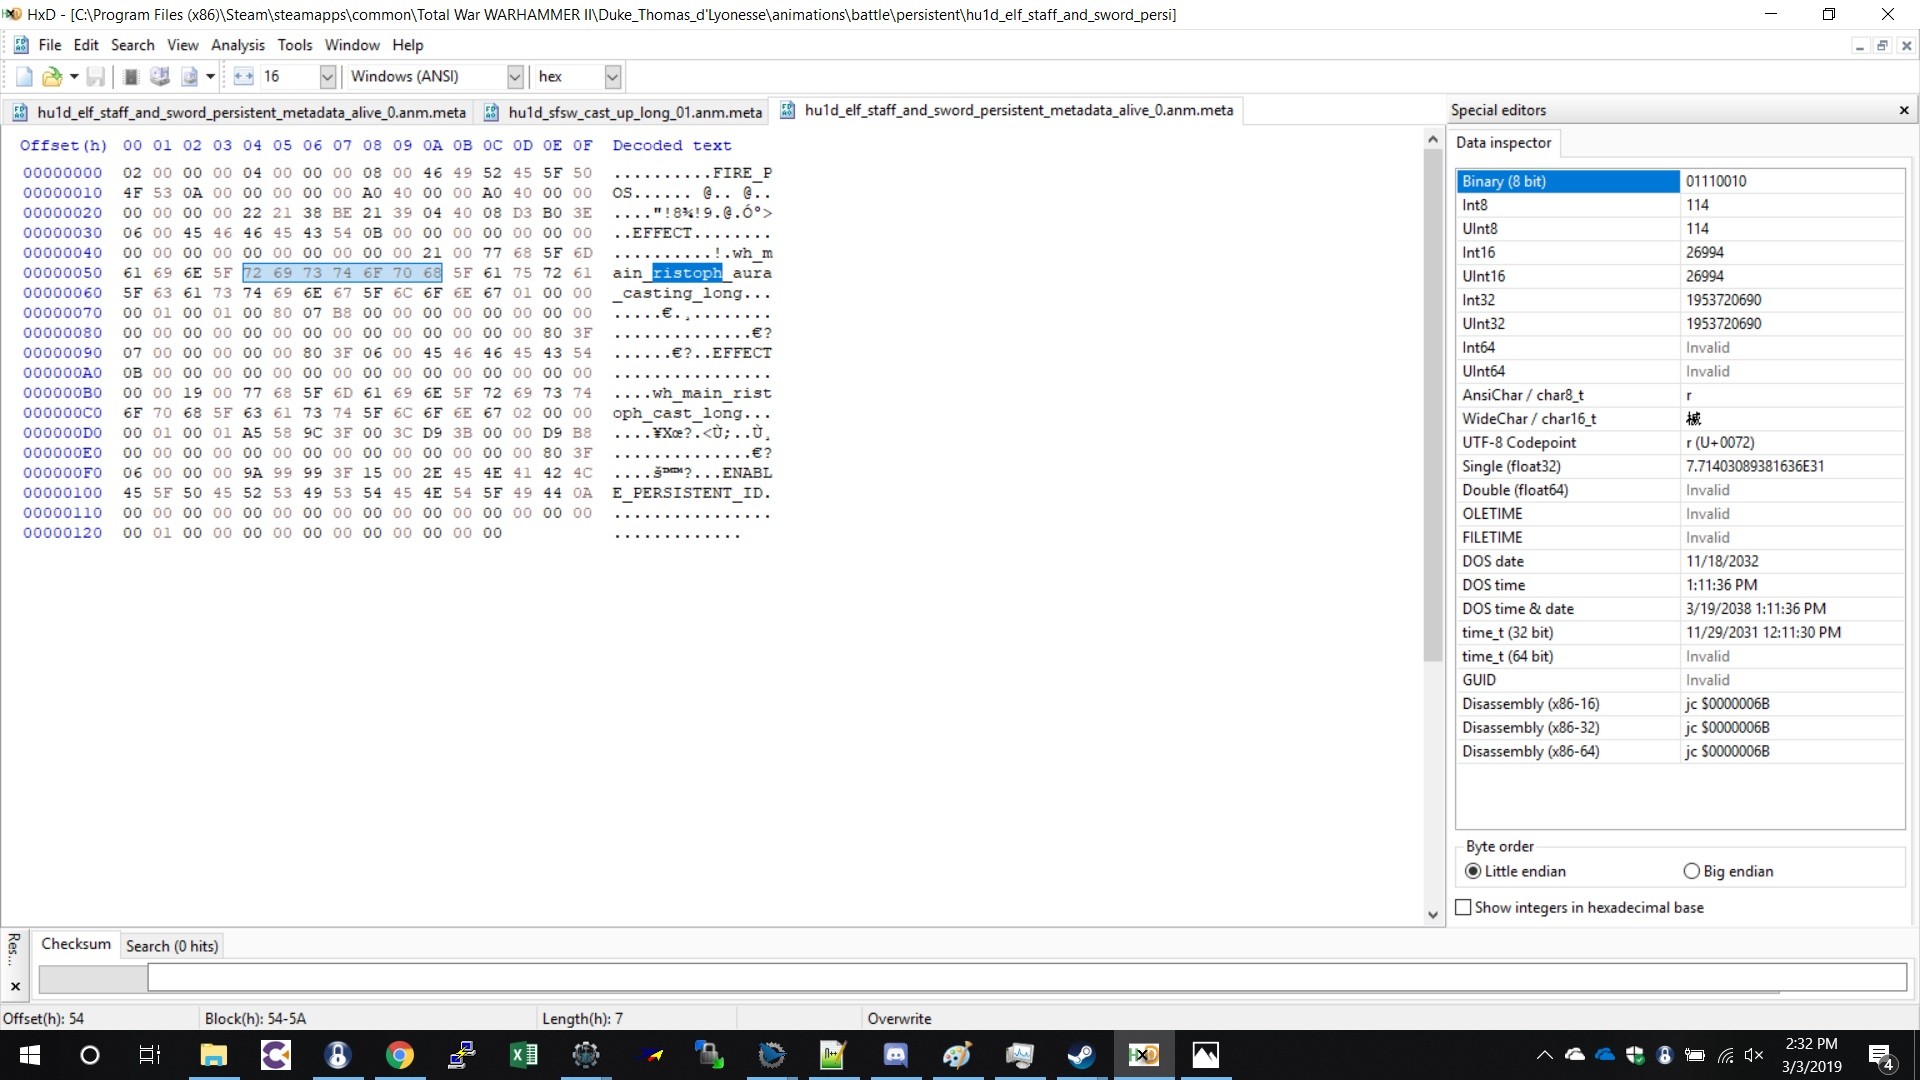
which should replace the old one, do not keep both! now if you open this file it should be the casting animation that you just edited. this one – | |||
[[File:animations_effects_36.jpeg|400px]] | |||
but this time it has different file name. | |||
Nearly done! | |||
So we changed the names of the glow effects earlier but they dont exist yet, so to make it simple using the casting file we extracted earlier that we changed the name to “wh_main_light_cast_medium_christoph” | |||
simply create two new effects with the names you put into the HXD animation file earlier, you dont have to even edit the file in notepad++ if you dont want to change any of the glows. | |||
now you have to put your 2 new vfx files into your MOV mod along with the hu1d_elf_staff_and_sword_persistent_metadata_alive_0.anm animation, as always using the same file path. | |||
looks like this | |||
now the last part to it, put your new Vfx file names into the particle_effects_tables so that the game game find them. | |||
[[File:animations_effects_37.jpeg|400px]] | |||
Great now go ahead and save then start the mod, you should have a sweet new animation that moves with your mage character! | |||
May look a little something like this – | |||
[[File:animations_effects_38.jpeg|400px]] | |||
A downside to this is that now teclis also has this animation. | |||
== All I know so far == | |||
this is as far as I have got and have not tried with any other character animations, I imagine you could use a similar technique to make it work though. | |||
Hope you enjoyed the guide and now have some epic new glows and effects on your characters. If anyone finds out something new, id love to know how you did it. | |||
Enjoy | |||
= Useful Tips = | |||
– do not use capital letters when renaming the files as vanilla does not. | |||
-NEW find, if you assign your VFX using “special_ability_phase_displays_tables” it will stop during a pause game (better for screenshots) also this method can work for whole units not just single entities. | |||
-you can also edit the projectile VFX using the same methods shown here, this means that you can change the color of spells but also you can add new effects to them. | |||
-not all VFX files will work with what you are trying to achieve, pick ones that are in a similar class to the effect you are trying to achieve. | |||
-you can add as many custom glows and effects to a unit as you like using the spells/abilities method, it does not limit you to 1 VFX file. Also for those who can write XML or are willing to give it a try, you can actually add as many emitters to a single file as you like, as long as you reference the lib file before the emitters that you want. | |||
Ok found an easier way to add a VFX to a unit, go to “battle_entities_tables” find the column “aura vfx” put the name of your VFX file here and also in “particle_effects_tables” and voila | |||
[[Category:Tutorial to Normal]] | |||
[[Category:Needs Review]] | |||
[[Category:Needs Formatting]] | |||
Latest revision as of 17:54, 7 February 2021
Have you ever wanted to change the color of a glow or give a custom unit an epic lighting effect like other units in the game? well look no further, this guide aims to shed some light on editing some anim.meta files and vfx files, how to take an existing animation and change not only its color but also to a completely different effect, from fire to lightning etc.
This guide assumes you know the basics about modding using PFM and creating your own units, if you dont look up “sebidee modding guide”
Getting Started
T hings you will need
PFM (this is the one I used in the guide but is now old use RPFM if possible) https://sourceforge.net/projects/packfilemanager/
RPFM (RECOMMENDED)
https://github.com/Frodo45127/rpfm/releases/tag/v1.4.1
notepad++
https://notepad-plus-plus.org/download/v7.6.2.html
Hxd
https://mh-nexus.de/en/downloads.php?product=HxD (pick your lanugauge)
Now we are ready to turn water into wine and fire into lightning.
please skip ahead to section 2 of the guide for the latest way of editing glows and effects
I have left the first section of the guide in as some people may still want to only change glows associated with animations.
Finding The Information
To start I am going to assume you have a character in mind that you have made or seen that you would like to edit.
In PFM locate your “land_units_tables” and find the “man_animation” column
here you can see this unit is using the “hu1_empire_hr1_warhorse_sword_and_shield_gk” which is the green knights animation
you have to pick animations that already have a VFX attatched to them as we, as of right now cannot edit anim.meta files enough to give any animation a glow effect. Perhaps in the future and if so I will update the guide.
so with this in mind we go to the next step which is to find the anim.meta file itself, which is located in PFM / data / animations / battle
in here are all the animations for battle, the ones we want are located in PFM / data / animations / battle / persistent
locate your animatoin file in this case because our unit is using the green knights animation we want to extract “hu1_green_knight_vfx_persistent_metadata_alive_0.anm.meta”
to do this simply highlight the file and right click extract/extract selected
Now to look inside this file for the information we want
To find this file you just extracted go to
C:\Program Files (x86)\Steam\steamapps\common\Total War WARHAMMER II\Duke_Thomas_d’Lyonesse\animations\battle\persistent
where mine says Duke_Thomas_d’Lyonesse this will be your mod name.
ok location of the file complete, now open it with Hxd (or notpad++ both work but hxd is better for later use)
as you can see the this now tells us that the vfx file we need that is associated with this animation is “wh_dlc05_green_knight_mist”
So now we know the name of the VFX file we can locate it in PFM found at
data/vfx
yup a long list, thats why its best to find what you need first. scroll down until you find
wh_dlc05_green_knight_mist.xml
now extract this file.
Great all our important info has been collected!
Editing the files
From here we want to locate our “wh_dlc05_green_knight_mist.xml” file in C:\Program Files (x86)\Steam\steamapps\common\Total War WARHAMMER II\Duke_Thomas_d’Lyonesse\vfx
now open this file with notepad++
dont fret its not all doom and gloom from here, its actaully pretty simple. so first, on the left you can see the name of the effect
this is where we pick which ones we want active, we do this by changing the true/false values, be sure to set the ones you dont want to false
so now we have set everything to “false” except “green_knight_mist” this means that this will be the only effect active.
now we want to change the colour of the mist, we do this by editing the RGBA values what is this I hear? simple R-red G-green B-blue A-alpha (alpha is like opacity)
the range of RED,GREEN and BLUE – is 0 = Black and 2=white/color (now these vary according to effect so a little trial and error)
So I want to make the “Green knight” the “Black Knight”
to do this we simply set all the values in this row to “0.00” but not the Alpha Value, as black does not show so well we will set the Alpha-min value to “3.00” and the max Alpha to “5.00” (alpha values can be the same)
this would create a black mist, if we wanted a red mist we would set all the R values to somewhere between “0.01”-“2.50” so on and so forth for Green and Blue.
now we have ourselves a black mist we want to put it back into the game. first thing is east just hit “save”
DO NOT CHANGE THE FILE NAME OR TYPE
Now you are going to need a movie mod file. here’s one I made earlier as we no longer require 2
files. you can use my template or using your existing mod change the file type to “movie” you do this under file/change file type/movie
https://drive.google.com/file/d/15kMrHUpH39l19agMCdsbUW_gU6yeetzR/view?usp=sharing dowload this file to this location as its an “mov” file
C:\Program Files (x86)\Steam\steamapps\common\Total War WARHAMMER II\data
(be sure to delete the “hu1_green_knight_vfx_persistent_metadata_alive_0.anm.meta” and “wh_dlc05_green_knight_mist.xml” files as yours will not upload if you do not do this, I left mine in so you can see what it looks like)
you should be able to see something that looks like this
great! now simple just insert your new vfx file “wh_dlc05_green_knight_mist.xml”
should have been located in the same file it came from
C:\Program Files (x86)\Steam\steamapps\common\Total War WARHAMMER II\Duke_Thomas_d’Lyonesse\vfx
otherwise it wont work.
if its not put the edited file in there then insert it into the mod. hit save and open the game see if it worked!
Editing The Choice Of Effects
But Shawmuscle what if I want lighting instead of a mist?
this follows alot of the same steps, remember when we opened the “hu1_green_knight_vfx_persistent_metadata_alive_0.anm.meta” with HXD this is why.
pro tip open this file using HXD, you should see something that looks like this
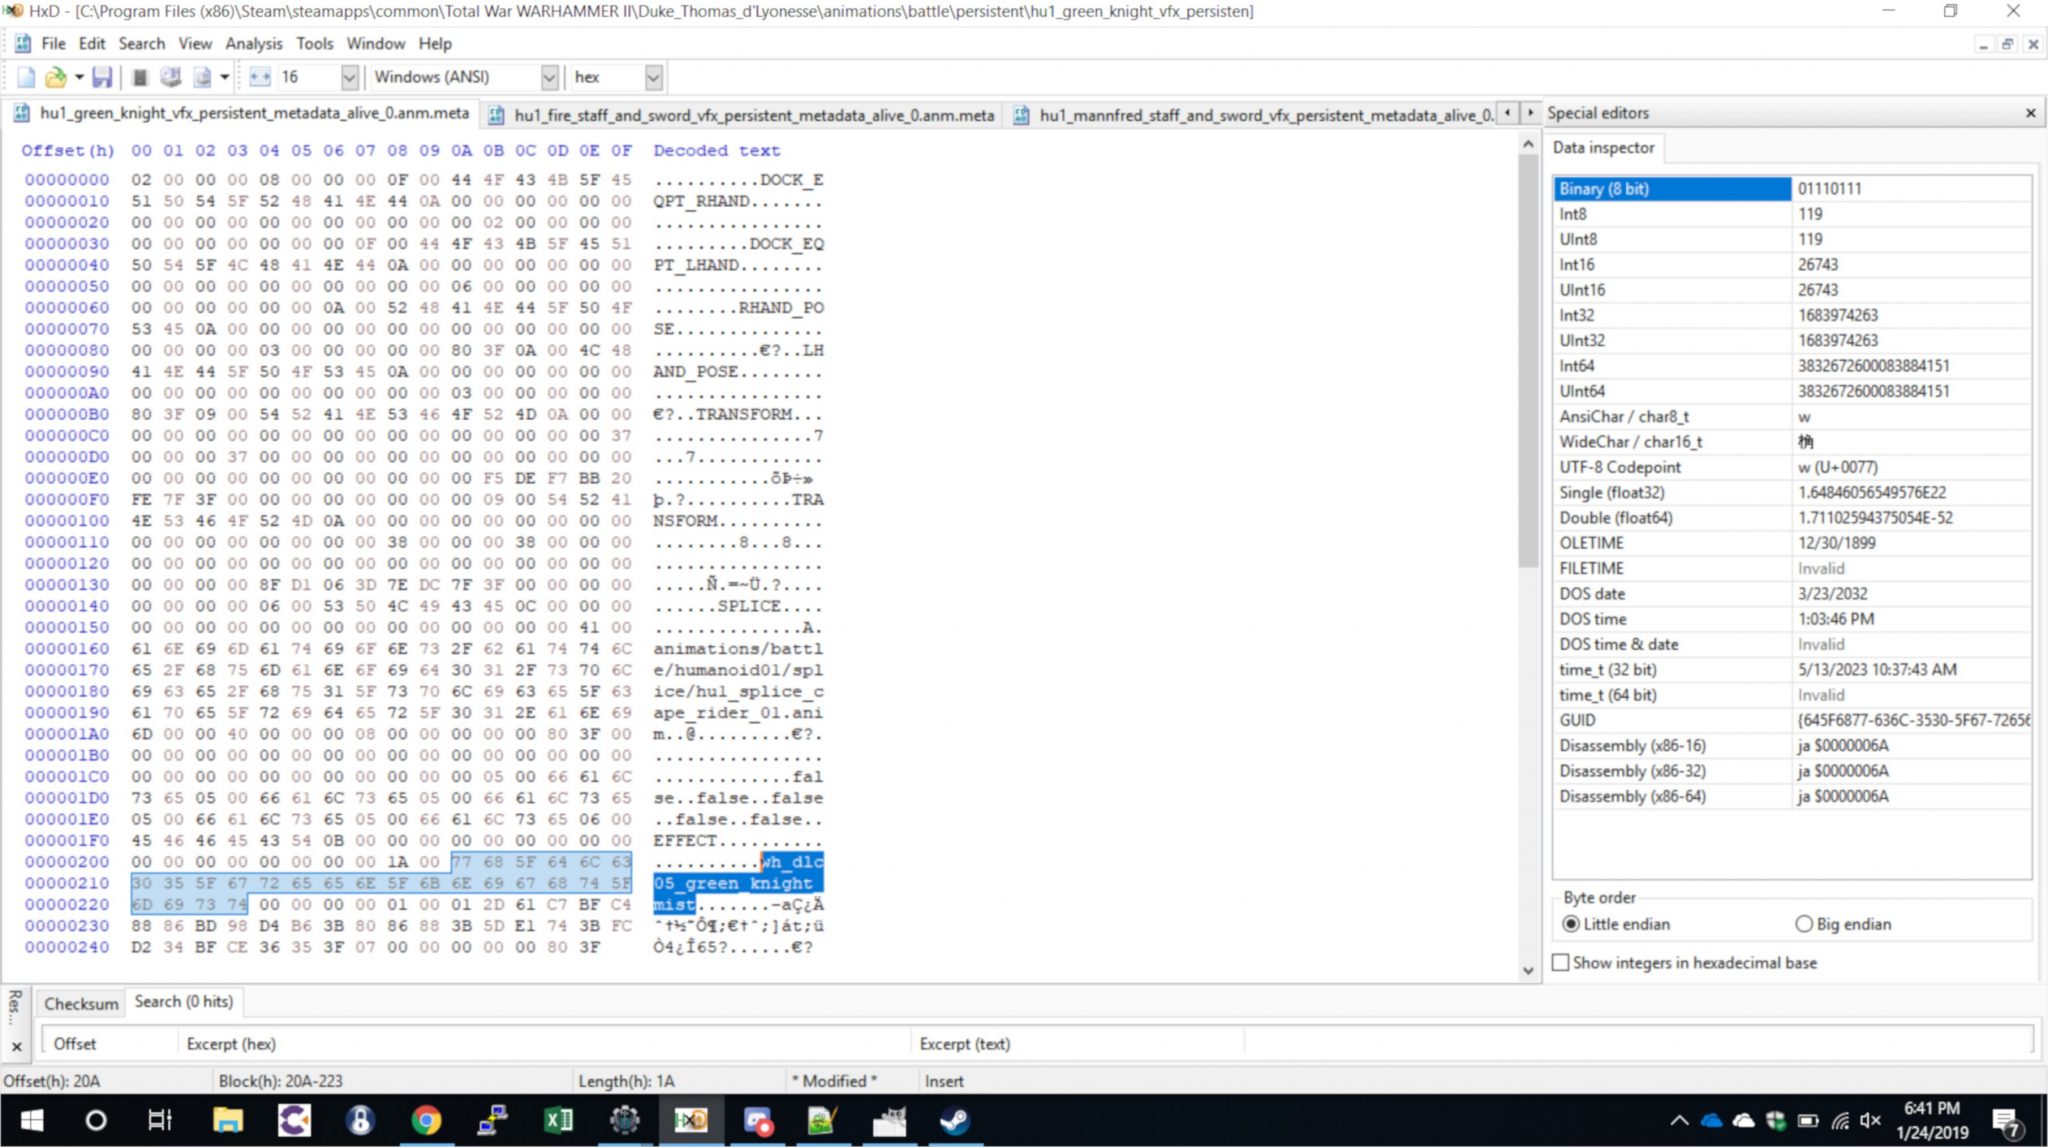 we are going to change the “wh_dlc05_green_knight_mist” to “wh_dlc05_shadow_cast_short”
so highlight “wh_dlc05_green_knight_mist” and paste in its place “wh_dlc05_shadow_cast_short” if you get a messege saying “do you want to change the file size the answer is NO
it has to be the exact same amount of characters, do not change. This is why we have selected “wh_dlc05_shadow_cast_short” you can use any other vfx that has 26 characters in it but, this works and has more choices
should look like this
hit save.
now you have to import your new
“hu1_green_knight_vfx_persistent_metadata_alive_0.anm.meta” file into your mod from the correct file which is
C:\Program Files (x86)\Steam\steamapps\common\Total War WARHAMMER II\Duke_Thomas_d’Lyonesse\animations\battle\persistent
now open up
the “wh_dlc05_shadow_cast_short” in notepad++ as we did before
as you can see in this file there are not only more choices but 2 references to effects, means we can be creative!
at first both of these effects are located in the same place but if we go to the top vfx line we can change the X,Y,Z values and even rotation if we wanted. but we wont today.
(the values of rotation are based on 360 degrees, if you set the X rotation value to “180.00” the effect
will now be upside down)
the first 3 are the ones we want to change, essentially this is just “up/down” “left/right” “front/back” easy.
we are going to give one effect to our rider and one for the horse, to do this we will set the top effect Y value to “2.00” and leave the bottom Y value as “0.00”
now repeat earlier steps pick your effect RBGA values etc. and put back into the pack file.
if you have changed it and cannot see it, it could be too small or the Alpha value needs to be increased.
to change the size of each effect you change the “scale” values located in the same line as the X,Y,Z
these two values can be set from 0.1 to 25.00+ but i would probably not go over 10.00 for the max scale.
once you have done all of those things you may have something that looks like this
Edit Summon Effects
This section assumes you know how to create custom spells and summon abilities. using a lot of what you have just learned we can now edit summon VFX
we are going to use a Hex Area spell that actives when the unit is summoned looks a little like this
looking at the “wh_abilities_generic_vortex” in the “active_aoe column” (you can also use the others seen but this is one I have already edited)
now go into DATA/VFX to find its vfx file wh_main_targeting_pre_vortex_ui_central.xml
extract this file and open in notepad++ like before
edit it as we did previously by choosing which effects you would like and what colour etc. and adding it to your MOV file
once you have decided you can add the ability to your unit in “land_unit_abilties_tables”
now using your summon ability the character will now spawn using your new effect, you do not have to use a summon ability with the hex ability I have just found that more effects/vfx are available this way.
you may end up with something like this
Words Of Warning
These files when edited will change all units that use those animations, for exaple if you change an animation just for your character all units in the game that use those animations will now have your animation.
try to pick animations that your faction are unlikely to meet like “krell” and “battle pligrims” Enjoy modding animation glows
Part 2 – Adding Glows To Any Animation
As promised, I have finally found a way to add glows to any animation, it does have it limits and I will show you what they are and some potential fixes and the downsides to the fixes etc.
Ok to start, using the same programs as before but instead of PFM for all our mod work we will be using RPFM downloaded here –
RPFM
https://github.com/Frodo45127/rpfm/releases/tag/v1.4.2
as this will make it easier to find some of our files as it has a search tool and you can see which columns relate to which tables.
Alright now we are ready to get into the good stuff.
Creating a new ability
The work around we will use for being able to add glows to any animation is through the creation of custom passive spells and abilities. I assume you know how to make one already I’m just going to point out the columns you need to change.
the tables you are going to need are –
unit_special_abilities_tables unit_abilities_tables
special_ability_to_special_ability_phase_junctions_tables special_ability_phases_tables area_of_effect_displays_tables
particle_effects_tables
Ok now we have the right tables to create a new spell and custom effect to go with it. starting with the unit_special_abilities_tables create something that looks like this –
ok great! now you have a passive ability, the part we are really focused on are the Targetting Aoe, Passive Aoe, and Active Aoe located in pic number 3, highlighted in yellow, name these whatever you like but to keep it simple names it the same as my ability.
Now go ahead and fill in the unit_abilities_tables, special_ability_to_special_ability_phase_junctions_tables as these are as you would usually make a passive spell or ability (if you dont know how copy a vanilla one and change the name)
great! next is special_ability_phases_tables which there is nothing in here that effects the glows but I just wanted to make sure you have the duration set to -1 because we obviously dont want it to end our effect.
Now to area_of_effect_displays_tables this relates to these tables Targetting Aoe, Passive
Aoe, and Active Aoe which means you have to have the same key as you used in these columns, should look something like this –
the important columns in this table are Vfx Central and Vfx Ring which are a reference to particle_effects_tables I would recommend using a prefix of something that exists as it will make later edits easier the prefix I used was wh_main_light_cast_medium
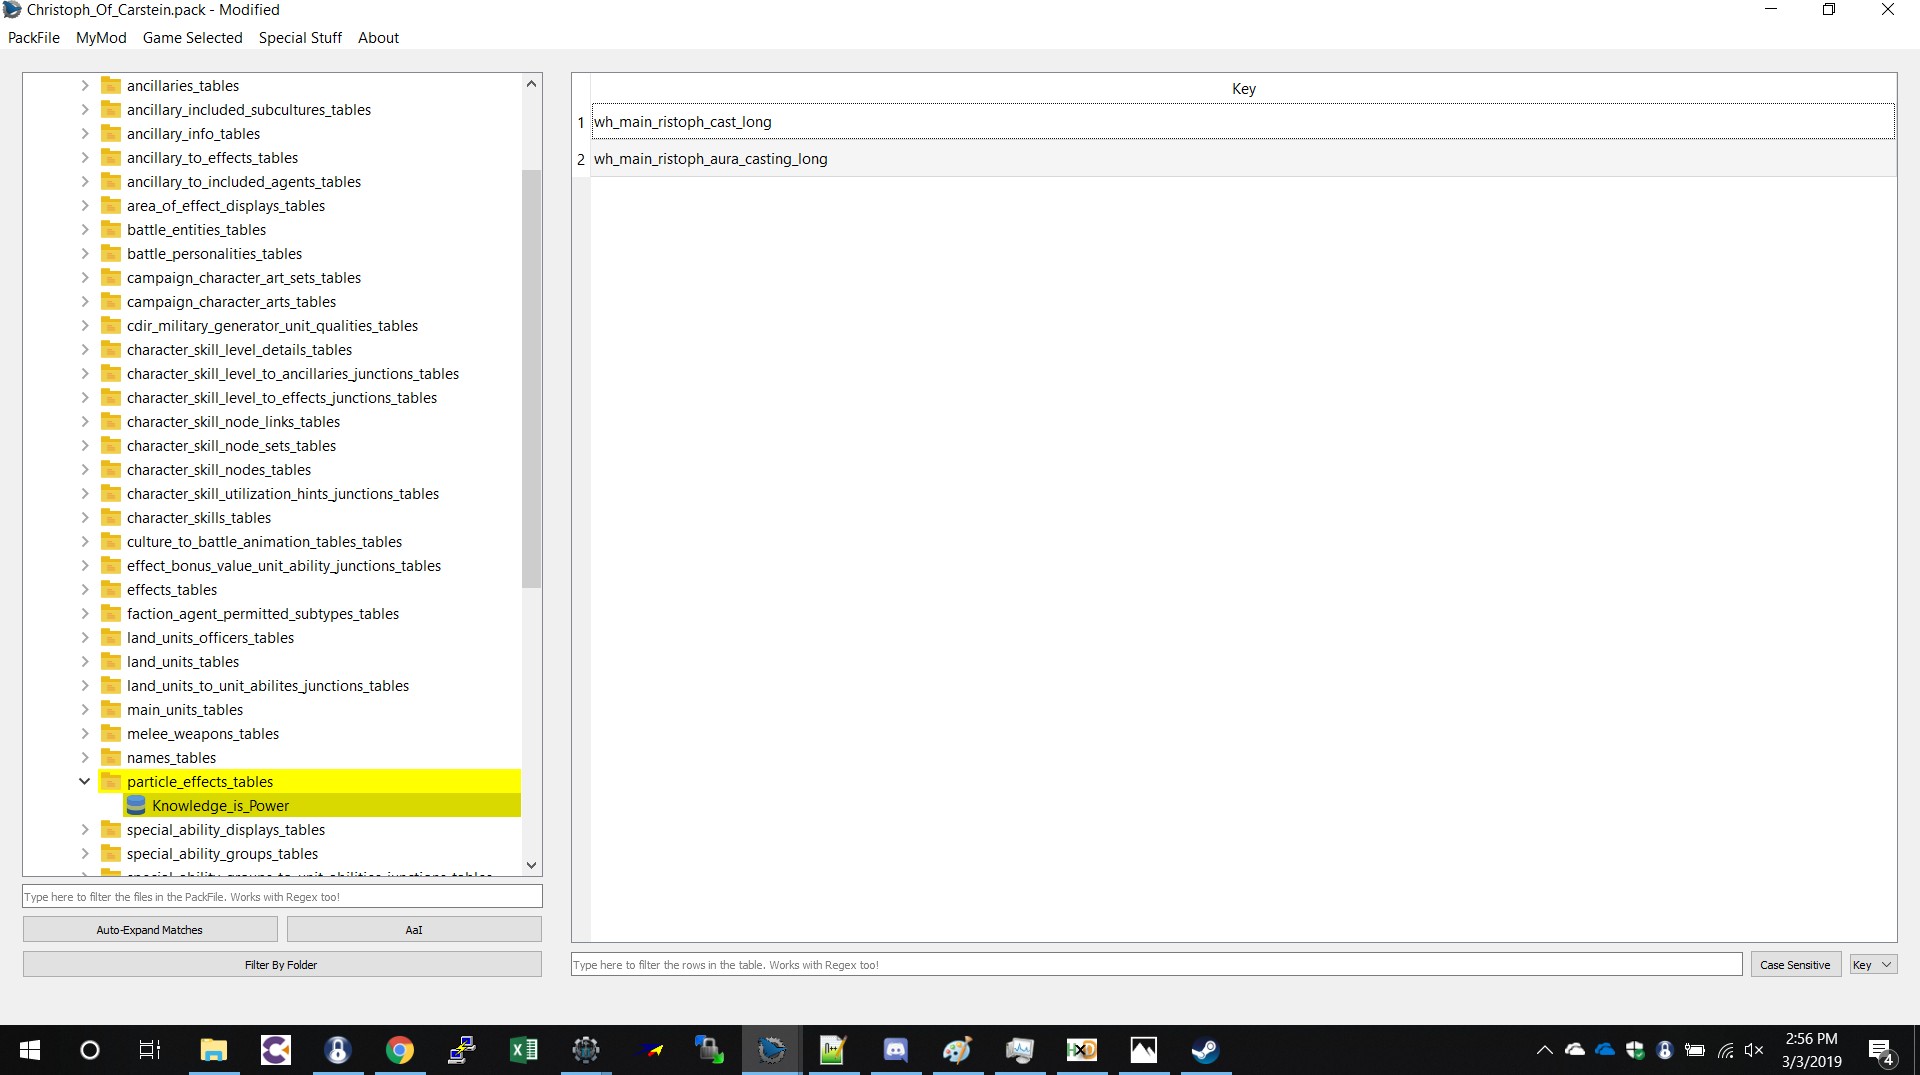
Ok last table particle_effects_tables its nice and simple looks like this –
looking only at the one highlighted in blue, notice how this matches the Vfx Central and Vfx Ring
columns.
so now we have to create a Vfx with that name. “ON TO THE NEXT SECTION!”
Creating a new Vfx
Now all the tables are in order we are going to get back into the Vfx files which I explained in Part 1 of this guide.
So assuming you read that go ahead and extract a Vfx file of your choosing from the Vfx folder – looks like this
I recommend a casting Vfx as it has 2 effects, I used wh_main_light_cast_medium
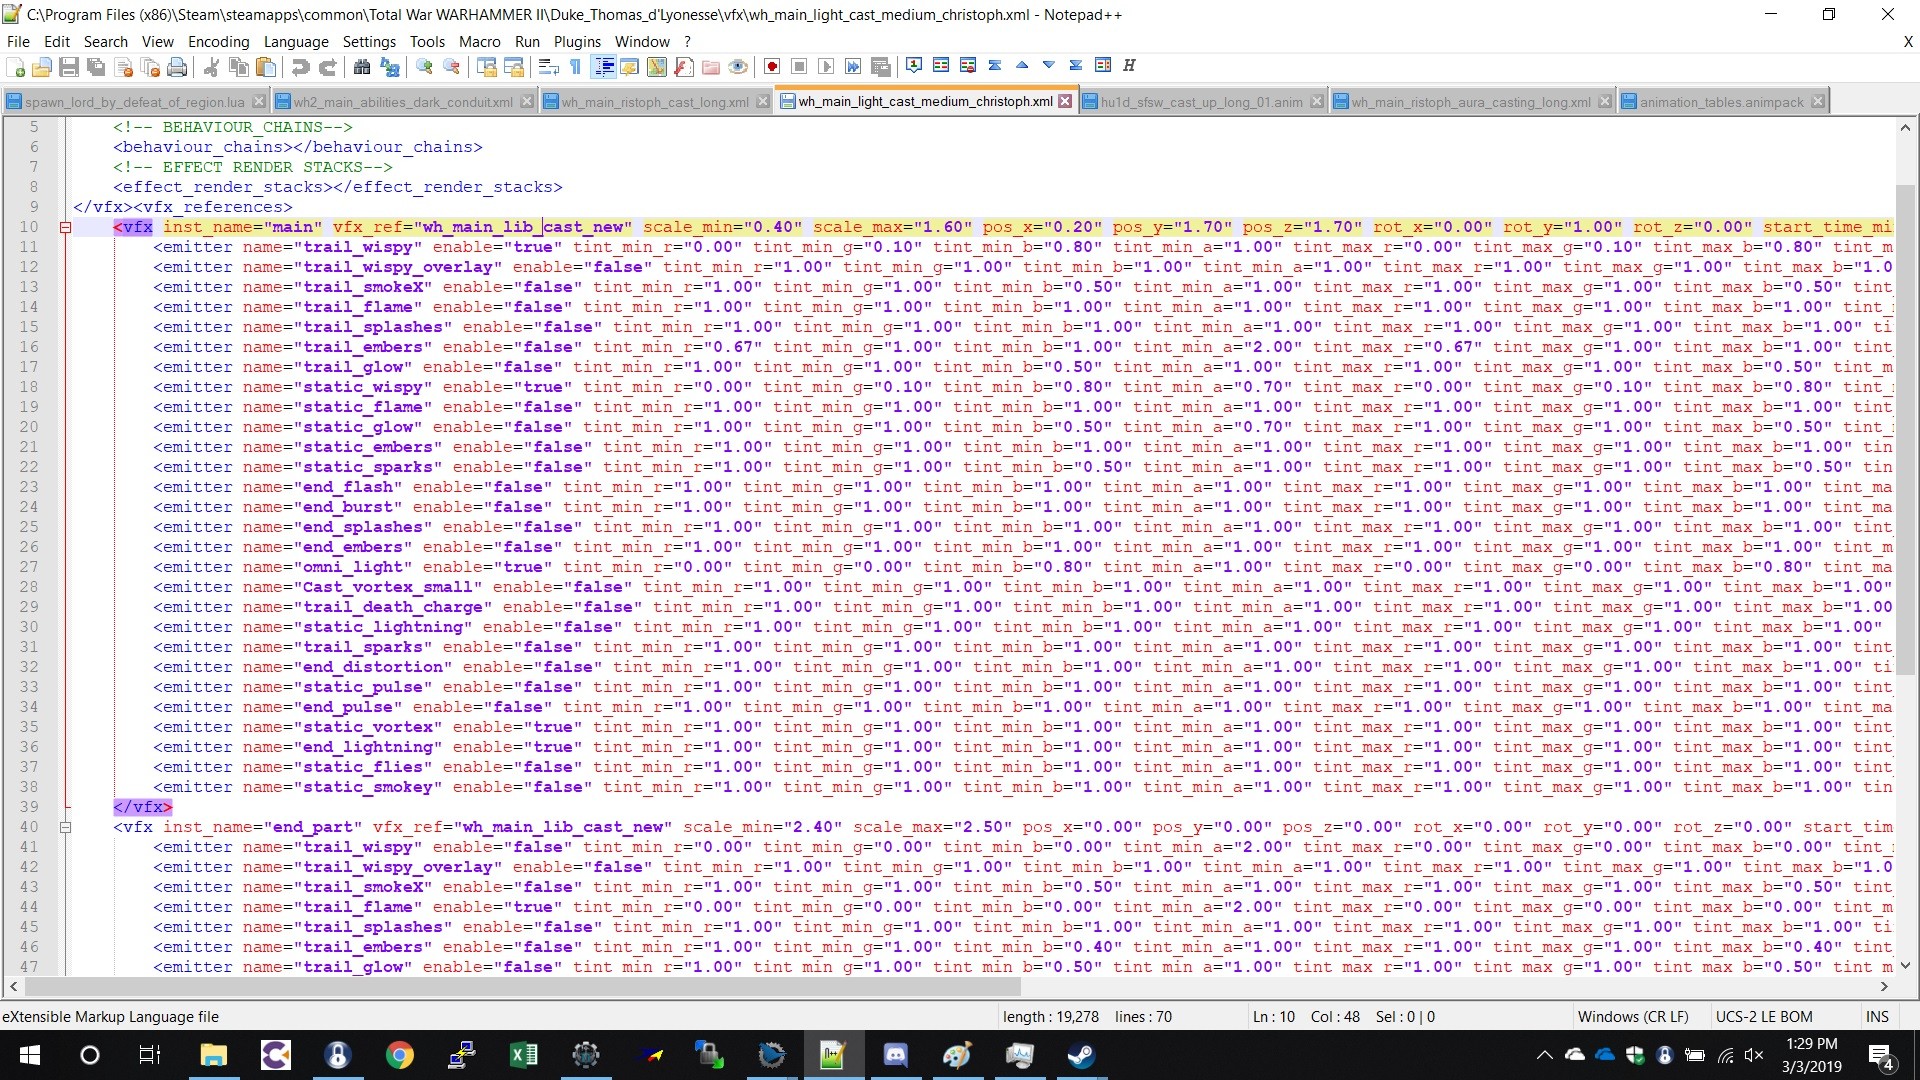
Ok now open it in Notepad++ like we did before, looks something like this-
which you guys have seen before and now know what to change to get your desired effects. now save the file not save as. Then find the file in “file explorer” and rename the file to match the
particle_effects_tables in my case it was “wh_main_light_cast_medium_christoph”.
Now as we did previously in part one of the guide, open/create an “MOV” pack or you can copy your other one and rename it if you dont know how, delete out the old files obvs.
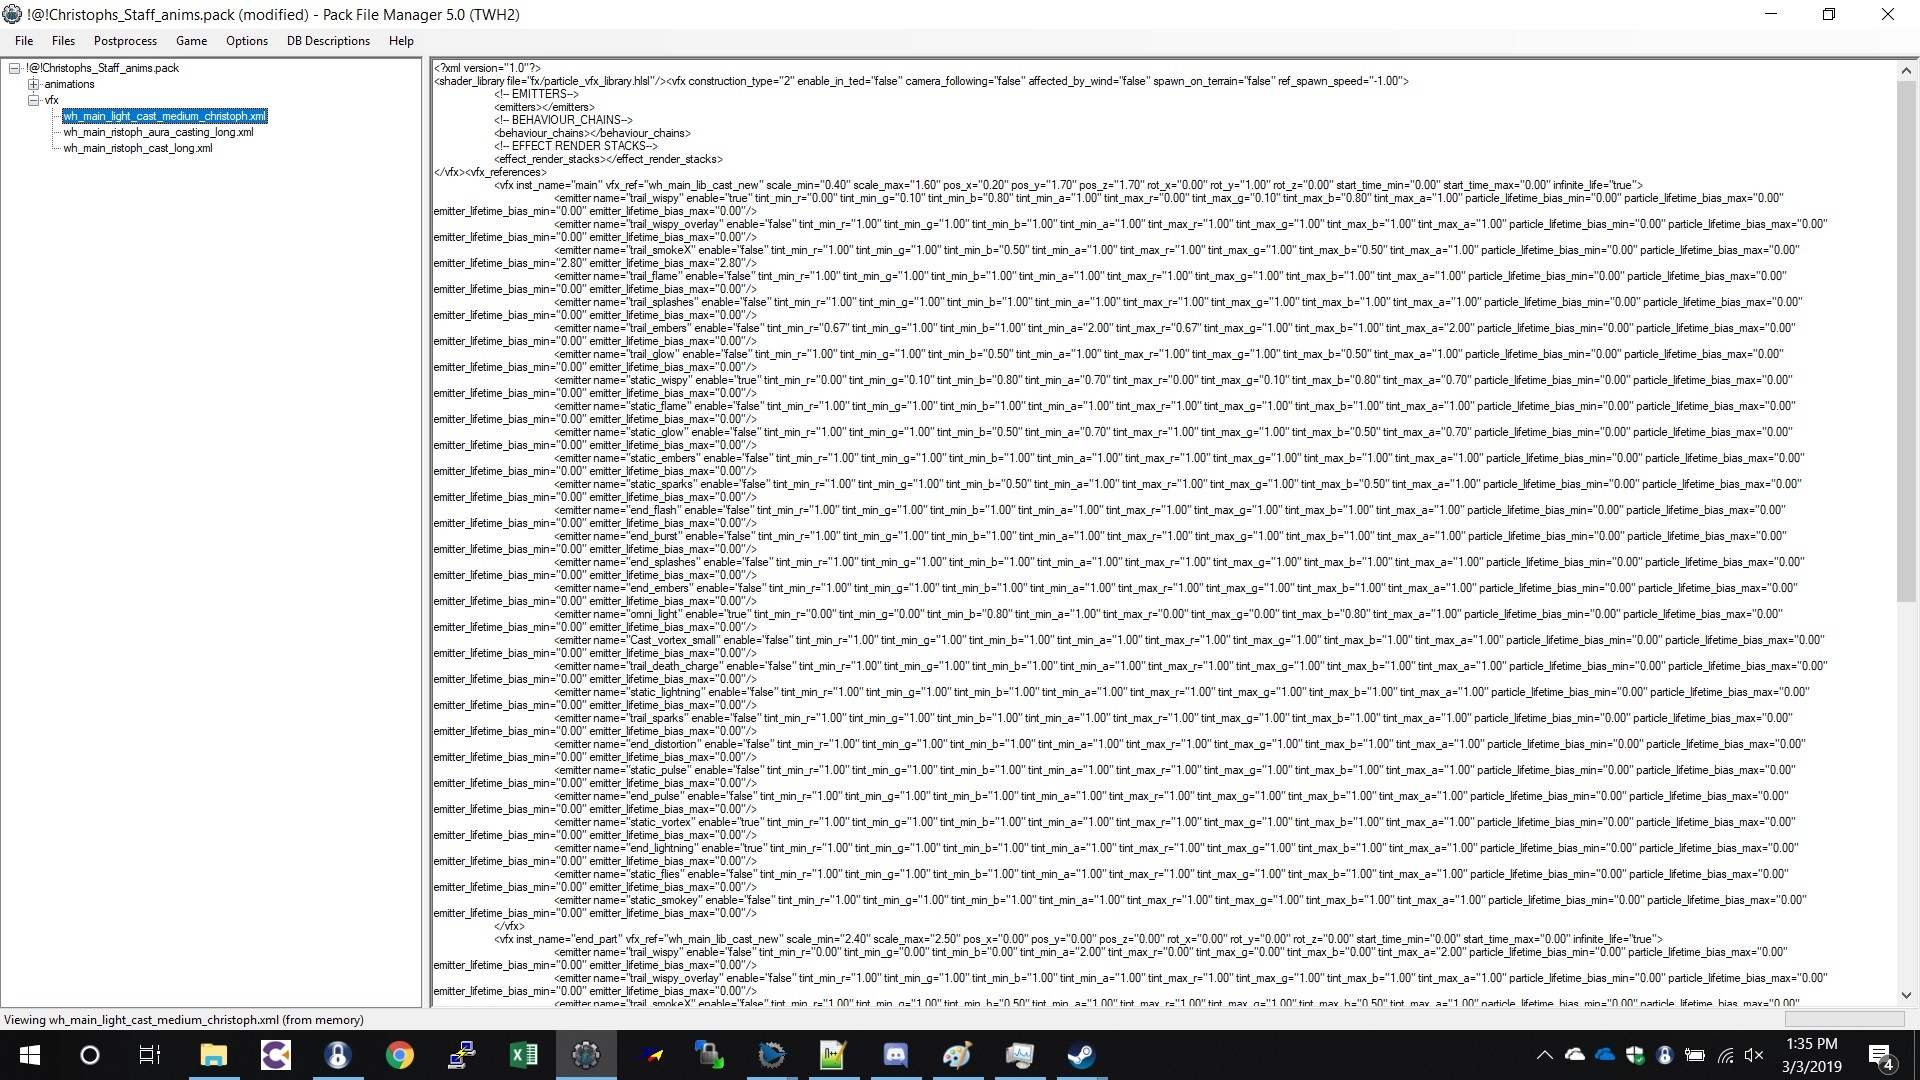
Insert your new “wh_main_light_cast_medium_christoph” file into this pack file as you did before following the file path you got it from. looks like this –
the one highlighted in blue, dont mind the others in there I will explain later.
Now as we did in part one save this file to
C:\Program Files (x86)\Steam\steamapps\common\Total War WARHAMMER II\data thats all for this section.
Limitations Of This Method
Go ahead and start up your mod and new effects. If it looks just as you wanted Great! You are good to go with your characters new Glows and Effects that no other character will have! As long as you only assign the Special ability to that char.
……if anyone changed the location of the effect in the previous Notpad++ section you will probably have a bug that looks like this –
the effect is only associated with the center of the character, it does not rotate with him.
There is a fix for this but it presents the same issue we had before, another character in the game uses the same animation.
If you dont mind this bug and you are happy that it does not effect any other unit in the game then you are Done! whoo! But for those who cant stand this lets find a fix.
Editing Animation files
Here we are going to get Knee deep into animations, as I mentioned at the start of this guide its not possible for us to edit animation files which we previously thought limited us to only being able to use
characters/animations with an effect assigned to them. This not completely true and I am going to show you how.
We are going to use a mage model as its the one I am working with at the moment and the first I have got to work this way.
If we look into the “unit_special_abilities_tables” there is a column called wind up stance, as we all know when a mage/wizard character in the game casts a spell it uses an animation that gives it glows and effects that move with the character, we are going to take this animation and give it to our character as a constant effect not just for that short spell cast time.
Start by finding your characters animation in data / animations / battle / persistent like we did in part 1 of the guide, looks like this –
We are going to be using teclis animation, go ahead an extract this file, be sure to use the right file path, as we are going to put it back in later.
Now we are going to need to find out where the casting animation is for teclis that gives him the glows when he casts a spell. The way I did this was to go to “unit_special_abilities_tables” then column “wind up stance” which said “cast_up_long” and searched it in RPFM this will give you all the animations that use this. looks like this –
I new it would be i the file location of “humaniod01d” as this is an elf animation, so for your relevant animation you will find the one you need in that file.
Go ahead and extract the file that has “anim.meta” as this is the same file type as the one in the persistent file location that we extracted earlier.
To the editing section!
Getting into it
Here we are going to open up the file we just extracted, the hu1d_sfsw_cast_up_long_01.anm in HXD
so now you have the file that gives the glows we can give it our own custom glows buy changing the
name of the glow effects (highlighted in blue) within this file as we did before in part one, however this time you can call it whatever you like but
DO NOT CHANGE THE FILE SIZE
Looks like this –
notivce how i took out the work heavens and replaced with ristoph both are 7 letters long so no change of file size, go ahead and save this file.
Now we are going to take the file name of the animation found in battle/persistent/ that we extracted earlier
copy it and then go to the file location of the casting animation hu1d_sfsw_cast_up_long_01.anm
and rename to match.
now copy this file that is renamed to hu1d_elf_staff_and_sword_persistent_metadata_alive_0.anm
and paste into the original file location which is
C:\Program Files (x86)\Steam\steamapps\common\Total War WARHAMMER II\Duke_Thomas_d’Lyonesse\animations\battle\persistent
which should replace the old one, do not keep both! now if you open this file it should be the casting animation that you just edited. this one –
but this time it has different file name.
Nearly done!
So we changed the names of the glow effects earlier but they dont exist yet, so to make it simple using the casting file we extracted earlier that we changed the name to “wh_main_light_cast_medium_christoph”
simply create two new effects with the names you put into the HXD animation file earlier, you dont have to even edit the file in notepad++ if you dont want to change any of the glows.
now you have to put your 2 new vfx files into your MOV mod along with the hu1d_elf_staff_and_sword_persistent_metadata_alive_0.anm animation, as always using the same file path.
looks like this
now the last part to it, put your new Vfx file names into the particle_effects_tables so that the game game find them.
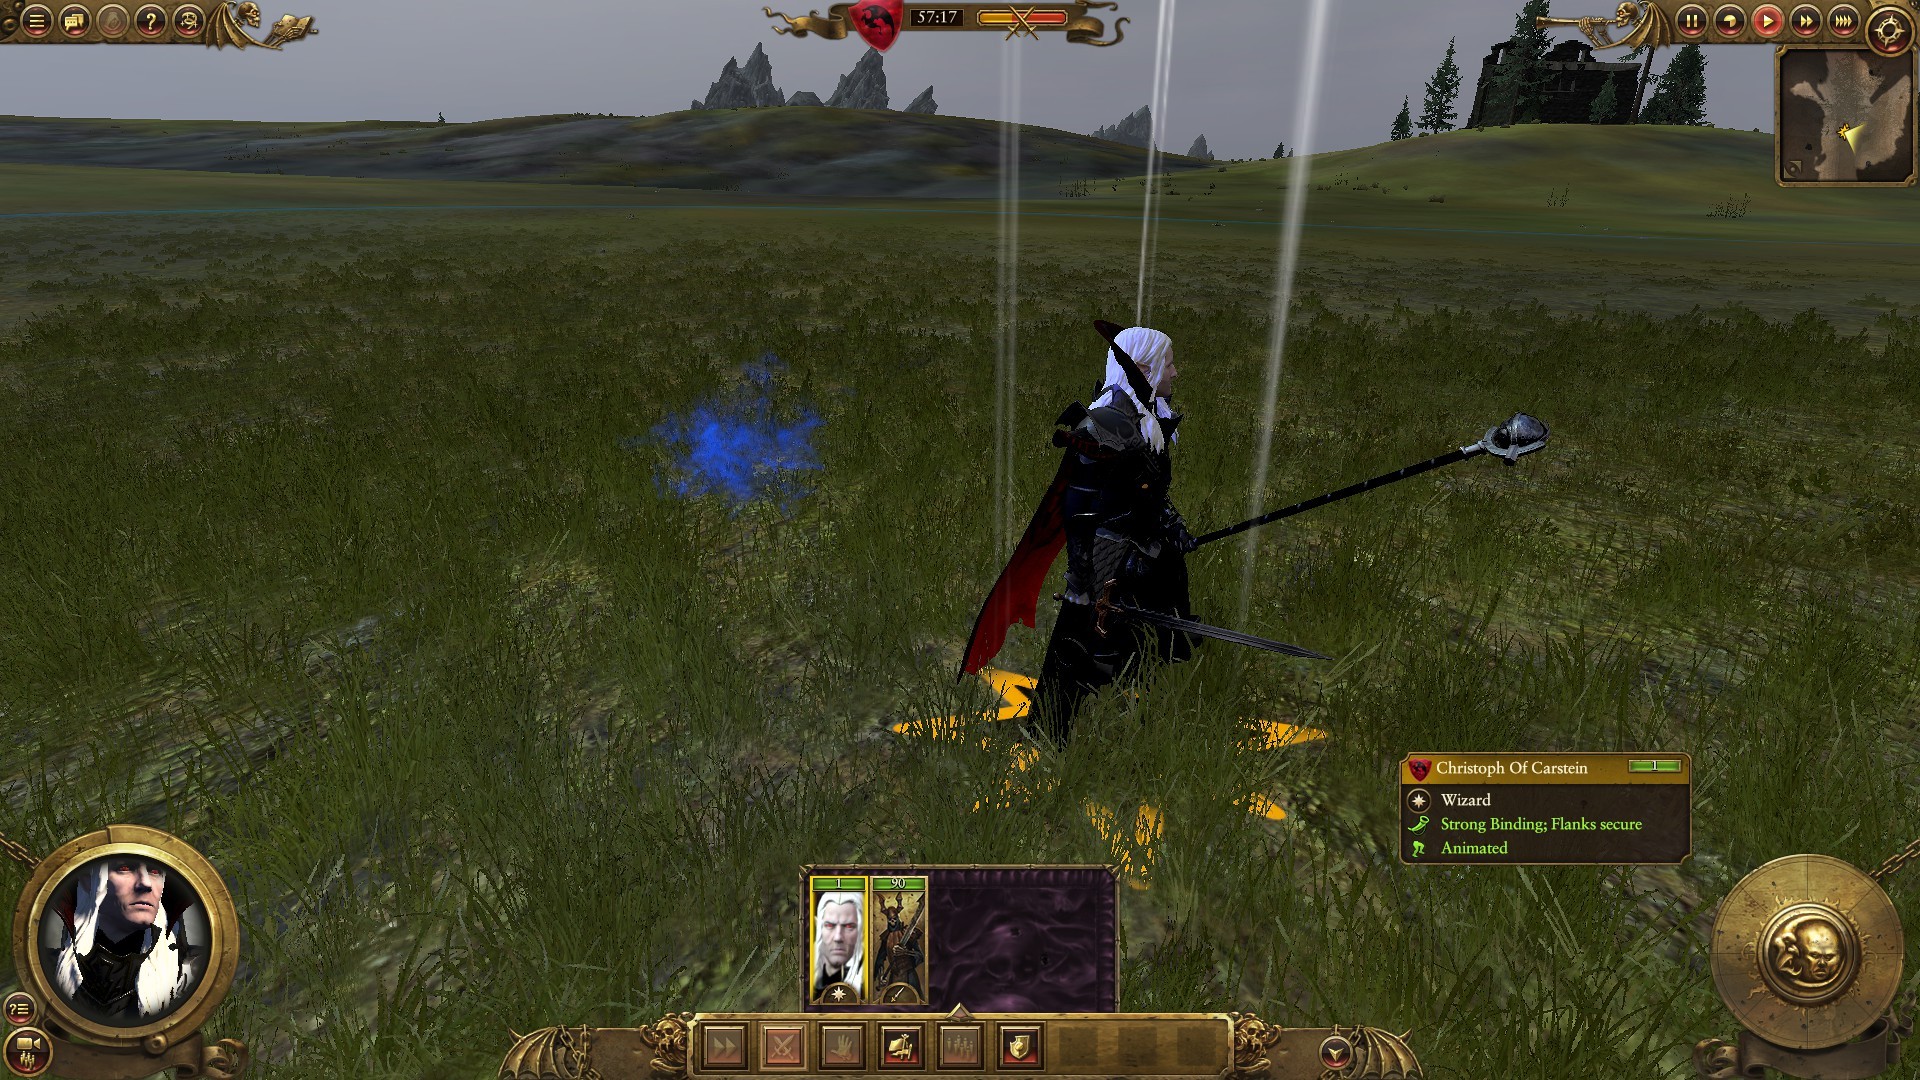
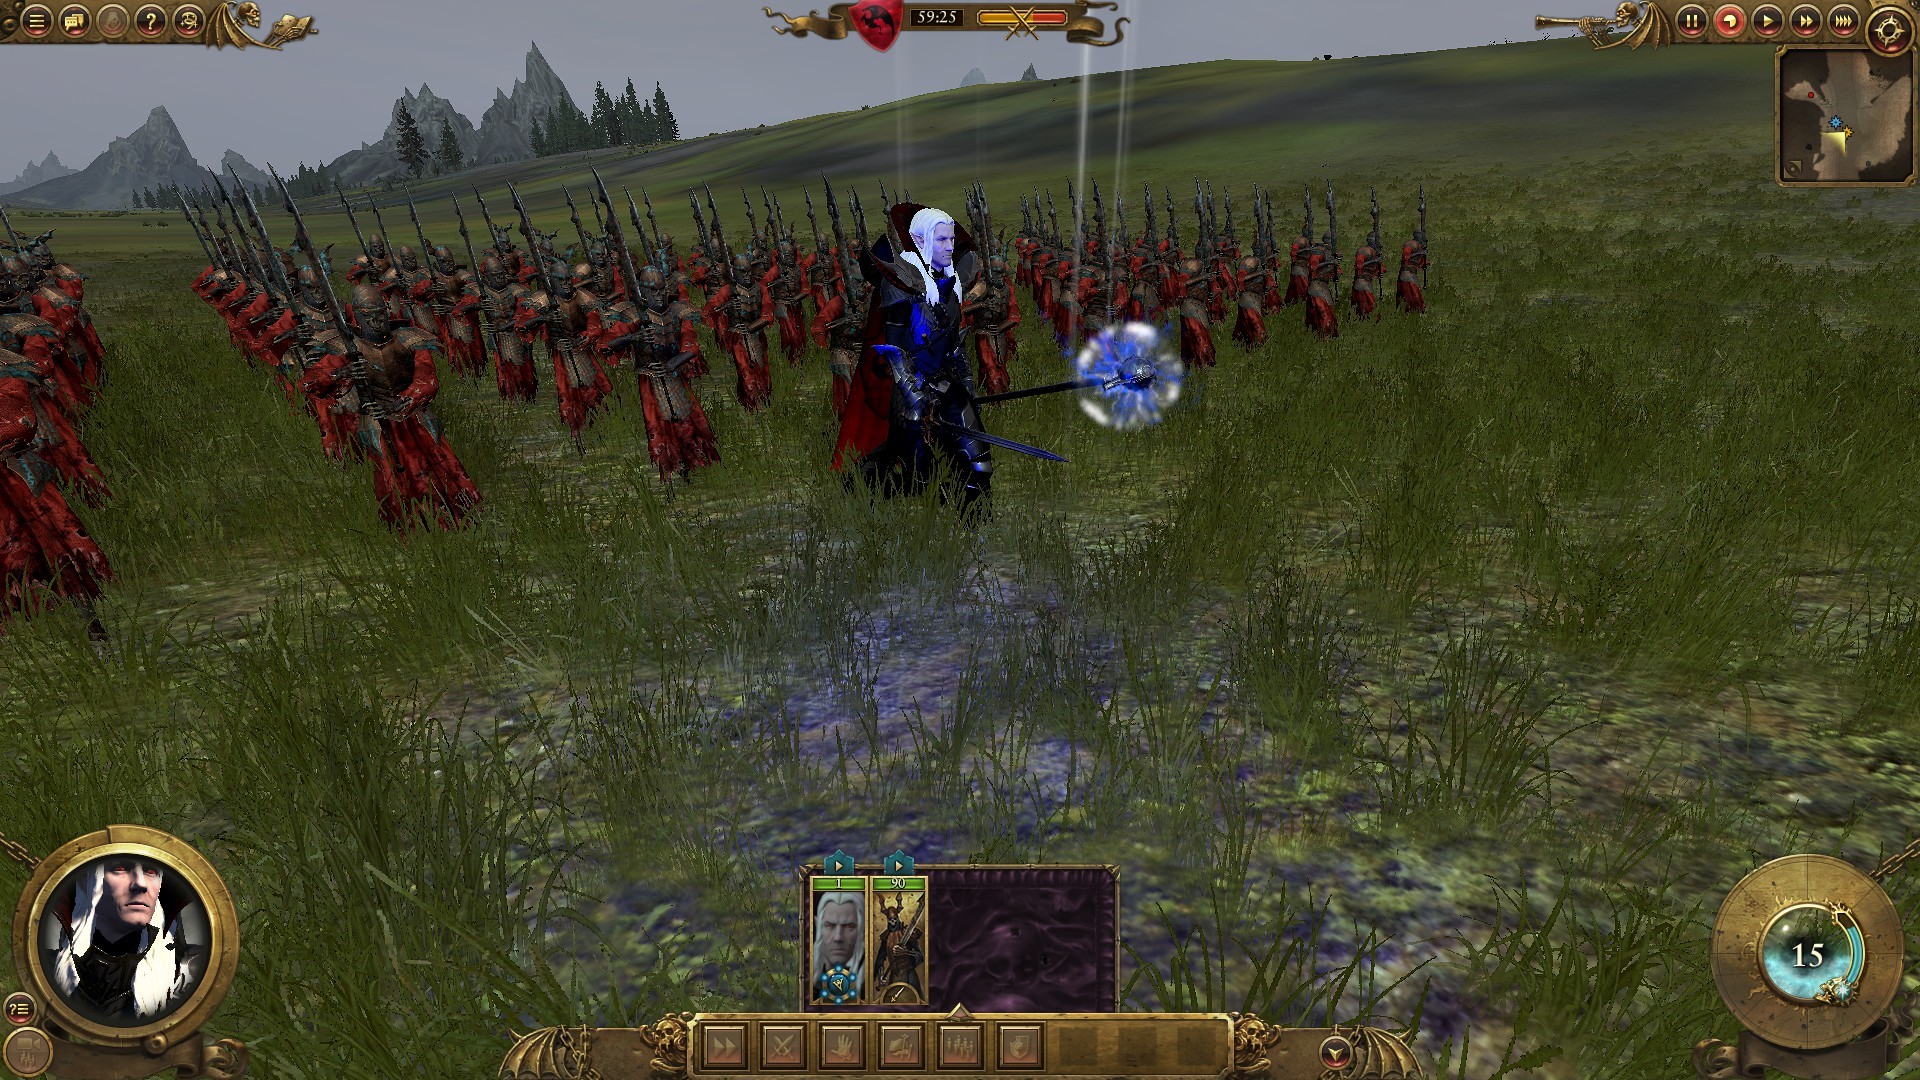
Great now go ahead and save then start the mod, you should have a sweet new animation that moves with your mage character!
May look a little something like this –
A downside to this is that now teclis also has this animation.
All I know so far
this is as far as I have got and have not tried with any other character animations, I imagine you could use a similar technique to make it work though.
Hope you enjoyed the guide and now have some epic new glows and effects on your characters. If anyone finds out something new, id love to know how you did it.
Enjoy
Useful Tips
– do not use capital letters when renaming the files as vanilla does not.
-NEW find, if you assign your VFX using “special_ability_phase_displays_tables” it will stop during a pause game (better for screenshots) also this method can work for whole units not just single entities.
-you can also edit the projectile VFX using the same methods shown here, this means that you can change the color of spells but also you can add new effects to them.
-not all VFX files will work with what you are trying to achieve, pick ones that are in a similar class to the effect you are trying to achieve.
-you can add as many custom glows and effects to a unit as you like using the spells/abilities method, it does not limit you to 1 VFX file. Also for those who can write XML or are willing to give it a try, you can actually add as many emitters to a single file as you like, as long as you reference the lib file before the emitters that you want.
Ok found an easier way to add a VFX to a unit, go to “battle_entities_tables” find the column “aura vfx” put the name of your VFX file here and also in “particle_effects_tables” and voila

