Tutorial:Map Making for WH3
Originally written by WakaWaka300 and posted by All is Dust
Map Making in WH3
CA said that and I quote "Terry is going to feel quite different. It's the full-fat version of the tools that we use in house. This should give you more power, but will also be more complicated with initial set ups."
So thankfully WakaWaka300 gave us some tutorials. You can fidn the original tutorials and extra files like examples and templates HERE.
The tutorials in question are:
WH3 Map Optimisation Guide
File Size Optimization
As we continue to make more and more maps, I think one thing that will be critically important going forward is to manage file size. Looking at the file sizes of the working_data files that are generated by Terry, it quickly becomes apparent that the largest contributor to map file size is various procedural generation data. This consists of the trees, grass, pebbles, etc that are generated depending on the texture channel being used in a particular area. See below for an example of the file sizes present in my map “Road to Vaul’s Anvil”; files related to procedurally generated objects are highlighted.

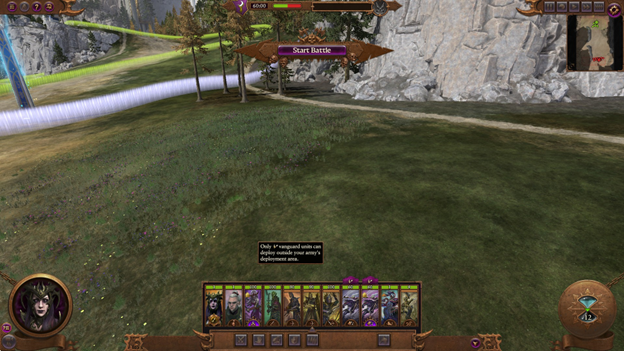
One thing that jumps out is that grass in particular takes up a lot of space because each grass blade’s position, rotation, etc are stored individually instead of being generated at the start of each battle. At the same time, I noticed that CA omits grass generation outside of the playable area in many of their maps (see Arnheim below as an example where the grass stops generating shortly beyond the white line)
From what I can tell, there is also an automatic system that deletes any small procedural objects, such as grass, from tiles in the outfield (outside the playable tile). However, for the space in between the playable area (white lines), and the outfield tiles, the grass here has to be removed manually. Don’t worry though, the process really isn’t that hard!
To illustrate this process, I have made an example map:

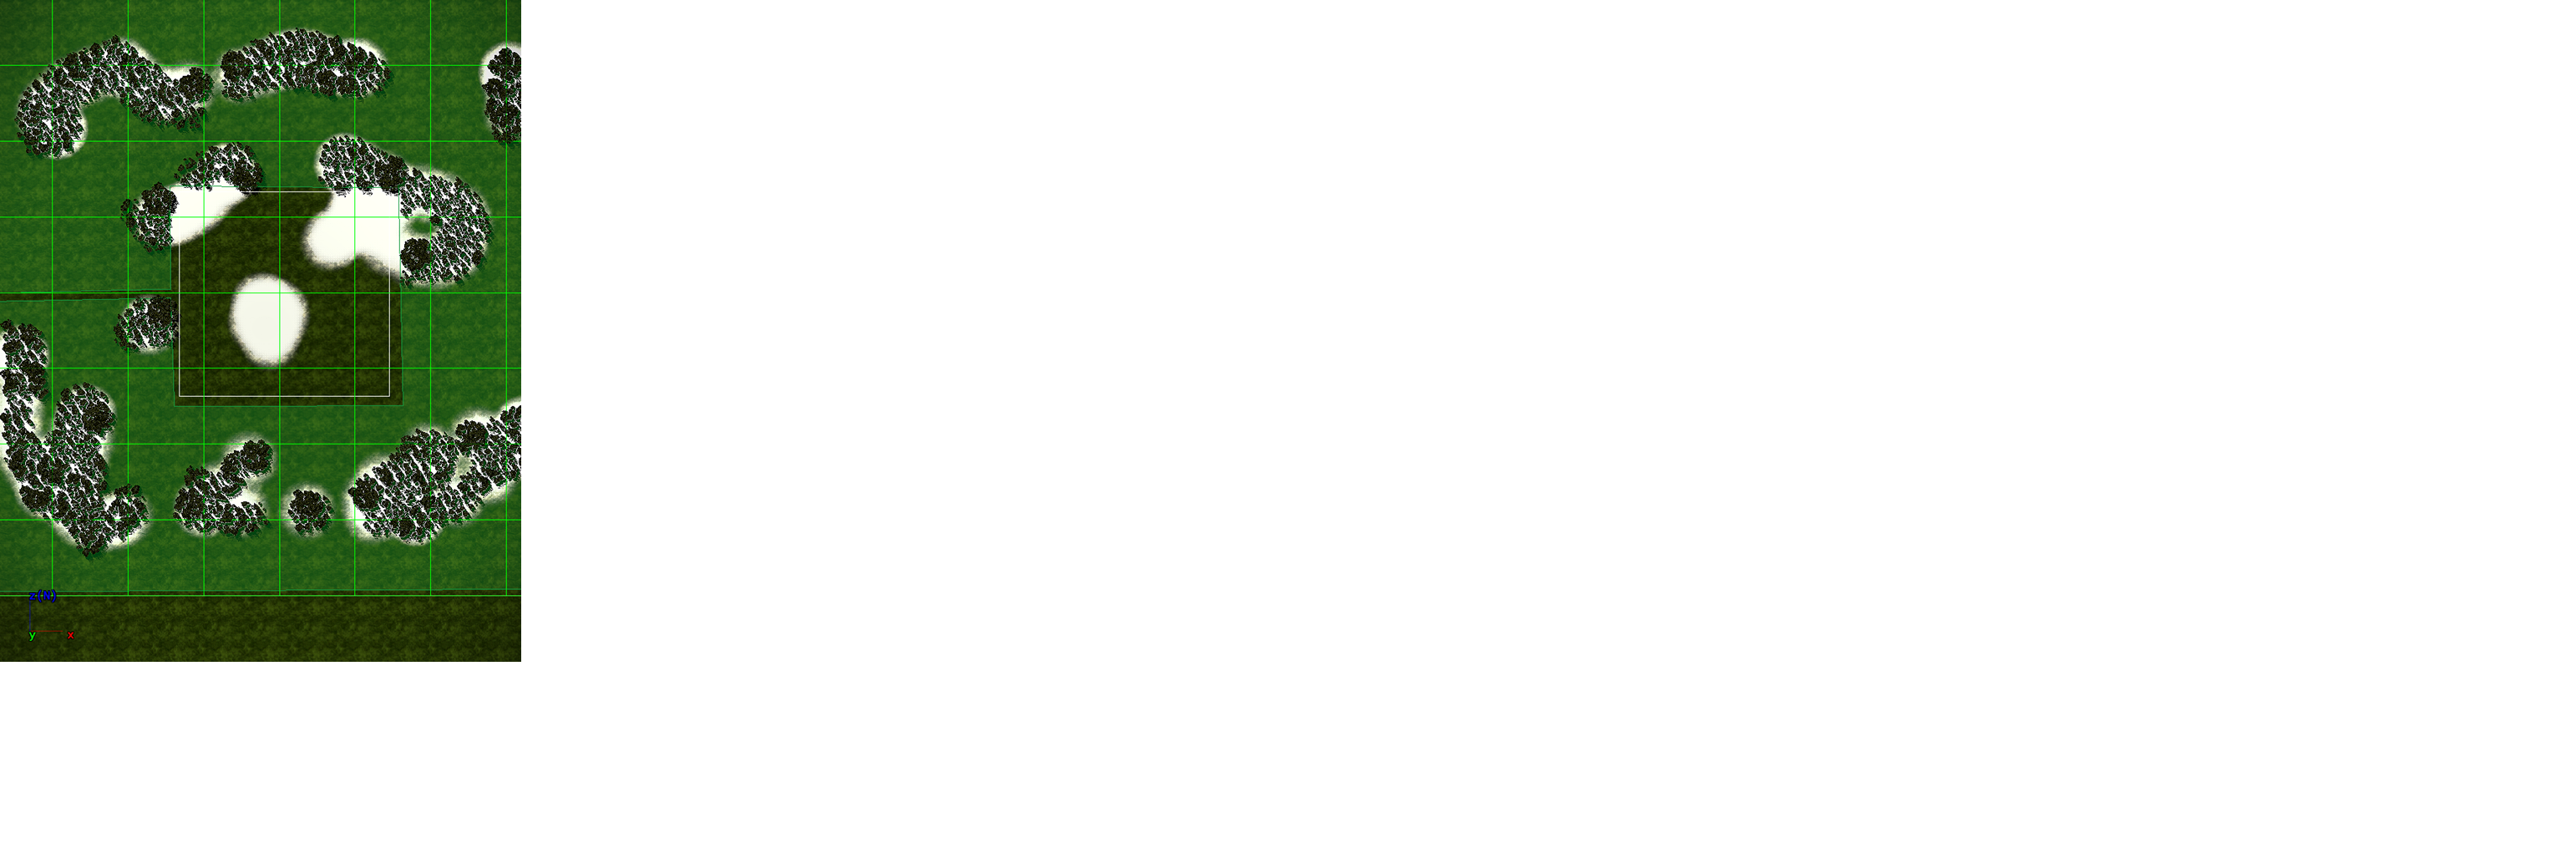
First, CA already has a pretty nifty tool for deleting any procedural objects in the form of procedural exclusion zones. These can be accessed via “entity creation > visual”. So just put them in such a way as to cover the whole tile area between the white lines and tile edge. It’s ok if you have multiple zones overlap. So here is an example of that:
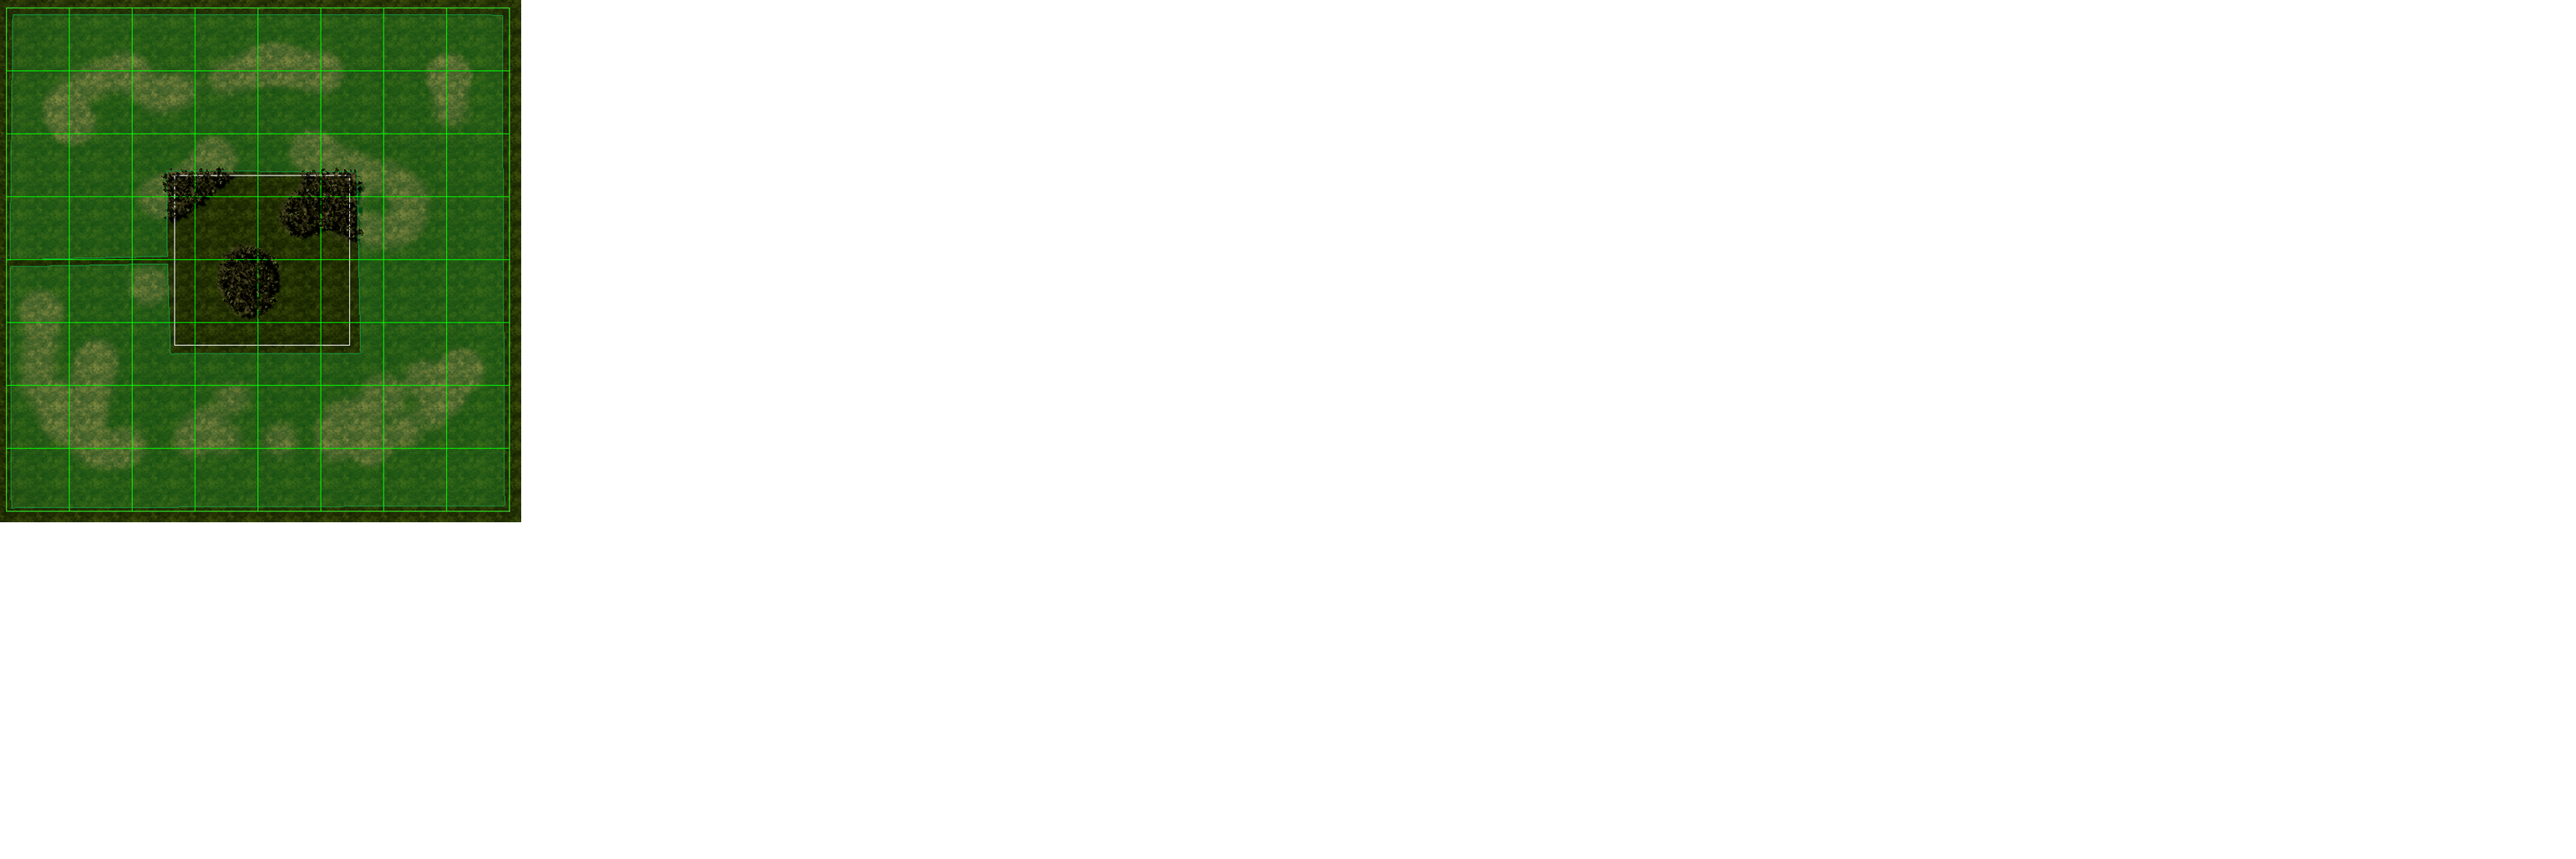
As you can see, while it has done a good job of deleting all the extra grass, it has also deleted the trees in the various forests outside the playable area. Those are procedural trees after all! In order to fix this, we need to recreate those forests using the vegetation paint tool rather than allowing them to be procedurally generated using the forest terrain type.
To assist with this, it may be easier to temporarily change the forest01 texture channel to something like white or snow to make it easier to see. But that’s up to you obviously. Next, you have to set up a list of trees to make the painted forest blend in with the normal one. You will probably have to fool around with this for while to make it look right. See below for example of painted trees.
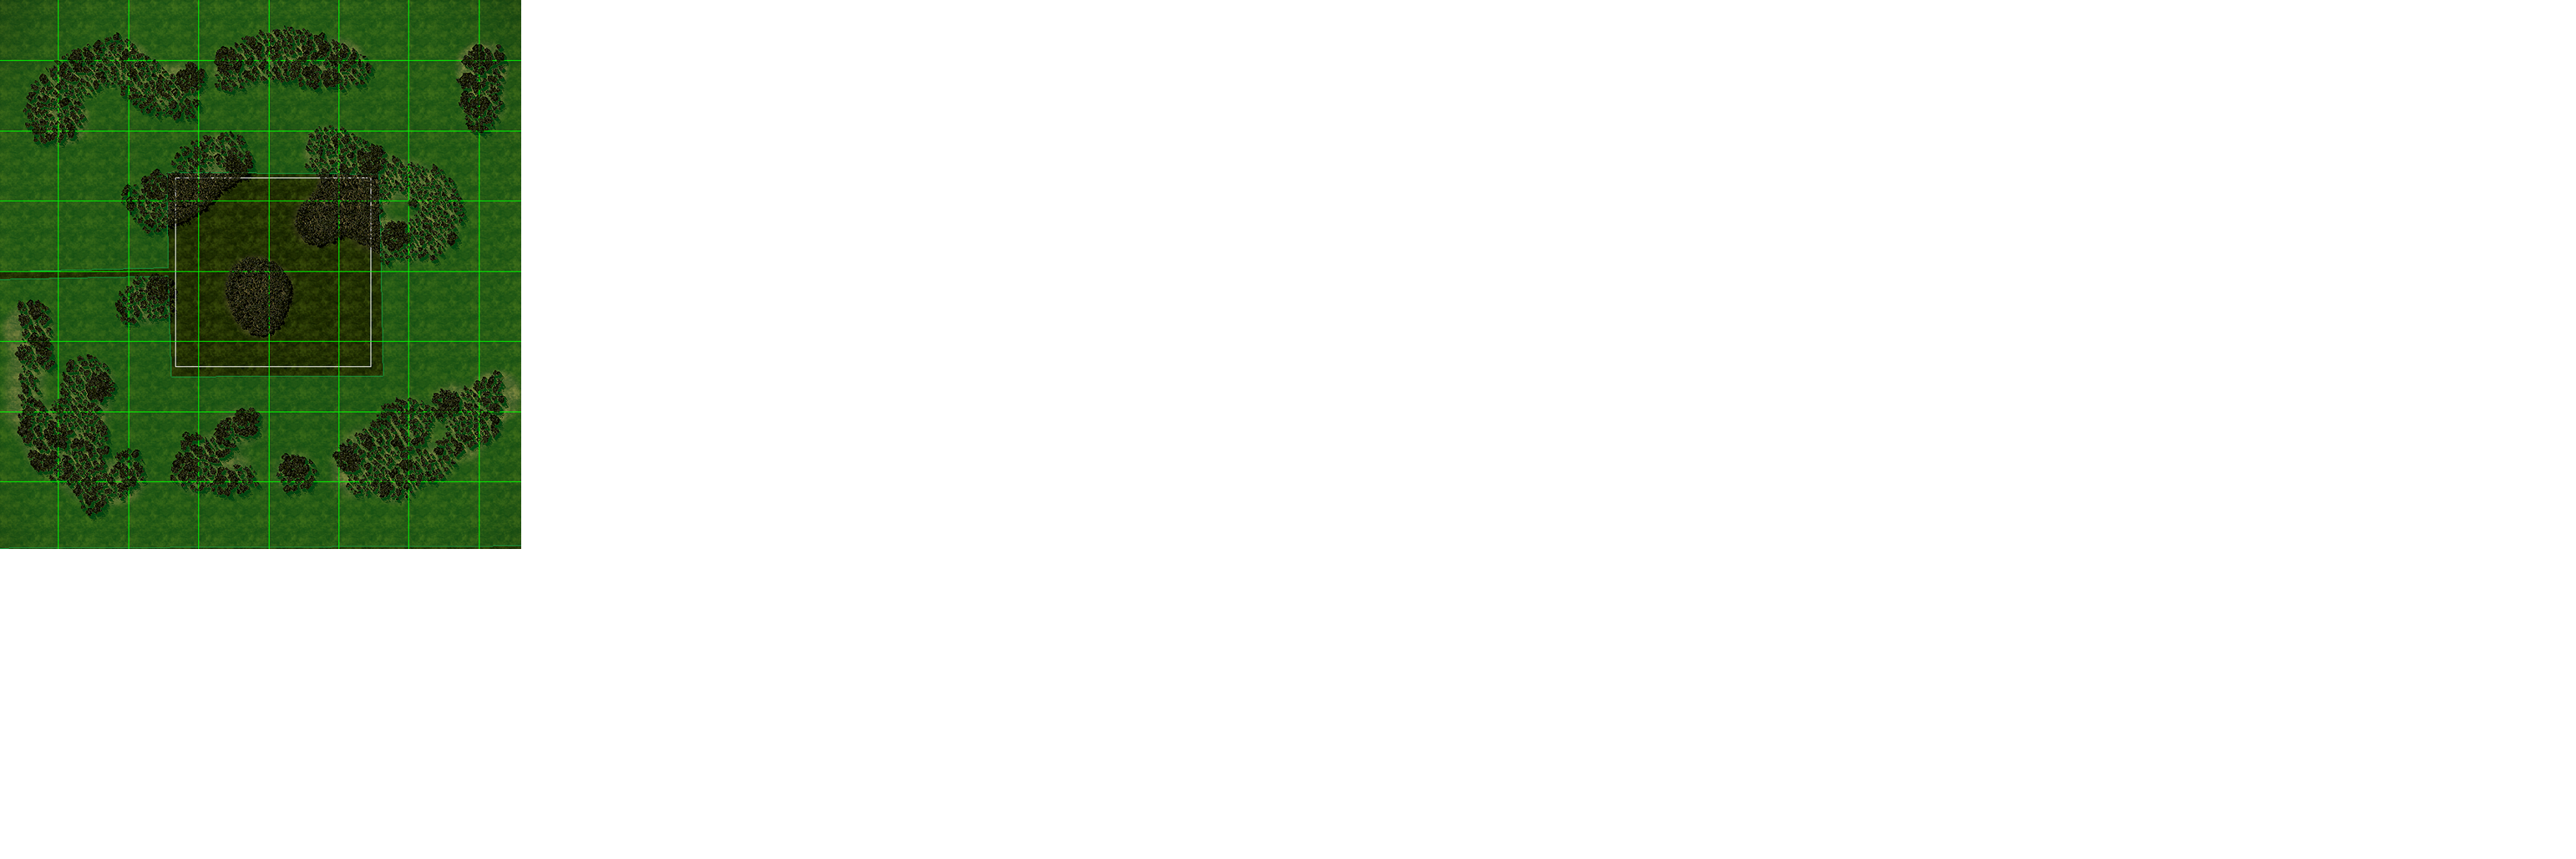
Afterwards, I simply change the texture type back to forest01 to get the trees in the middle back.
FPS Optimization
So I suppose there isn’t really much to say here. CA’s engine can indeed handle a lot of objects at once, so you don’t really have to worry about that. What will really bog the game down is putting in lots of VFX, especially transparency effects. Why does this cause issues? Because of overdraw.
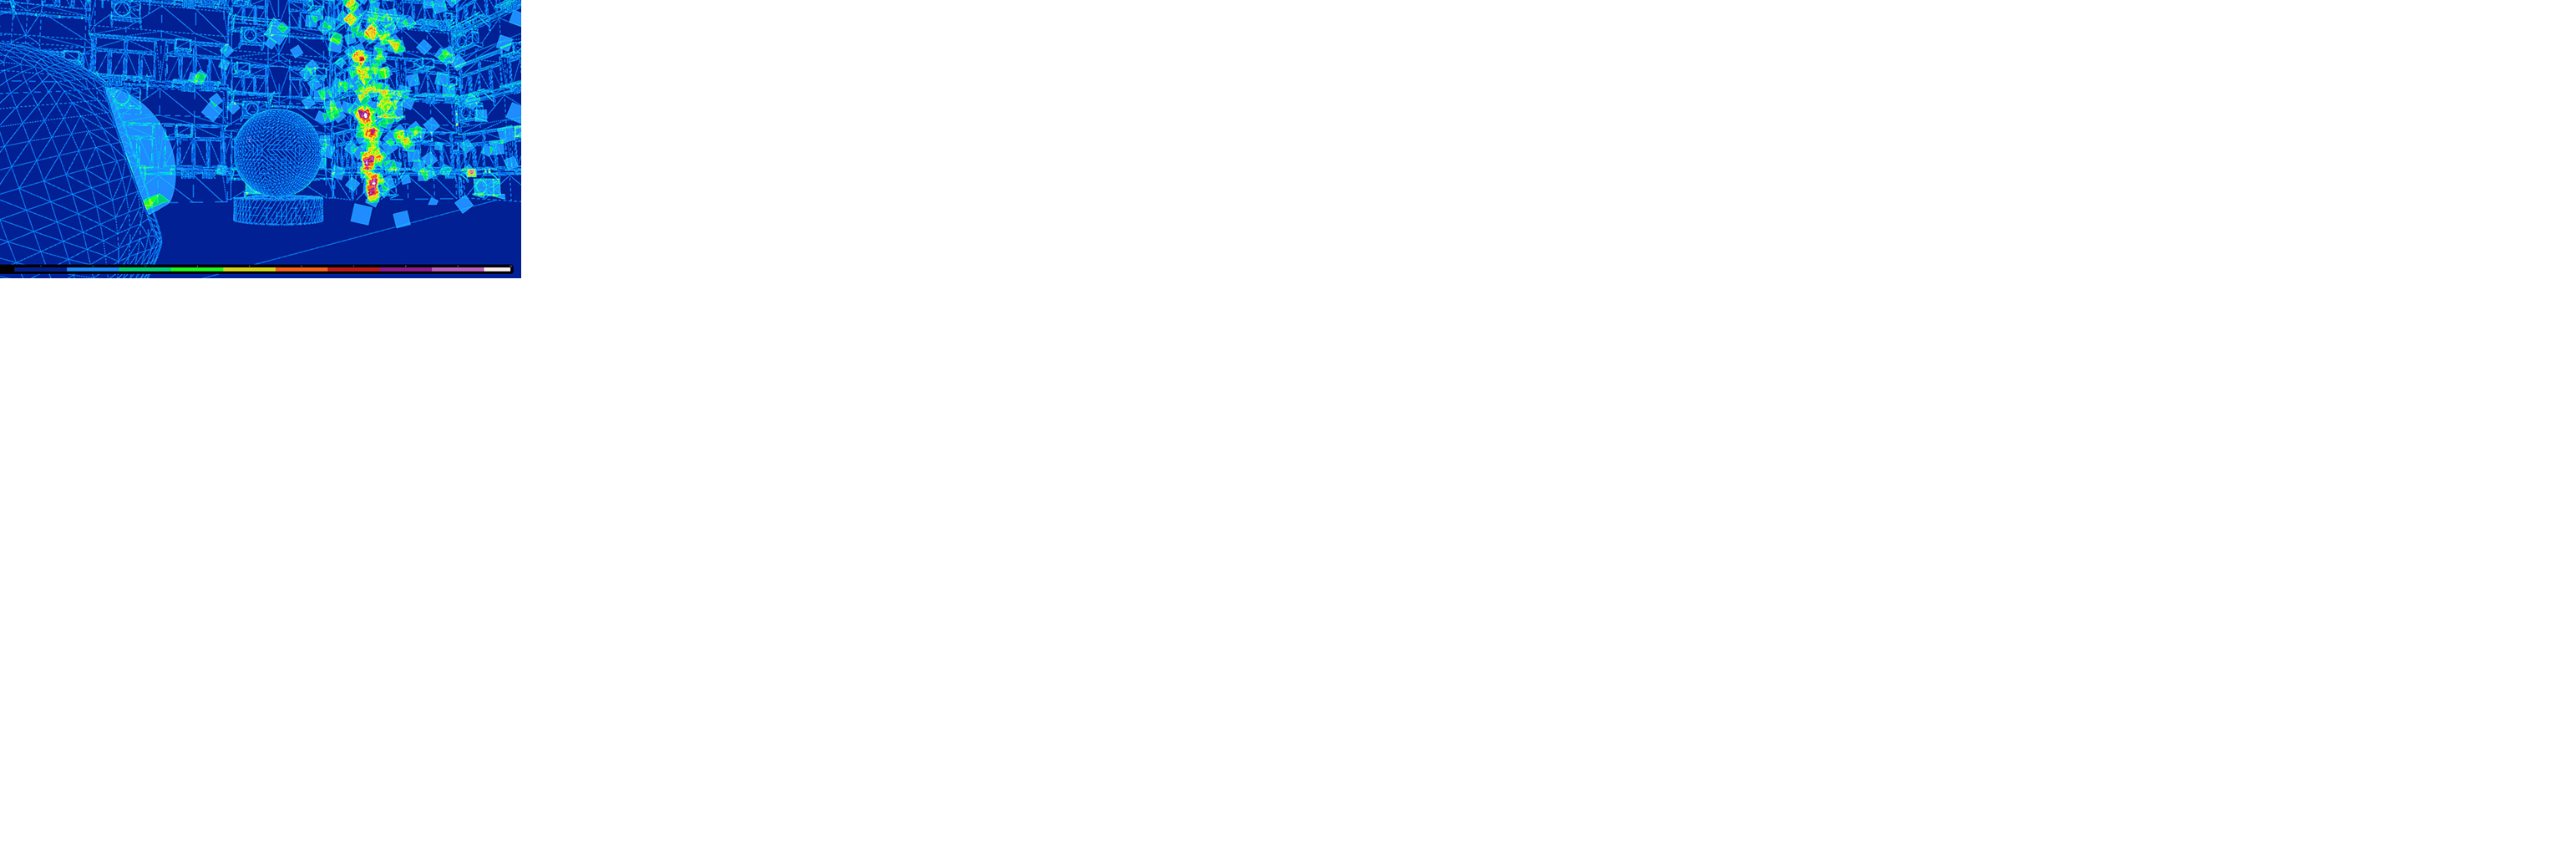
Overdraw (visualised here in red) is when the game engine gets bogged by essentially redrawing the same pixel multiple times due to transparency overlap. As a result, you can definitely use fog effects if you want to, but don’t spam them close together, and try not to scale them up in such a way that you could see one through another
In case you’re wondering, this is (probably) why the cathay maps perform so badly in the base game.
WH3 Domination Map Making Guide
INITIAL FILE SETUP
When you first open Terry, you will be greeted by the following screen:
Lets get some terminology straight first: 1. A “tile” is a section of terrain (of any size) that can be loaded as the playable map or as part of the outfield or vista 2. A “tile map” is the outfield (background outside the playable area) that gets loaded in game whenever you boot up a map. As the name implies, a tile map is an arrangement of multiple tiles. 3. A “prefab” is a collection of objects that can be loaded in and selected as one entity. It’s useful for making maps quickly as you will likely find with the CA-made prefabs. This guide will not touch on prefabs
As of the initial writing of this guide, we don’t have any tile maps made by the community (or by CA) for use in WH3, but we do have all the WH2 tile maps (and most of them seem to work!). As such, I have uploaded them here for use in your maps.
For the best compatibility with the existing WH2 tile maps, you should use 8x8 as your tile size. This “size” refers to the grid size of the green squares when you load up your tile.
For climate, this controls the texture set used for your tile, and it should be pretty self-explanatory. This does not control the environment (lighting and atmospherics)
The first time, save your map using “save as…”, which will pull up a dialog asking you to save a tile set and name. The name is not the display name for the map, and for the tile set you use, please save it as domination. Be sure to leave the box checked at the bottom.
If you are importing a WH2 map, you need to change “ProjectTilewithVista” in the .terry file to “ProjectTile” by opening the file with notepad and changing it manually. In addition, when you load the map in, you will likely be greeted by a red hellscape. To get rid of this, you have to load a new environment file in “settings” at the bottom right.
Whenever you reload a map, you may often be greeted by overly dark shadows. To fix this, regenerate light probes in settings (shown below).
Insert the provided terry_buildings file into WH3’s data directory to add additional buildings into terry for your use.
Finally, you should refrain from putting anything in your map below y=0 due to a water heights issue. If you do have stuff below y=0, then you will have to raise the tile map until no terrain is below y=0 in order to prevent floating unit icons.
===SETTING UP INITIAL DEPLOYMENT So we’ve skipped ahead a little since the act of texturing, placing objects, adjusting the height map, etc hasn’t changed much from previous iterations of terry and is very intuitive. This section will basically cover how to set up deployment zones. However, as best practice, you should also set up no-go zones around any impassable terrain and check the size of your map as you make it with the prop “ref_group_human”.
For deployment zones, go to tools > entity creation (logical), and create one on each side. Next, go to the object tree on the left and click on each zone. In each, you will find an additive deployment zone region. This is the zone players will deploy in to start the game. Next change one of the zones to alliance ID 1 and it will turn red. Remember that blue is attackers and red is defenders (very intuitive, I know).
With your initial deployment zones made, create another deployment zone region with tools > entity creation (logical). The option is only accessible if you have selected the corresponding deployment zone you want it to be associated with. This deployment zone region will be for vanguard deployment and will use the zone type “guerilla exclusion additive”.
Basically, the way guerilla exclusion additive zones work in Terry is that it prevents the opposite alliance from deploying in that zone. In other words, the opposite team can vanguard deploy everywhere except for the enemy alliance’s guerilla exclusion zone. See below for an example of how my zones are set up. I have drawn over the zones to make them easier to see.
As you can see, there will be some overlap between guerilla exclusion zones in the middle. As a final note, you must ensure that players cannot vanguard deploy onto the domination points since that would allow them to capture them before the match starts.
Finally, you can make a playable area using tools > entity creation (logical). This defines what space in the tile that players can actually move around in (aka, the “white lines”). I think it should be between 2x2 and 3x3 or so, but it’s highly variable depending on how big or what shape you want the map to be.
SECTION 3: SETTING UP DOMINATION CAPTURE POINTS
To make capture points, go to tools > entity creation (logical) and create a capture point. You can make the point any shape, but I will use the rectangular shape as a reference. For type, use domination 1, 2, or 3 depending on which point you are making. For importance, you must use “score”. For size, I think anywhere between 80x80 to 180x180 can work depending on the map. See below for reference.
SETTING UP TELEPORT POINTS
To make the points used to spawn units in, go to tools > entity creation (logical), and create an ai hint. Use the type “attacker (or defender) teleport reinforcement line” and create a single, short line with two points. Remember, attacker is the blue side and defender is the red side.
The vanguard deployment lines are exactly the same, but make sure to check the box for vanguard deployment in the entity properties. See below as an example for one of the vanguard points.
If you have issues with the teleport point not appearing in game, it is likely due to the line being too short. If it’s about 20 units long, that’s enough.
SETTING UP THE TILE MAP
At this point, you have to understand two different file locations where map files are stored. In your assembly kit folder (located within WH3 wherever you have that stored), you will find two folders, raw_data and working_data. Raw data is the files that the modding tools will work with to make maps, while working data is the stuff that the mod tools export which you will need to compile to make the final map file. Everything we need will be located within the terrain folders of each.
When you are more-or-less done with the map, go to “tools > create battle for tile…”. This will create a tile map file associated with this map in raw_data>terrain>battles>yourmap. You will only need to do this once. This has generated a tile map for your tile, but we need to change it because the climate isn’t set up and there’s no outfield.
This is where you either create your own tile map or use one of the WH2 ones (I would suggest the latter for now). Use the vistas I have provided with this guide to pull the tile_map.png and climate_map.png files from whatever vista you want into the tile map folder that was generated. The tile map tells the game which tiles from the tile db to generate in the outfield, and the climate map tells the game which textures to use. Climate map colors are located in the settings file of terrain>tiles>battle>_tile_database. Tile map colors and sizes are located in the tile database found in terry. See below for an example of the files needed in the tile map folder. The extra terry user file is only generated when you open the tile map in Terry.
Next, you need to modify the explicit_tiles file to tell the game where the playable tile is located within the tile map. By default, it will probably be something like this:
3,3,terrain/tiles/battle/lzd_hills_infield/chaqua_pit,0
If you are using an 8x8 tile and one of the WH2 tile maps, your map will line up with the 8x8 black square in the middle. Open the tile map in a program like GIMP to view the coordinates of the upper left corner of the black square. Change the first two numbers of the explicit_tiles file to these coordinates. See below for an example of the 28,28 coordinates for a 64x64 tile map.
Once you’re done with this open up the .terry file (the tile map) in Terry itself. This will initially load a tile map that is too small and isn’t using the right climate, but don’t panic! Changes to the tile map file will only show up in the editor once you have exported it, so do that now using file > process with BOB. To see if the tile map looks right, reload the tile map in Terry after you have exported it.
EXPORTING THE TILE
Always export the tile AFTER exporting the tile map. Do this by using file > process with BOB. If you make changes to your tile, you only need to re-export the tile, not the tile map. As stated before, you never need to do “tools > create battle for tile…” more than once.
Before you export, also ensure that legacy vegetation generation is turned off the in the map properties (bottom right)
COMPILING THE MAP IN RPFM
Total war uses pack files to load mods into the user’s game. To make your pack file, you could use CA’s pack file manager, but most people think that the community-made RPFM is superior for this process. This tutorial will exclusively use RPFM.
As an example for how this is set up, please download my map pack and go to steamapps > workshop > content and then find the folder for WH3, then find my mod in that folder. There, you will find my mod’s pack file, which you can open in RPFM to see how to set this up.
I will not describe in detail exactly how to use RPFM to do everything here, but I invite you to go to the modder’s den discord to ask questions about how the program works. Here is generally how a compiled map pack (with multiple maps) will look:
There are 4 main components: 1. First add the map files by adding the entire working_data > terrain folder. Then delete the files for the assembly kit example map. 2. Add a text db then add a line with “battles_localised_name_[map key]” followed by the display name. Tooltip is good. 3. Add the folders for battle map images and add all of the in-game images that will display in the map selection screen. These images should be 3 times as wide as they are tall. 4. Add a db with the battles_tables table. Most of it should be easy enough. For specification, use “copy path” to get the terrain > battles > yourmap folder for your map. You do need the extra slash at the end. Get the path for the environment file from the game files in the bottom left; it’s in the weathers folder.
Finally, save your pack in WH3’s data folder located in the game’s base directory. Make a cover image to display in the workshop; it should be square, compressed, and should have the same name as the pack file.
To assist in testing, you can use this mod made by Klissan, which will allow you to load into domination maps without another player.
GOOD LUCK, YOU’RE GONNA NEED IT
WH3 Map Making Beautification Guide
WH3 Battle Map Capture Points Guide
INTRO
With the latest release of the Total Tavern map pack (Nov 2, 2022), we now have a rudimentary ability to add additional capturable objectives to domination maps other than the 3 main objectives. In particular, we are able to add points that give supplies as well as generic points that can be used for as a logical link to other capturable objectives.
Assuming you already know how to make capture points, let’s look at all of the different parameters in a capture point:
The most important parameters are the type and the importance. The type controls the symbol given to the capture point on the UI as well as the tooltip that appears when you mouse over it. The importance controls how many tickets the capture points gives, what currencies the points gives, and the time it takes to capture it.
As you can imagine, the importance of the capture point is its chief parameter. Unfortunately, due to database limitations, we cannot add new levels of importance for capture points, but we can add new capture point types. Therefore, when thinking about how to add different types of capture points, we can only work with 4 different levels of importance: Key Building A, Key Building, B, Major and Minor (these 4 were otherwise unused in domination).
HOW TO ADD SUPPLY POINTS
The biggest functionality that this map pack update provides is the ability to create points that generate supplies. This functionality is mainly controlled by the db/battle_secondary_currency_sources_links_tables (see pic below).
As you can see, each entry defines how a certain number of supplies are doled out as long as the “source type” condition is met. For example, for line 3, the game will give 3 supplies/second to a player as long as they control a major victory point, regardless of how many major victory points they control. Because of that, if you wanted to make two capture points in a map that each gave 1 supply/second, you would have to have them on two separate importance levels.
As a result, this is how the importance levels shook out when I designed this mod: ● Score - This was not changed at all since this is reserved for the domination points themselves ● Minor - This will give neither supplies nor tickets. It is intended to be a point type used for side objectives like capturable towers or reinforcement points ● Key Building A and B - I wanted the ability to make maps with two points that each give 1 supply/second, so both of these are reserved for that purpose ● Major - Gives 3 supplies/second
To communicate this to the player, I created 3 new capture point types. The picture below shows the .loc that generates the tooltips so you can see what they say:
Therefore, there are a limited number of available configurations for supply points, and certain point types should only be used with certain point importances. To sum up, these are the only available configurations of supply points you can use on your maps:
Option A: 1. Supply point 1 of 2 a. Type: tt_dom_supply_point_i b. Importance: Key Building A (generates 1 sup/sec) 2. Supply Point 2 of 2 a. Type: tt_dom_supply_point_i b. Importance: Key Building B (generates 1 sup/sec) Option B: 1. Supply Point 1 of 1 a. Type: tt_dom_supply_point_ii b. Importance: Major (generates 3 sup/sec)
Option C: 1. Supply point 1 of 2 a. Type: tt_dom_supply_point_i b. Importance: Key Building A (generates 1 sup/sec) 2. Supply Point 2 of 2 a. Type: tt_dom_supply_point_ii b. Importance: Major (generates 3 sup/sec)
Option D: 1. Supply point 1 of 3 a. Type: tt_dom_supply_point_i b. Importance: Key Building A (generates 1 sup/sec) 2. Supply point 2 of 3 a. Type: tt_dom_supply_point_i b. Importance: Key Building B (generates 1 sup/sec) 3. Supply Point 3 of 3 a. Type: tt_dom_supply_point_ii b. Importance: Major (generates 3 sup/sec)
HOW TO ADD REINFORCEMENT CAPTURE POINTS
Tower capture points are fairly self-explanatory in the sense that you can just add the required tower prefab and then link it to the CA-provided tower_only capture point zone. However, reinforcement zone capture points didn’t seem to be something that CA planned for, so it required the addition of another capture point zone type to communicate this functionality to the player.
To be clear, when I’m talking about reinforcement zone capture points, I’m talking about stuff like my map, Crater of Decay, where you have an additional objective that, when captured, unlocks neutral zones where you can spawn units from.
Minor importance was reserved for this purpose since it will not give any supplies. As a result, all reinforcement zone capture points should look like this:
Of course, reinforcement capture points also require the extra step of linking them to the points they give control over. To do this, simply go to the entity properties of those reinforcement points, and select the tt_dom_reinf_zone_point from the capture location drop-down menu. See example below for a capturable vanguard point.
One important thing to note is that despite the fact that the reinforcement spawn points are now capturable, they aren’t “neutral” in the sense that they are still linked to attacker and defender. For example, if the attacker captures the tt_dom_reinf_zone_point, they will not gain control of this defender teleport reinforcement line. Only the defender can do that and vice versa.
REQUIRED FILES AND HOW TO TEST
Since modifications were made to the game to make all this stuff work, you will need to put these changes into your mod to do any testing. To facilitate this, I have created two pack files: link link
The first link is a pack file that you should put in your game’s data folder. All this does is it adds the new capture point types as table entries so that you can select them when making maps.
The second pack file is something that you should merge into your map mod’s pack file to get all of the other database changes that affect gameplay. To do this, right click the root of your pack file in RPFM and go to add > from pack file. Then navigate to the file from the second download link that says “merge me”.
After that, just double click the root of the other pack file, and it will bring everything in.
How to Make Land Battle versions of Domination maps
This will use the catchment system so that you don’t have to make multiple copies of the same map.
First, put everything related specifically to the domination game mode into a file layer or logical layer. The difference between the two is that file layer saves the selection to a different layer file whereas logical layer will save it as a selection within the same layer file. Either will work.
Next, change the BMD export type of the layer to catchment_01 (or whichever you want to use).
Example:
Then export the tile and add it to your pack file as you normally would; exporting the tile map is not required if you have already done so before.
In battles_tables in RPFM, you will have to make two separate rows for your map. I have copied the relevant columns from the two entries in my pack so you can see how it should be.
KEY de_labor_camp_dom de_labor_camp_lb TYPE domination classic SPECIFICATION terrain/battles/test_domination_de_labor_camp/ terrain/battles/test_domination_de_labor_camp/ SCREENSHOT PATH ui/frontend ui/battle_map_images/bleakspire_wide.png ui/frontend ui/battle_map_images/bleakspire_wide.png CATCHMENT NAME catchment_01
So basically, everything stays the same except you change the battle type, append something to the key to make it easy to recognize which is which (I chose “_dom” and “_lb”), and then load the appropriate catchment layer for dom.
Once you’ve done that, you also need to update the text loc file which generates the display names since there are now two different keys.
In this case, all I did was isolate the domination-specific features. However, this system is quite flexible. For example, you could have different initial deployment zones and white lines on the domination version of the map than the land battle version by having one set be on catchment_01 and the other on catchment_02.